
So you want to do DSLR astrophotography? This DSLR Astrophotography for Beginners Tutorial will help you get started figuring out what you need to buy and what you need to learn. Think of it as your DSLR astrophotography 101 class or a beginner’s guide to DSLR astrophotography.
While this DSLR Astrophotography for Beginners Tutorial won’t cover all the astrophotography equipment for beginners, we will cover much of the basics. While this astrophotography tutorial will only make you a reasonable astrophotography beginner, it will get you creating awesome images quickly.
DSLR Astrophotography for Beginners Tutorial: Introduction
DSLR Astrophotography is simply astronomy photography, or taking pictures of things in the sky (usually the night sky).
There are two basic types of DSLR astrophotography; short exposure and long exposure.
Short exposure is typically reserved for the moon and sun, but can also be used to do large areas of the sky and star trails.
Long exposure is normally considered exposures longer than thirty seconds at a very far away and dim object such as a nebula (brightly colored gas cloud in space). All those really cool Hubble telescope images are all in this category. This is the primary focus of this deep sky astrophotography tutorial.
DSLR astrophotography and other forms of photography have much in common. Both can be done by anyone with enough money for a body/lens or body/scope combination, and both can be improved with the right skills and right equipment.
Let me start this by saying that most of what is in this DSLR Astrophotography for Beginners Tutorial are things that worked for me. Asking lots of questions and reading lots of books is a great start, but eventually you need to get out there and test things to see how they work for you. This astrophotography tutorial was primarily written for astrophotography with dslr and telescope, but could also be used for DSLR astrophotography without telescope with the right lens.
With either type of photography you have to ask yourself what you want to accomplish before you just jump in. There are many different levels and tons of different specializations you can master. The bulk of people I hear talk about wanting to do astrophotography want to do a few things including the moon, Jupiter, Saturn, the Orion nebula, the Horsehead nebula, and a few other galaxies and nebulas to show their friends and impress their family.
Planets are usually done with a video camera (mainly webcams) and are stacked from there. Some nebulas like Orion and galaxies like Andromeda can be done with some form of success using short exposures on an Alt/Az mount (more on that later). I stress the word can because technically, you can perform brain surgery with common household tools, but would you really want to? Since this article is aimed mostly at long exposure AP, short exposure and planetary will only be covered in passing.
Most of what this covers is general astrophotography of star clusters and nebulae, also called deep sky astrophotography or deep sky photography with dslr.
DSLR Astrophotography for Beginners Tutorial Section 1: The Mount
So on to the basics, the mount. The single most important piece of DSLR astrophotography equipment is the mount. This is also where you will spend the single biggest block of your money. If the mount is not solid enough, and accurate enough, your images will look like blurry little blobs. Do you want to take pictures of blurry little blobs? I didn’t think so. That’s why the DSLR Astrophotography for Beginners Tutorial covers this topic first.
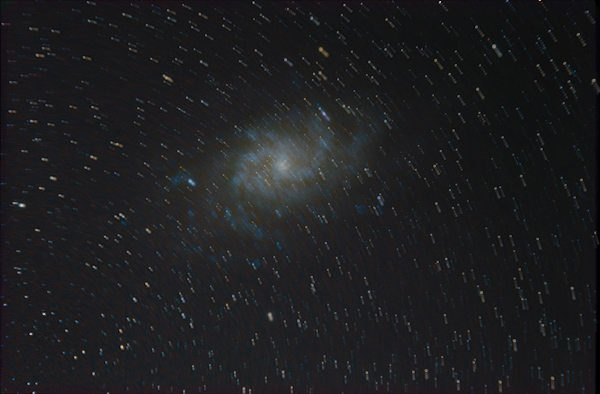
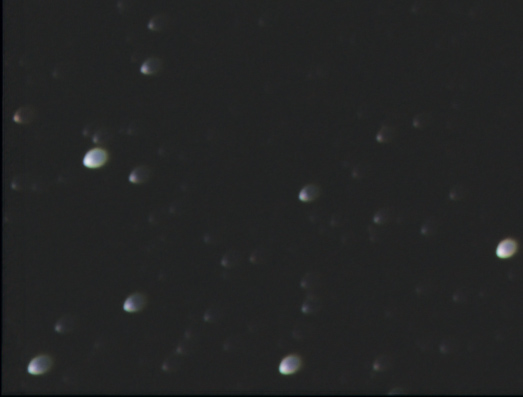
There are two types of mounts for telescopes, Alt/Az, and EQ. Alt/Az mounts move up and down, and left and right. Unfortunately the stars appear to rotate around the earth instead of move up/down left/right. If you use an Alt/Az mount for long exposure the object you have in the center of your eyepiece will stay in the center, and everything will rotate. Think of it this way, point your camera at the center of a windmill, now watch as the center of the windmill stays in the center of the frame, but the blades rotate around in a circle. With an Alt/AZ mount you would only be able to take the picture by moving the camera up, down, left or right, you could not rotate it so the outside of the windmill would always be blurry from motion. With this type of mount you can not do long exposure astrophotography. Alt/Az mounts are typically found on scopes used primarily for visual use such as Dobsonians and many other reflectors. Figure (1) shows an illustration of what happens when you try to do long exposure AP with an Alt/Az mount.
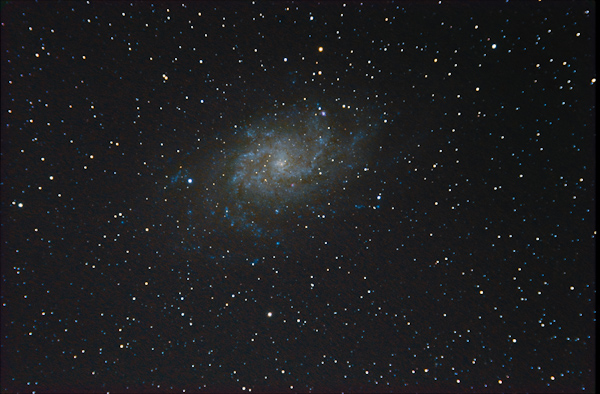
This brings us to the EQ mount. On an EQ mount the scope rotates on two axes, this allows for it to not only keep the centered object in the center, but to keep the framing correct by rotating the camera with the scope as the stars rotate. Again with the windmill, you can now rotate the camera at the same speed as the blades of the windmill spin, so the image is nice and sharp and everything is stopped as shown in figure (2).
To find the best DSLR astrophotography mount for your telescope and budget, click the following link:
Find The Best Astrophotography Telescope Mount
DSLR Astrophotography for Beginners Tutorial Section 2: The telescope
Next up in this DSLR Astrophotography for Beginners Tutorial comes the scope. There are two basic types of scopes, reflector and refractor. You can use either for AP work and the choice is usually a personal one although most AP people I know use refractors.
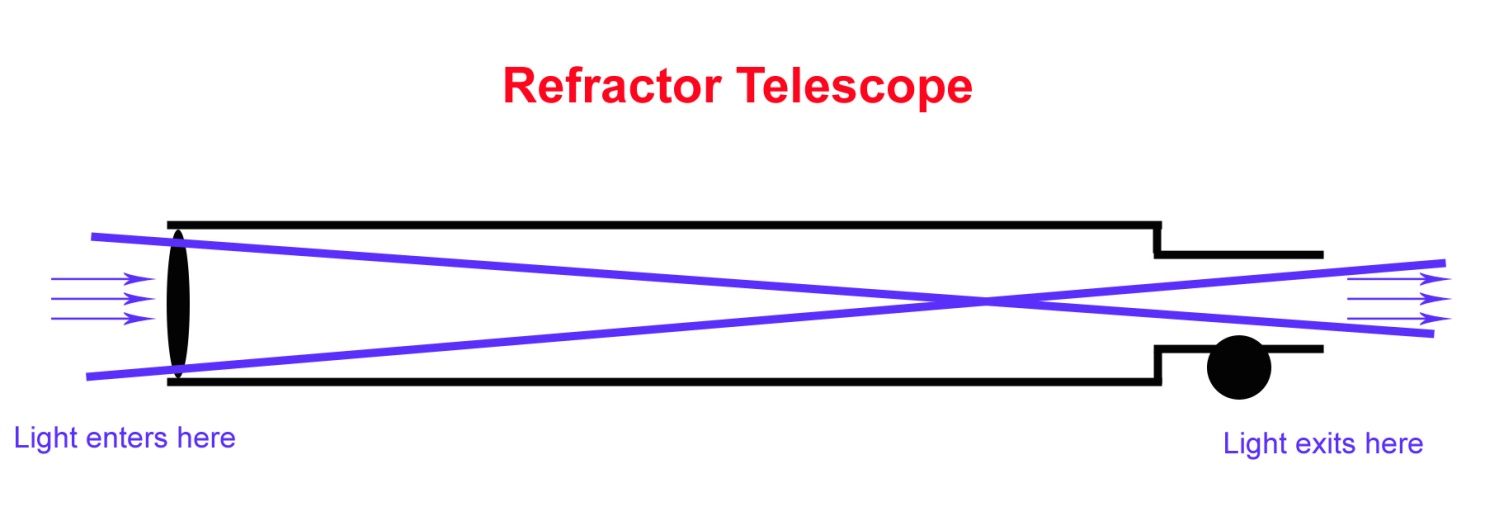
Refractors can be good for AP work because they have no central obstruction, do not suffer from coma, do not usually need to be collimated, require virtually no cool down time, offer low wind resistance, have a higher Strehl ratio by nature, and a smaller area for their mass (makes it easier for the mount to drive them). The down side for a refractor is that inch for inch, they are the most expensive type of telescope. They also generally have a shorter focal length which is neither good nor bad, but is a consideration. Figure (3) shows a refracting telescope. Note that the light just passes straight through, this maximizes the amount of light gathered per millimeter of aperture and minimizes problems inherent with bouncing light all over the place.
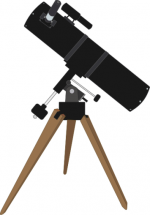
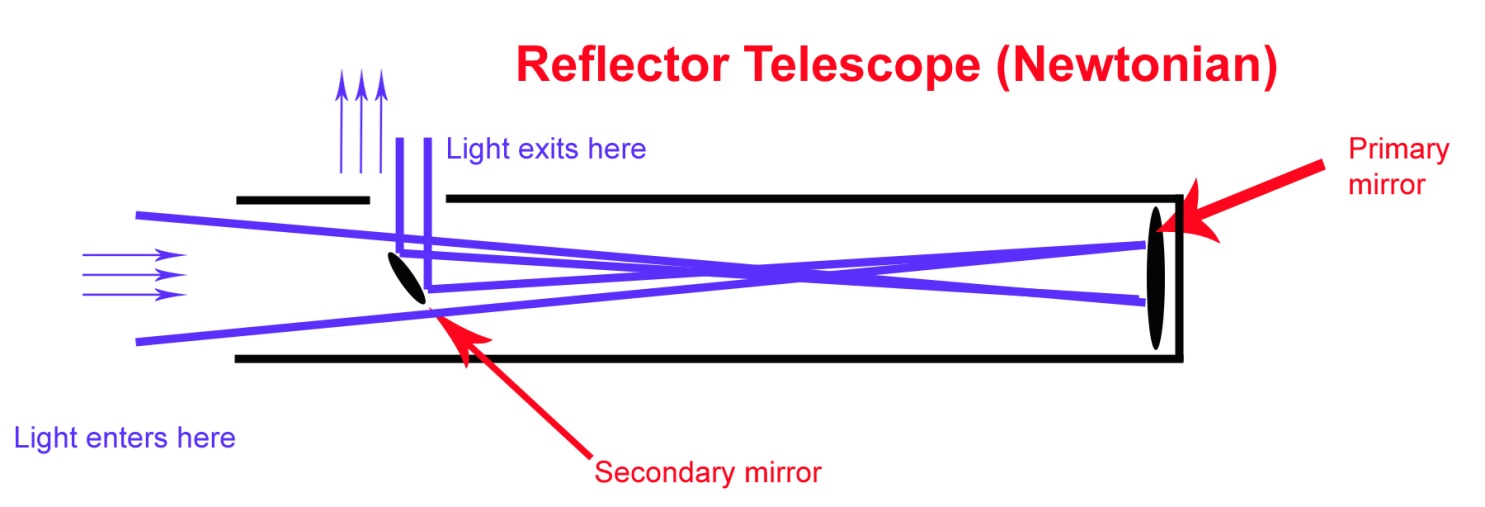
Reflectors can be good for DSLR astrophotography work because they can offer longer focal lengths or faster focal ratios and are less expensive per inch. Some can also be much more compact than a refractor. Note that in a Newtonian reflector, which is the most common type, the light has to bounce off of two mirrors which have to be precisely aligned and since one end is wide open, this allows in dust, dirt, spiders, dew and other things we don’t want to talk about. When you hear about collimation, this is the alignment of the two mirrors has needs to be done frequently.
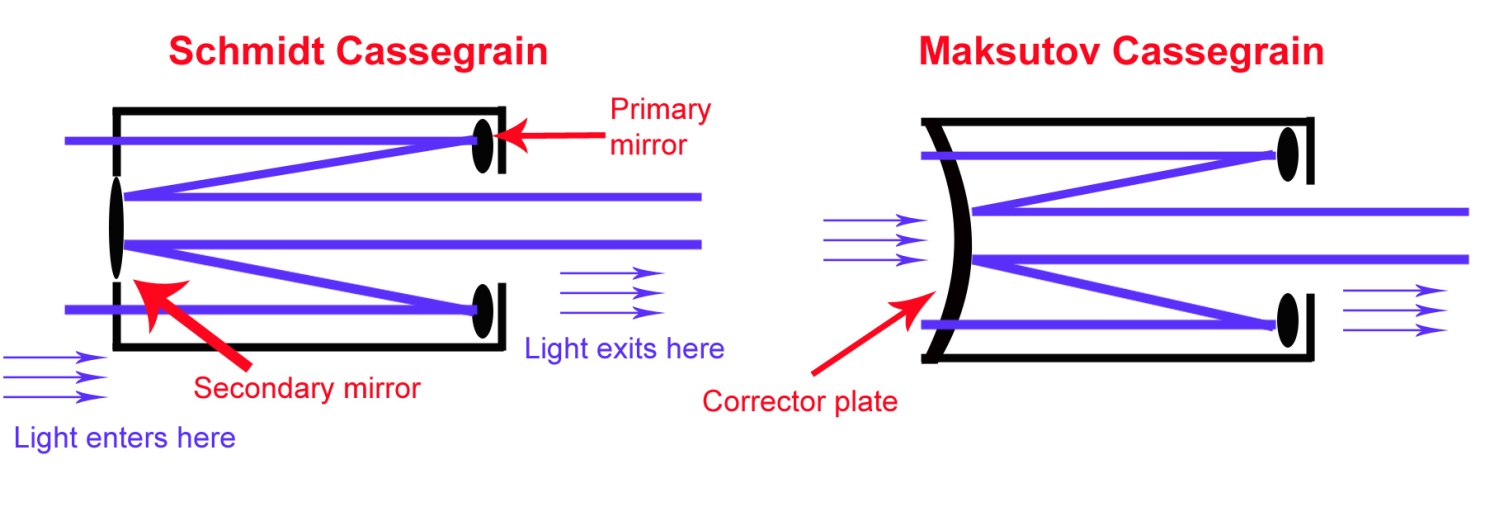
There are also hybrid scopes such as Maksutov-Cassegrains and Schmidt-Cassegrains which combine some of the qualities of both a refractor (being sealed and sometimes lenses) and a reflector (multiple mirrors). These typically have the advantage of being much smaller than Newtonians, and are sealed against dust. They still retain the disadvantages of being slow scopes, having to be frequently collimated and having long cool down times so the Astrophotography for Beginners Tutorial won’t be covering much about these specialized scopes.
Once you pick the type of scope, there are other factors to consider. For refractors you should pick an ED APO scope for imaging (ED is enhanced dispersion, APO is Apochromatic, these make sure that all wavelengths of light converge at exactly the same place preventing the blue/violet “glow” you see on many bright objects through a telescope). You can even go one step further and get an ED APO triplet which uses three elements of glass instead of two for the standard doublet to do an even better job reducing those halos. For reflectors you need to make sure they are designed for astrophotography. The reasoning is that some reflectors such as Newtonians (including Dobsonian mounted Newtonians) can not focus with a camera attached and need to have the primary mirror moved forward. Moving the mirror forward is not at all an easy task and should not be attempted except by a professional or very advanced amateur. Astrographs are a type of reflector telescope specifically made to be able to focus with a camera attached.
Next thing we will consider in this DSLR Astrophotography for Beginners Tutorial is the scope’s f-ratio. Scopes are usually listed as, for example, a 110mm f7 scope, this means that the opening on the front is 110mm (aperture), and that it has a focal length of 770mm (110 x 7 = 770). This is important because the lower the f-ratio, the shorter exposures you can use, and this is called a faster scope. So, a f5 scope is faster than a f7 scope which is faster than a f12 scope which is slower than a f10 scope. This also means a faster scope has a shorter focal length and less magnification (actually larger field of view) than a slower scope given the same aperture.
One other important consideration with your choice of scopes is the focuser size. Many starter scopes come with a 1.25” focuser. This is a problem because if you hook up a camera such as a DSLR to this you are likely to get some vignetting of the image. Vignetting is where the center is nice and bright but the outside edges are darker, especially the corners. It is much better to get a 2” focuser right off the bat. Many scopes designed just for astrophotography have 2.5”, 3” and even 4” focusers to ensure this is not a problem. Since I shoot a crop sized DSLR sensor 2” is more than enough. You can expect some very slight vignetting using a DSLR with a 2” focuser but nothing a couple of flat frames will not fix quite easily, however a 1.25” focuser will lose too much light to fix well with flat files. Larger focusers also provide more stability to the image train with lots of things like cameras, field flatteners, filters, etc attached.
For scopes you can expect to pay anywhere from $500 up just for the optical tube. My refractor I believed to be the best bang for my buck when I bought it at about $1000, it is a 110mm f7 ED APO Orion Premium.
Your choice of scope will also determine your mount. You need a mount that can easily hold your scope. Mounts have maximum load specifications such as 30lbs. This means that the scope can accurately drive up to 30lbs of payload not including the counterweights. Most people say that for AP work you should never exceed 75% of the mount’s rated capacity. I disagree with such a broad statement and get a little more technical with it.
Be warned, do not go by the maximum load rating alone as these are sometimes incorrect and you also should consider the software you will use to drive the mount if you will be using a computer. I have had experience with an Orion Sirius mount (rated at 30lbs) and a Celestron CG-5 (rated at 35lbs) and in my experience would take the Sirius mount every time. It is more stable at any load, quieter, interfaces with my software much better, and is far easier to align and use out of the box. If you get the chance to use both before you buy one it will greatly help you decide on what works best for you.
To find the best telescope for you to start astrophotography, click on the following link:
Find The Best Astrophotography Telescope
DSLR Astrophotography for Beginners Tutorial Section 3: Configuring your setup
To figure the maximum load for your mount you should start with 50% of the rated maximum, then add and subtract based on factors such as how large the load is, how long it is, etc. For example, a short refractor weighing 75% of the maximum load will actually provide better results than a large Newtonian at 50%. Why? Think of it this way, which is easier to carry around, a 15lb bag of dog food or a 10lb 4’x8’ sheet of ¼” plywood? The plywood is huge, turns into a kite in the slightest breeze, and because of its size makes it very hard to control quickly and accurately. Even though the dog food is heavier, it is much easier to control and wind does not affect it.
So I say up to 75% of the maximum payload for refractors, and up to 50% for reflectors, as a general rule. This means with a payload (including scope, camera, adapters, guidescope, etc) of 20lbs you can use a HEQ-5 rated at 30lbs for a refractor, or if you want to use a reflector you need to use an EQ-6 rated at 40lbs. One note is that these weight ratings do NOT include the counterweights. So if a mount can hold a maximum of 20lbs of load, that is in addition to any counterweights needed to balance that 20lbs.
In order to take long exposures, even with a great mount, you need to align it correctly. EQ scopes need to be polar aligned, or aligned with the north celestial pole. This is just about pointed to the star Polaris in the northern sky. In fact, if you are doing visual you can just point the mount towards Polaris and be done, unfortunately with AP you need to be a little more accurate. See figures (9) and (10) for examples of incorrect alignments. Note that since it is an alignment problem figure (9) which is the top left corner of the image, and figure (10) which is the lower left, show the exact same problem.

Your nicer EQ mounts have what is called a polar scope built into them, this is a small scope actually in the mount itself. Looking through the polar scope you may see something similar to figure (11).
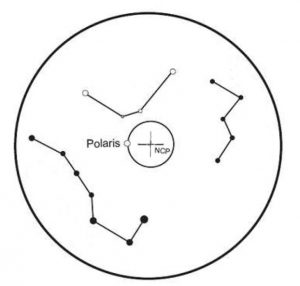
The little circle next to the word Polaris is where you want to adjust the scope so that the star Polaris is visible in the center of that circle. Use the images of the constellations Big Dipper and Cassiopeia to align it correctly with those constellations in the sky at the time you are setting up. Note that the images (and the circle to put Polaris in) rotates as the scope rotates, line up the constellations and center Polaris.
The other thing you need to check before you start imaging is the balance of the scope. There are three axes you need to balance on an EQ mount, the first is shown here in figure (12):

In the image above I have turned the scope on it’s side by loosening the right ascension release then locking it at 90 degrees. I can then loosen the declination release and pivot one end of the scope up and down to see if it is balanced. To balance it, I loosen the scope ring knobs and slide the scope towards the lighter end and recheck. Once finished, I tighten the scope ring knobs back down and move to the front of the scope.
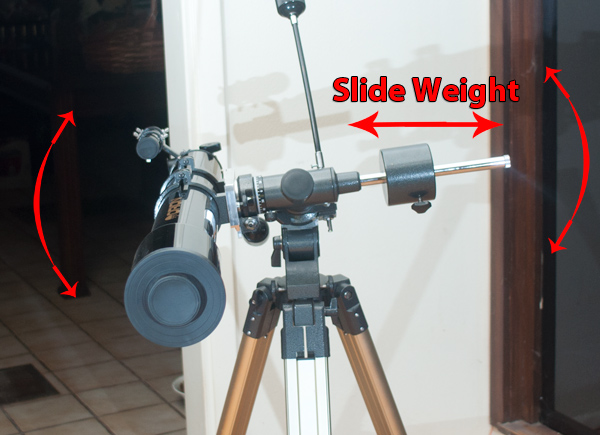
Now we need to balance the second axis just like we did to the first one. This time, loosen the right ascension lock and pivot the scope and weight up and down. You can slide the weight left and right (as it appears in figure (13) above) until it balances the scope. Lock everything down, return the scope to it’s home position and you are done.
The third axes is just pointing the nose of the scope straight up in the air and making sure that the nose does not tip one direction or the other. This is primarily to see if you have too much weight strapped to one side or the other such as on an astrograph with the camera hanging off one side.
While this DSLR Astrophotography for Beginners Tutorial only covers the basics of adjusting and setting up your equatorial telescope mount you can read everything you ever wanted to know about setting up and using your mount in Getting Started: Using an Equatorial Telescope Mount by Allan Hall.
Next up is the guiding. Long exposure work requires that the telescope follow the stars exactly. If it does not, you get odd shapes for the stars instead of round, or you get streaks, or some other weird things. For this we use an autoguider which watches a star and send minute corrections to the scope computer to make sure it is dead on accurate. One thing to note is that the larger the field of view a telescope has (smaller f-ratio, less magnification) the easier and more forgiving the guiding is. The most popular guider I know of is the Orion Starshoot Autoguider (SSAG for short).
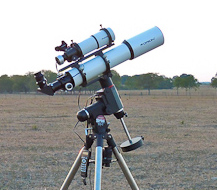
Now that we have the guider, you have to have some kind of scope to put the guider into so it too can see the stars. You can use an “off axis” mount which basically splits the light from the scope into two paths, one for the camera and another for the guider. I prefer the second method which mounts a second telescope onto the main scope for the guider, look back at figure (4) to see what this setup looks like. This allows me to have a wider field of view for the guider so I have more guide stars, and also allows me to do whatever I want to the optical path without having to worry about the guiding.
Orion sells the guider in two packages like the ones I recommend, the mini autoguider package and the awesome autoguider package. The difference is the scope size. I run the awesome package so I get the larger 80mm guide scope which has a longer focal length and is therefore more accurate. These two guider packages run $349 and $399 respectively. If you choose to go with an off axis solution, that runs about $409.
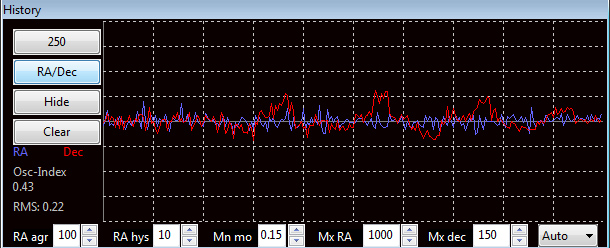
Once you have an autoguider you may need to tweak it, using guiding software such as PHD Guiding you can get a graph that shows you exactly how the mount is moving (see figure (14)), then tweak the settings to get smoother guiding. As a general rule you want the two numbers on the far lower left, Osc-Index and RMS to be as low as possible and the graph to be as smooth as possible.
To find the right autoguider and guide scope for your setup and budget click on the following link:
Find The Best Autoguider and Guide Scope for you
DSLR Astrophotography for Beginners Tutorial Section 4: The camera
The next concern in our DSLR Astrophotography for Beginners Tutorial is the camera. If you are just starting out I recommend you use a DSLR such as the Canon Rebels or Nikon D5100/7000. If you already have a DSLR, use it, even if it is a Pentax, Sony, Fuji, whatever. Canon has probably the widest array of software available to control the camera (which you will need) of any brand. You can however use pretty much any of them, I for example use a Nikon D7000 and it does a fantastic job.
When choosing a DSLR if you do not already have one I would suggest a few things. Get one that is at least 10MP, one that you feel comfortable using (feel it in your hand, check out the controls, play with it and see what you do/don’t like about each one), one that shoots in RAW, and silly as it may seem, get one that is at least partially weather sealed (the D7000 is). Why weather sealing? One word, dew. If you choose the D7000 or something comparable expect to pay $1000-$1500 for the body alone. Now some people will scream and say you can get a much cheaper body that will do just fine, and it will, right up until the dew forms on it, the scope rotates, and the runoff seeps into the camera shorting it out.
One thing you notice I did not mention with cameras is their maximum ISO. Having higher ISO performance is good, but not because you want to use it. My D7000 captures outstanding daylight or nighttime images at ISO1600, and quite good images at ISO3200. ISO6400 is usable in a pinch. The problem is, you will be stretching the image so you need the dynamic range offered by the lower ISOs which is why the vast majority of my imaging is at ISO800. If I need more light I just extend the exposure time.
Eventually you will hear of people “modding” their DSLRs for better response to red. Let me first dispel a myth about DSLRs. Some people say that they are completely insensitive to high wavelength red such as Hydrogen Alpha (Ha for short), this is absolutely not true, see figure (15). Ha is at about 656nm in the visible spectrum and a standard DSLR will capture it just as well as anything else in the visible spectrum. The problem comes because there are some very dim Ha nebulas which are just too dim to do easily with a standard DSLR. You can then “mod” your DSLR and have the UV/IR filter removed which as the added benefit of increasing the red sensitivity substantially. Keep in mind that when you do this, it massively increases the red in your images making everything very very red (including things that should not be red) and totally useless for normal photography without additional filters or heavily tweaking the custom white balance feature of your camera. Both Nikon and Canon cameras can be modded. I am currently still using an unmodded camera.
You could also consider a dedicated CCD imaging camera built just for astrophotography. The down side here is that you can’t use this kind of camera for anything but astrophotography. The advantages are that they are usually internally cooled which can dramatically reduce noise, they are more sensitive to the full spectrum of light, they can have filter wheels built in, and they can have guiders built in. They can also get very expensive in a big hurry. A basic CCD for astrophotography can start at $1500.
Unfortunately there is no such thing as generic DSLR astrophotography settings for your camera because that depends too much on the target and your telescope. This astrophotography for beginners tutorial suggests starting at 100 seconds at ISO 800 and go from there.
DSLR Astrophotography for Beginners Tutorial Section 5: Other important equipment
Depending on where you live you might be like me down here in Texas where you have a real problem with dew. I have come home from the dark site and literally used five or six towels to wipe off my equipment before taking it inside. When I lift the lid to one of my equipment cases at the dark site, water runs off and splashes on the ground (not drips, not trickles, literally splashes). So unless you just want to image for an hour or two and then pack it up, you need dew control.
I use a four port, dual channel dew controller with four dew strips (heated strips with velcro that warm the air around my optics to keep them dry). One strip goes near the front of the optics on both my main and guide scopes, one on my finder scope, and one on my main scope’s focusing tube. Without these it would be more trouble to set up and tear down than it would be worth imaging for an hour or two. Expect to pay $100-$300 for this setup.
Now you may think, scope, mount, guiding, camera and dew, that should do it! Not even close.
Next we need at least one computer to run the shutter and guide the scope (the autoguider plugs into a computer to run software that does the actual guiding). Most imagers use a laptop or netbook for this. I actually use two, one netbook for shutter and guiding, and one laptop for image transfers (images show up complete with histograms on the screen immediately after taking each frame), remote control of the scope and session planning. To preserve your night vision you can get neutral density sheets and cover the laptop screens.
Neutral density (called ND from now on) sheets basically dim the screen much dimmer than just turning down your brightness. The advantage to ND over something like Rubylith (red plastic sheets) is that if your screen is covered in red then it becomes very difficult to make out faint nebulae in your images.
ND solves this problem by dimming the screen and not changing the color. I recommend using ND .9 at the very minimum, and prefer using a .9 and a .6 together. The actual amount you need will depend on how bright your screen is when on the minimum brightness setting. I also highly recommend Rosco brand as these have been the best I have found by far, and they are really inexpensive.
To see a selection of Rosco neutral density filters for your computer screen, click the following link:
Find Rosco Neutral Density Filters
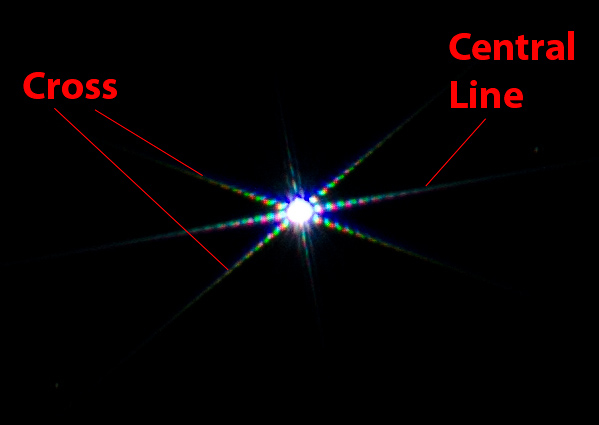
Now we need to be able to focus accurately. I start by pointing the scope at a bright star, something like Vega or Rigel. Then using the live view on the camera zoomed all the way in I make the star as small as possible using my focusing knobs and then lock the focus. Once that is done I place a Bahtinov focusing mask over the front of the scope and shoot a four second exposure at ISO800 to make sure my focus is perfect, adjusting the focuser forward and backward in small increments until the central line is centered in the cross as in figure(17). If I am using a narrowband filter such as Ha, I double the exposure time to eight seconds.
To see a selection of Bahtinov focusing maks and find one for your telescope click the following link:
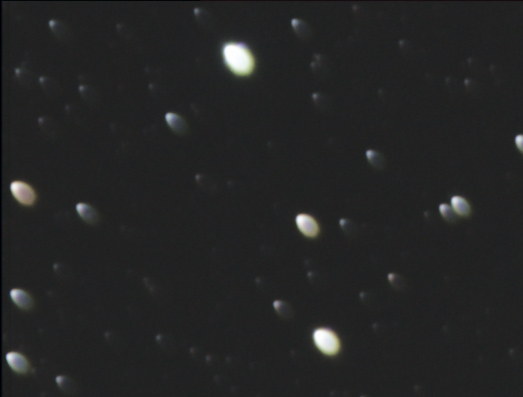
As long as we are talking about round stars, the spacing of the camera, type of telescope and options used can really cause some strange problems. For example, a refractor typically needs what is called a field flattener to make sure the stars at the outer edges are just as round as in the center. When you do not have one, you can get images with the corners looking like figures (19) and (20). Note that the stars elongate in different directions between the two figures, that is because figure (19) is the top left and figure (20) is the bottom left, they elongate towards the center of the image.
Field flatteners typically need to be designed for a specific F-ratio scope and will note something like it is for a F5-F7 scope. Even if your scope is in this range, the field flattener may require a T-thread spacer between the field flattener and the camera. This spacing is critical to the performance of the device.
DSLR Astrophotography for Beginners Tutorial Section 6: Acquiring and processing images
What some people forget at this point is that almost nothing you take a picture of will look the way you want it to, you need to do some processing. For that we need to stack the images first. Stack you say? Stack what? Glad you asked!
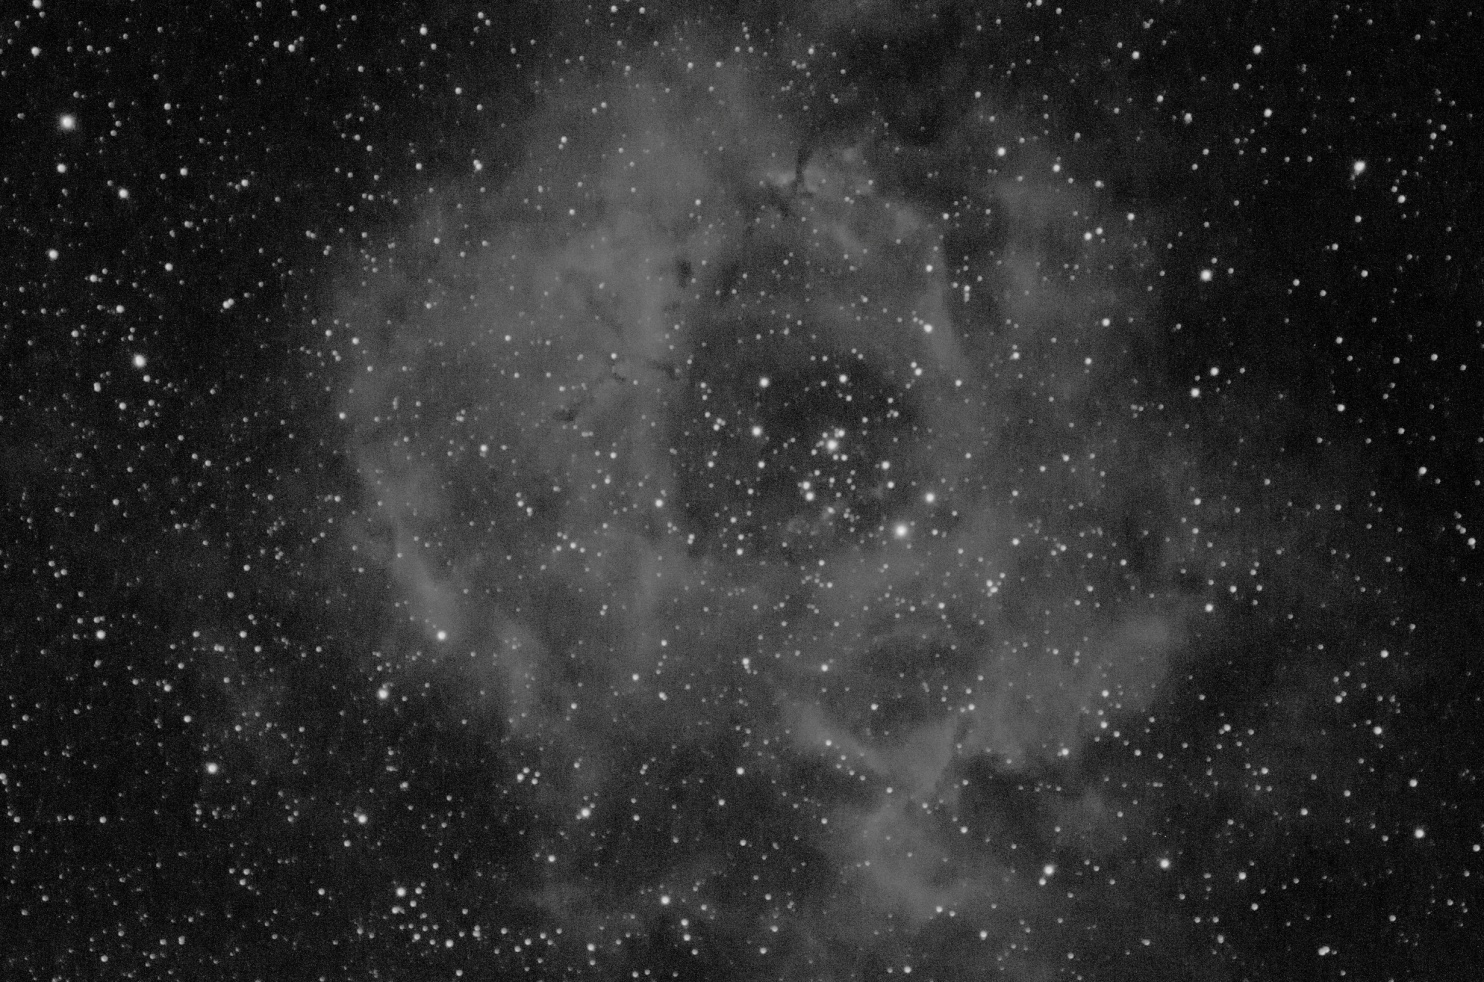
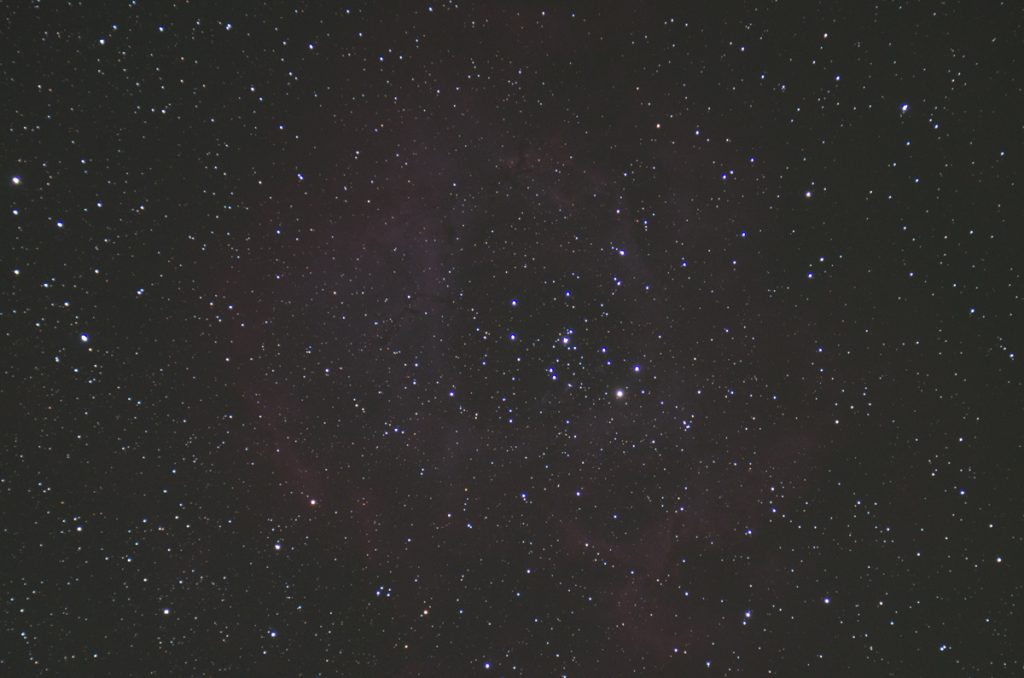
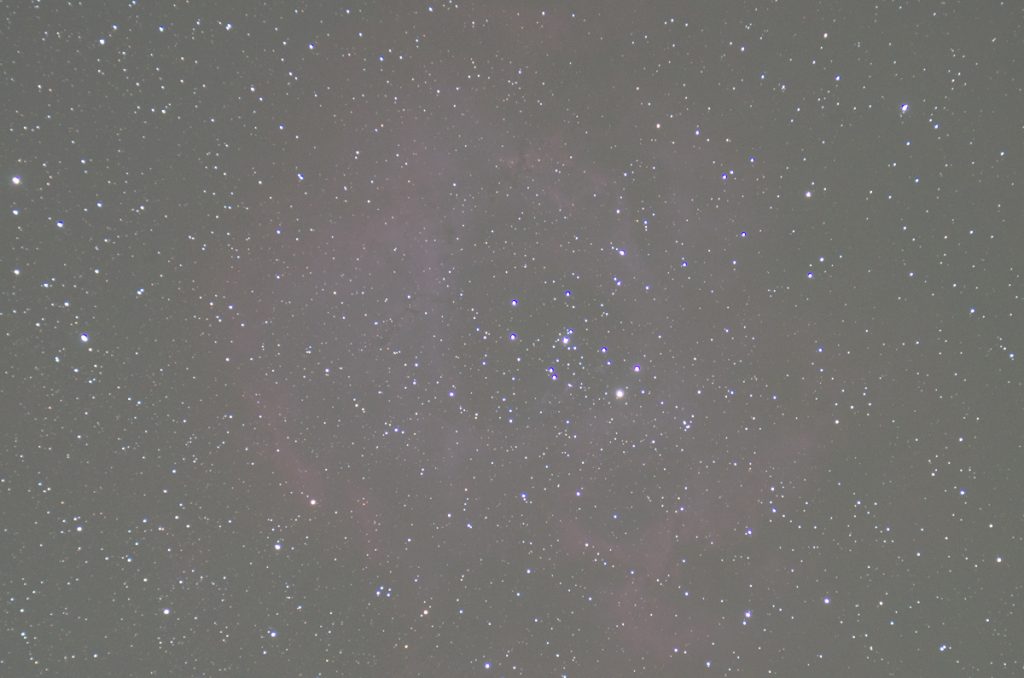
DSLR astrophotography is not one image. Back in the film days it could be, but even then you could stack multiple images in the darkroom to make one image. To see what stacking and processing can do to an image, see figures (21) and (22). There are four types of images we can use to stack, in order of importance they are…
Light frames. These are normal pictures just like you would take in the daytime. Each one we try to get as close to the final product as possible as we are taking them. The more lights you take, the more detail you can get out of an image, to a point. Once you pass 20 or so the returns diminish quickly. The formula is simple and inversely proportional. If you take one image, you can get a 100% improvement by taking two, then a 50% increase by taking four, then 25% increase by taking sixteen, then a 12.5% increase by taking thirty two, then a 6.25% increase by taking sixty four, and so on. The additional detail is gained by increasing the signal to noise ratio of the image.
Dark frames. These are taken using the same ISO and shutter speed as above, at the same temperature (this is important), except they are taken with the lens cap, scope cap, or body cap on so that the frame is completely black. The same rules for number of images applies as above. We take these images so that they show us what dark currents the camera generates at a given temperature, given exposure time, and given ISO, which we then subtract from the lights to get cleaner images.
Bias frames. These frames are taken at the same temperature, the same ISO, but at the fastest shutter speed your camera can do with the lens cap on. This shows us the electrical noise the camera generates so that we can subtract it from the lights. The same rules for number of images applies as above.
Flat frames. These are taken with even lighting over the front of the scope. An example would be during daylight, drape a white t-shirt over the front of the scope, then adjust the camera to take a correct exposure through the scope. The same rules for number of images applies as above. These are used to correct vignette and other optical defects in your optical train such as dust. It is important to note that you must take a flat at the exact same focus as the lights or it is worthless.
Technically darks already contain bias information so bias frames are not really required unless your processing software deals with bias frames separately, and if you have no vignette or other optical defects you can skip flats as well although this is unlikely. Lights and darks however are pretty much required.
Once you have these images you can use a program such as Deep Sky Stacker (freeware, download) to combine them into a single image you can then process using something like Photoshop.
Now after reading this far in the Astrophotography for Beginners Tutorial people still ask, how many should I take? The short answer is take 20, that way you are covered for 16 plus some in case some do not turn out as well as you expected. Using this number you will get the “best bang for the buck”, or “most return for your investment”, or whatever you want to call it. Once you have worked with the target and 16 light frames, you will start to know what targets may need “more light” and you can extend the number of frames from there.
Exposure time is something that a lot of people have trouble understanding. There are no magic exposure settings for any particular type of object. Some things like M42 need a combination of images at different exposures which can range from ISO800 15 seconds, to ISO800 200 seconds. Most of your targets however will use one setting for all the images (unless you decide to shoot with different filters and combine them).
The way I do exposures for nebulas and galaxies is I start with something like ISO800 300 seconds and look at the resultant image. There are two particular things I look at (besides framing of course) which starts with the histogram as shown in figure (23).
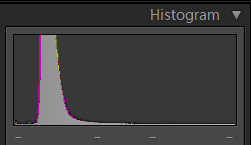
What I am looking for in the histogram is clear separation from the left hand side of the image. This tells me that I have clear definition in my image. Next I look at the background, it should be dark gray. The background turning lighter means you are capturing more sky fog, which is light pollution.
In the two figures below note that in figure (24) not only is the background darker, but there is much more contrast between the nebula and the background than in figure (25). You want to get as much detail out of the nebula as possible which requires as much exposure as possible, but keep in mind in the final image you want the black of space to be dark (I prefer almost black) and there to be clear separation between that and the nebula.
So to recap, start off with something like ISO 800 and 300 seconds, then look at the histogram. If the hump is either touching the left side, or right next to it, increase your exposure. If the hump has clear separation, check the sky fog and see if it is too light, and if so, reduce the exposure to balance it out.
The guidelines in this DSLR Astrophotography for Beginners Tutorial are to give you something to start with, only your experience and trial and error will get you where you need to be to create great images.
One thing is really important when you go to edit the image, you must use a photo editing program that can work on 16bit images or better such as TIF files for good results. One popular free program, GIMP, I believe will not work with 16bit files, so is not suitable. I also believe that the cheaper versions of Photoshop called Elements will not work with 16bit files. I hate to say it but you really should consider the full Photoshop CS5 package for this at about $600.
Why 16bit files? Because you are going to “stretch” the image to make things more visible. Stretching needs a lot of latitude in the image colors or you get banding. Each of the colors Red, Blue and Green in an 8bit image has 256 shades of that color to work with. So for example there are 256 shades of red, 256 shades of blue, and 256 shades of green that can be blended together to make one of 16.7 million colors.
In comparison a 16bit image has 65,536 shades of each color for a total of 281 trillion colors! Now this is important because a faint nebula might be so dim in your image that if the image is 16bit and black is 0,0,0 that red may be 100,0,0 out of 65536, 65536, 65536. If that same image was 8bit it would have to round to 0,0,0 out of 255, 255, 255 since 100 is so low. This would have the effect of erasing any data you captured!
One thing that always seems to pop up on forums is the use of light pollution filters. Do they work? What are the pros and cons? Lets start with do they work….
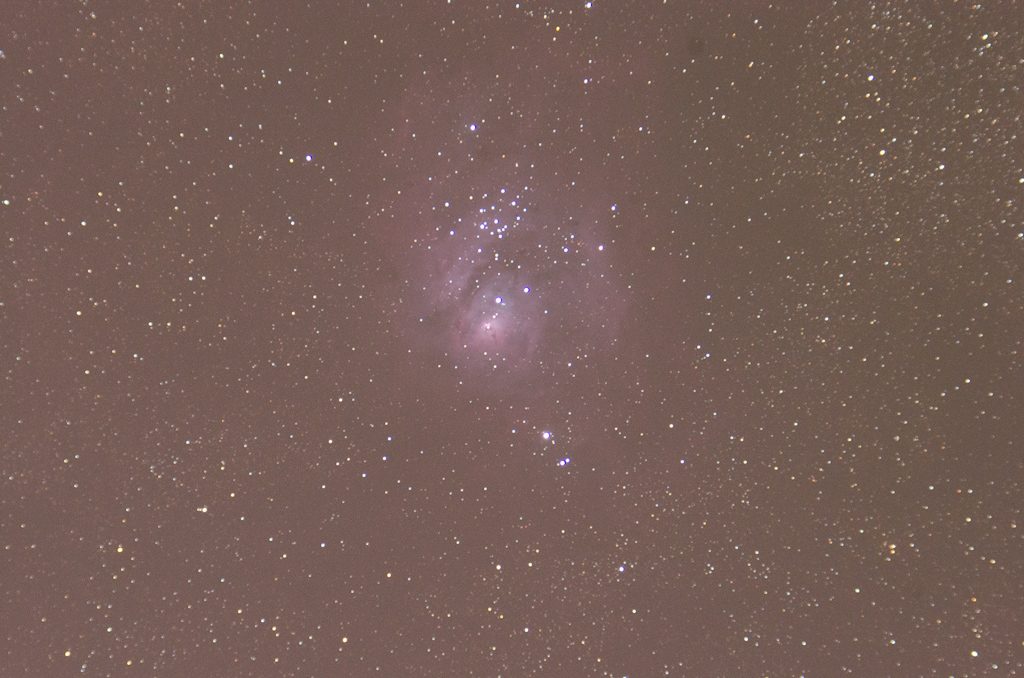
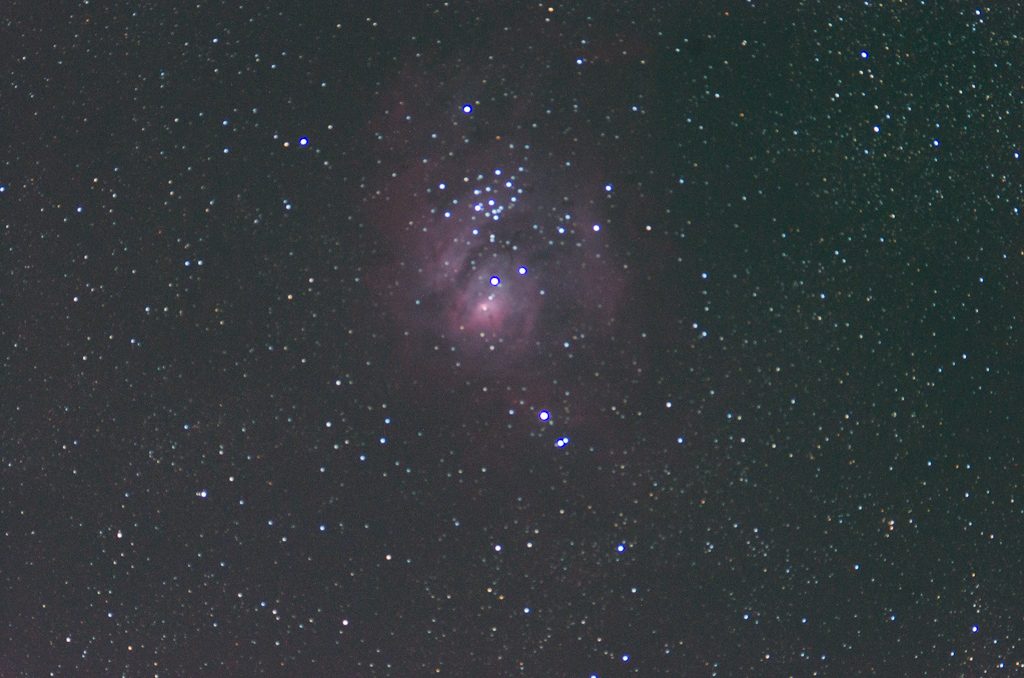
Figure (26) & (27) were taken minutes apart, same scope, same settings, same everything, except figure (27) was taken with a light pollution filter. So do they work? You betcha! Unless I am shooting narrowband I always have a light pollution filter on my setup.
To see a selection and reviews on light pollution filters, click on the following link:
Find The Best Light Pollution Filter
Of course if I lived somewhere where I had no light pollution (the middle of the ocean, the middle of the desert in West Texas) then I probably wouldn’t use it as it does block some light I might want. Some versions also tend to make the blue/violet halos around bright stars worse (the Orion Astrophotography LPF I had was much worse at this than the new Baader Moon & Skyglow filter I currently use).
Next up is focal reducers. These are often combined with field flatteners although both items can be purchased separately. The focal reducer does two things, it increases the field of view (reduces the magnification) of your scope, and it increases the amount of light hitting the sensor of the camera since you have a wider field of view. This means you can use shorter exposures but trade off size of the object in your frame. Where this comes in really handy is larger targets like the North American nebula which would normally be impossible to fit completely in the frame of all but the smallest focal length scopes, and when you use a really slow scope such as an f10 SCT telescope.
More to come in part 2 of the DSLR Astrophotography for Beginners Tutorial!
DSLR Astrophotography for Beginners Tutorial by Allan Hall, www.allans-stuff.com , used with permission.
Excellent! Really a great help to answering questions! Look forward to the ‘next class’ !!