
Astrophotography How To Part 2: Getting going
In our last article, Astrophotography for Beginners Tutorial part 1, we mainly talked about what equipment you needed to get started while in this part you will find more information on setting up and collecting images. Packed with lots of astrophotography how to information and astrophotography tips, this should get you taking images in a hurry.
Astrophotography How To Section 2: Camera Control Software
There are a lot of different software packages that do different things but we will start with camera control.
There are several types of camera control software out there including, free, dirt cheap, medium functions and best. Below is a chart showing some of them and their functions:
| Shutter <30 sec | Shutter >30 sec | Image Download | Live View | Focus Assist | Auto Stretch | Dither | Processing | Canon
DSLR |
Nikon
DSLR |
CCD | Price | |
| DSLR Shutter | Y | Y | N | N | N | N | N | N | Y | Y | N | Free |
| Images Plus | Y | Y | Y | Y | Y | Y | Y | N | Y | Y | Y | $79 |
| Nebulosity | Y | Y | Y | Y | Y | Y | Y | Y | Y | N | Y | $80 |
| MaxIm DL DSLR | Y | Y | Y | Y | Y | Y | Y | Y* | Y | Y | N | $399 |
| MaxIm DL Pro | Y | Y | Y | Y | Y | Y | Y | Y | Y | Y | Y | $499 |
Shutter <30 sec means it can trip the shutter for exposures of 30 seconds or less, but not more. This can start you out but you will not get very far doing detailed faint objects with this.
Shutter >30 sec means it can do the previous and also do exposures of more than 30 seconds including many minutes. This is pretty much required to do real DSO work.
Image download means it can download the image from the camera and display them on the screen as they are shot. This is important because it allows you to see what is going to be on your images without having to look at the tiny LCD screen which not only is hard to do because it is so small and so low resolution, but also because it will destroy your night vision.
Live view means you can see what the camera is looking at live while in live view mode. Useful for coarse focus adjustments and sometimes to make sure your target is where you want it to be.
Focus assist means the software has routines to help you perfect your focusing. I don’t really use this, I use a focusing mask which I will describe later.
Auto stretch is a function where the image has the histogram automatically stretched so you can see faint targets much better. This can really help with really faint objects.
Dither is the capability to move the image a few pixels between shots to increase signal to noise ratio.
Processing means the same software can both control the camera and do post processing of the image. Items with a * mean partial processing is possible. We will discuss stacking and processing later.
Canon DSLR, Nikon DSLR and CCD means it can control those types of cameras.
Last but certainly not least is price.
These are certainly not your only choices for camera control but are a pretty good sampling.
With Canon cameras you typically will have one USB cable that runs from your laptop to your camera for control and download of images. The good news is it is cheaper and easier to use this way. The bad news is that it is slightly slower than Nikon downloads since it uses a separate cable for transfer and for shutter release so it can send two signals at the same time.
Speaking of Nikon, to do longer than 30 seconds you will need a special shutter release cable for these with either an IR connector at one end or a GPS plug. The difference is in the camera. Most very low end Nikons do not have a GPS port so must use the IR remote. Higher end/newer cameras (D90/D7000) have the GPS port and can use a cable that connects there. You can get the cables from Shoestring Astronomy. Be sure you get a long enough one.
Section 3: Mount Control Software
This is a critical component to making your evening efficient and enjoyable. The first piece of software I recommend is EQASCOM. This is a little free suite of software that allows other software to communicate with your mount, and even to slew your telescope with a wireless gamepad if you choose.
EQASCOM runs on a platform called ASCOM, which is a freely downloadable piece of software that just about every manufacturer of astronomy gear has drivers for. This allows everyone to talk together including mounts, guide cameras, CCD cameras, focuser controls, dome controls and a myriad of software all at the same time.
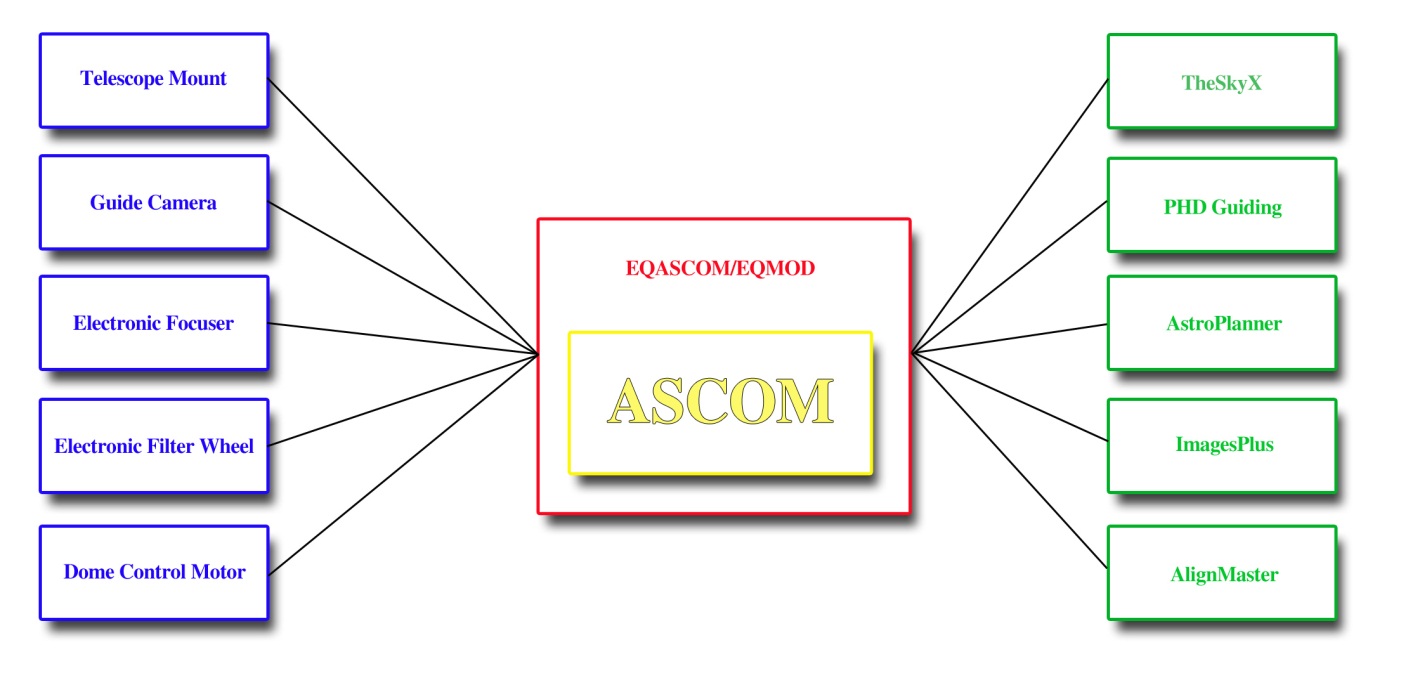
Figure(8). Illustration of how everything communicates through EQASCOM and ASCOM.
EQASCOM will allow you to interface planetarium, planning and other software with your telescope. For example, software such as TheSkyX, Starry Nights, Red Shift, and Stellarium allow you to look up targets and slew to them. It is also useful for aligning your telescope.
EQASCOM allows control of your guiding as well so instead of having to connect a cable from the ST-4 port on your guidecamera to your mount, you can use what is called “pulse guiding” with EQASCOM. One really neat thing here is the ability to control something akin to a gain control for the guide signal making it move the mount more, or less, depending on what you want. This comes in very handy in some situations where your guiding software takes forever to calibrate.
Another really nice feature of EQASCOM is PEC training. In the previous section on mounts we discuss what PEC is and how software is used to find, strip out and finally make PEC adjustments. EQASCOM’s PECPrep program can provide the last two of those by providing a program that reads and filters the log file from guide software such as PHD and then outputs a correction file that EQASCOM can directly use to provide the corrections.
My setup allows me to connect to the scope with TheSkyX and instead of using the hand controller to do alignments etc I do it all through software. I pick any three targets (and it could be two, ten, whatever) in the sky and tell it to slew to the first one. I then use my wireless gamepad to center the object in my camera, and then in TheSkyX I click on Sync. I repeat this two more times and then I have a very good alignment. One advantage this has is I can sync on ANY three objects, planets, the moon, stars, whatever. I am not limited to objects in the hand controller’s alignment database. One trick is to make the objects rather far apart and make sure two are on opposite sides of the meridian.
I am going to throw planetarium software in here too since it is used primarily to drive the scope and see where I am and what I am looking at.
Stellarium is a great package to get your feet wet with. Since it is a free download and fairly small it is a great place to start. If you get semi-serious about imaging you will probably want more. The top of the line is TheSkyX Professional at $329, next down is TheSkyX Serious Astronomy Edition at $144, from there your next best bet would be one of the Starry Night versions ($79-$249), and then Stellarium. Now you may have noticed that I rank TheSkyX SAE above Starry Night’s most expensive version, and indeed I ‘upgraded’ from Starry Night Pro Plus 6 to TheSkyX SAE. TSX is just that good. I fully plan on going to the pro version once other things settle down, it is a great package that will do everything you ever wanted and then some.
Section 4: Guiding
This section is about guiding camera, scopes and software, all in one. It is really hard to separate one from the other. Let’s start with an understanding of guiding accuracy as it is one place I have seen a lot of misconceptions.
To find the pixel accuracy of a given setup for guiding you use this formula:
TelescopeResolution = CameraPixelSize / FocalLength * 206.265
So in my case it works out to my main scope(110mm, 770mm FL):
4.78/770*206.265 = 1.28ArcSec/Pix
And my guidescope (80mm, 400mm FL):
5.2/400*206.265 = 2.68ArcSec/Pix
This means that when my guider is off 1 pixel, it moves the mount 2.68 Arc Seconds. This in turn moves my main camera 2.09 pixels. My guiding is pretty accurate with all the tweaks I have done so being off more than a pixel is rare, which means my main scope normally moves less than 2 pixels at any given time.
Decreasing the focal length of my guidescope (for example using the Orion Mini Guider) would increase the difference to 5.17 pixels and cause a huge loss of detail and much larger stars. The trick is to keep the error difference down to a couple of pixels if you can and to balance that with the amount of light gathered by the diameter of your guidescope.
This formula is highly dependent on your camera, telescope, guidescope, and guidecamera so what works for me may not for you. Be sure to run the formula and keep the difference between your guidescope and main scope to a minimum.
Next we come to guidecameras which has something to do with all of this because it is the pixel size of the guidecamera that helps us dictate the focal length of our guidescope and its accuracy. A good general purpose guidecamera is the Orion Starshoot Autoguider and indeed it is one of the most popular cameras out there. Another choice is the Orion G3 monochrome as it would provide more possible guide targets since it is cooled and sees less noise. Some of the more popular choices are listed here:
| Pixel Size | Cooled | Weight | Resolution | Price | |
| Orion StarShoot AutoGuider | 5.2 | N | 4oz | 1280×1024 | $279 |
| Orion G3 Mono | 8.6 | Y | 12oz | 752×582 | $499 |
| Fishcamp Starfish | 5.2 | Y | 11oz | 1280×1024 | $995 |
| Meade DSI III | 6.45 | N | 11oz | 1360×1024 | $799 |
Again, this is only a sampling and there are other alternatives such as a modified webcam. I have no problem with cheap homemade items like the homemade webcam, as long as the parts + reasonable labor do not exceed what I would have spent on an actual guidecamera and provide equal results. In this situation I do not believe it does so I run the Orion SSAG.
We now come to guiding software and the de-facto standard, PHD by Stark Labs. Since it is the standard most people seem to use, it is free, it works with just about any camera you would ever want to use, and is supported by almost every piece of software that interfaces with guiding, I saw no reason to explore other options. Download it, install it, use it.
If for some weird reason PHD does not work well for you a couple of other options are Guide Dog and Meta Guide which I believe are both free as well.
Section 5: Tablet Software
Tablets, specifically iPads, are so prevalent in today’s world that I just could not leave them out. Too many times I have enjoyed both visual and AP with the help of my iPad. From navigating the night sky, to seeing the moons of Saturn orbit the planet in a planetarium, to just watching videos while my scope imaged, the tablet has become a staple when I go out.
So why a tablet? One thing a laptop can not do well is be lifted up and compared to the sky, and then move in real time as you move it against the sky. Tablets excel at this. You have no idea how cool it is to put a moving sky chart up to the sky and move it around to see what all is in that area of the sky. This is absolutely wonderful for visually exploring with binoculars or a telescope, or can help you plan targets that are in the same area you are already shooting in.
Like desktop planetarium/star charting software there are several options for this function on tablets. To start with there are programs such as Star Walk ($4.99 iPad version) which is a planetarium and planning guide which lists all of the Meisser objects and some others. The database is small but the graphics are rich, and for the money, this is my choice of apps to start with. It also has a wonderful feature called Sky Live which shows you the rise/set times of the Sun, Moon, Venus, Mars, Jupiter and Saturn at a glance as well as their angle in the sky, and phases of the moon.
Next up on our list is SkySafari Plus ($14.99, iPad/iPhone/Android, native on all). This app lists 2.5 million stars, telescope control, and 31,000 deep space objects.
From there we can jump to SkySafari Pro ($39.99 iPad/iPhone/Android, native on all) which boasts one of the largest stellar databases of any planetarium program for any platform (including PC/Mac!) This is the app you will eventually wind up with if you are serious.
If you are less interested in having a star catalog but would like to explore our solar system, watch space related videos and keep up on the latest in the space program, the Nasa App HD is a wonderful little app, and its free! It also has a detailed satellite tracker.
Want to control your telescope with your iPad? No problem! The same company that makes SkySafari, Southern Stars, also makes SkyFi, a wireless telescope controller which they license to Orion Telescopes as the StarSeek Wi-Fi module. Not into wireless? Try their SkyWire USB product.
Section 6: My setup procedure
Sometimes it is difficult to know what to do, and what order to do it in so I thought I would offer this step by step process. Feel free to use it, modify it, and abuse it:
- Setup and level tripod pointing north
- Install mount and tighten it to tripod base
- Install telescope to mount
- Attach dew heaters
- Attach power cables, data cables and hand controller
- Attach filter wheel and field flattener
- Attach DSLR
- Attach cables
- Balance scope
- Polar align scope then set to home position
- Setup table for laptop and laptop
- Plug in cables to laptop
- Plug in all power cables
- Turn on dew heaters, mount, laptop
- Setup folding chair
- Input date/time/location information into hand controller, then switch to PC connect mode
- Launch PHD Guiding software and connect to guidecamera, this launches EQASCOM
- Set PHD to 2 second frames and take darks
- Uncover guidescope and telescope
- Reset wireless gamepad and test connection
- Turn on DSLR
- Launch Images Plus and connect to camera
- Launch TheSkyX and connect to telescope
- Turn on Orion EZ Finder Deluxe
- Pick three objects to align on by looking at the sky and finding three easy objects, the third should be a very bright star to end on
- Tell TheSkyX to slew to first target
- Turn on Live view in Images Plus and click the Display Crosshairs checkbox
- Use the wireless gamepad to slew until first target is exactly centered in crosshairs
- Tell TheSkyX to slew to second target
- Use the wireless gamepad to slew until second target is exactly centered in crosshairs
- Tell TheSkyX to slew to third target
- Use the wireless gamepad to slew until third target is exactly centered in crosshairs
- Launch AlignMaster and go through alignment process
- Switch to EQASCOM interface and clear alignment data
- Repeat steps 25-31
- Turn off Orion EZ Finder Deluxe
- Place Bahtinov mask on telescope
- Use live view at maximum zoom to focus
- Turn off live view and take a 4 second exposure at ISO800 to verify focus(double that when using narrowband filters), prefix filename with “focus-“
- Tell TheSkyX to slew to first target of the evening
- Fire off a 30 second exposure at ISO 3200 to verify target placement and calculate first exposure, prefix filename with “targetname-“ where targetname is something like M15 for Meisser 15, or NGC1805
- Test exposures until I get the right one
- Set exposure properties and number of exposures for time allotted, including stopping for meridian flips where required
- Once exposures are complete, install flat frame light source and start exposing for flats, prefixing filenames with “targetname-flat-“
- Remove flat frame light source and start exposing for bias frames, prefixing filenames with “targetname-bias-“
- Tell TheSkyX to slew to the second target of the evening…
Note there are no darks as I take them generally at home, in the refrigerator during the winter, in the house in spring and fall, and on the back deck in the summer. I use the same dark frames for multiple targets as long as the temperature, ISO and exposure duration is the same.
Section 7: Exposure considerations
The first thing you have to understand is image bit depth and dynamic range.
There is no better way to understand these concepts than graphics, so lets look at some and see what is going on. I want you to understand that these are just for this discussion to make it easy for you to understand, they have no basis in AP at all.
Every color is made up of combining red, blue and green colors into one full color image. Each color is represented by a scale that shows its bit depth. The image below we will call a 6 color grayscale because it shows 6 shades of gray.

Figure(9). 6 color grayscale.
Now for the sake of conversation lets say that the numbers at the top represent the percentage of light that has come into each pixel of your camera. When the number of photons hitting the pixel max out that pixel’s ability to absorb more photons (this is called the well depth) then it is at 100%. Let us further assume that your exposure has the pixel we are talking about saturated at 15%. In the image above 15% is clearly in the left hand solid black region so 0% up to 19% is all one color, black. You might as well not have even opened the shutter.

Figure(10). 12 color grayscale.
In this image if we talk about the same pixel receiving the same amount of light, 15% of saturation, we are clearly in the second section which is very dark gray. When you stretch the image and increase the contrast you can begin to pull out some separation between the first and second sections, or very dark gray and black.
So as you can see, the higher the bit depth (number of colors), the more likely you are to be able to differentiate between two different shades, and the more likely you are to pull out your target from the background. It should be clear that you want the highest bit depth you can get. Bit depth is measured a little different, 1bit is 2 possible colors or shades of a color, 2bit is 4, 3bit is 8, 4bit is 16 and so on.
Dynamic range is the camera’s ability to differentiate between different light values. Since a DSLR uses what is called a Bayer Matrix where a group of pixels is combined to produce one color, one red pixel, one blue, and two green we are talking about each pixel’s ability to respond to a specific range of brightnesses in that particular color.
Why this concerns us is that dynamic range is reduced as ISO is increased which causes a problem with exposures. When you increase ISO, sensor gain noise is increased, but as you increase exposure time, thermal noise increases. Danged if you do, danged if you don’t. But then there is dynamic range to consider. This leaves you with the best option, use as long exposures as you possibly can with a low ISO to increase your dynamic range and ignore thermal noise which will be largely filtered out with darks.
Here is a chart that shows how the ISO affects other aspects of a Nikon D7000:
| ISO | 100 | 200 | 400 | 800 | 1600 | 3200 | 6400 | 12800 | 25600 |
| DR | 14 | 12.75 | 11.75 | 10.75 | 9.75 | 8.75 | 7.75 | 6.75 | 5.75 |
| SNR | 40db | 38db | 34db | 32db | 28db | 26db | 22db | 19db | 15db |
Now as we can see, at ISO 100 each pixel in the camera has 14 bits per color component (R, G, and B). Each bit has two options (on=1 or off=0) so this means there are 2 to the power 14 (=16,384) possible shades for each color component. Now each final pixel is a combination of three colors so 16,384 x 16,384 x 16,384 = 4.3 trillion colors. Now take that down to the lowest number of 5.75 and do the same math, 2 to the power of 5.75 is about 54, and 54 x 54 x 54 is about 157,000 colors.
This clearly shows that the higher the ISO, the fewer colors you have, which we already showed makes it much more difficult to stretch detail out of the image.
So should you always shoot at ISO 100? No. You need to get a balance between realistic length exposures and maximum dynamic range. You can first figure out how long of an exposure you can get on your mount without any issues and at least a 90% keeper rate, and then figure out how long you want to be there, heh.
If you look at the previous chart you will also notice the last row which shows SNR, or Signal to Noise Ratio. This becomes very important because we are trying to pull a weak signal out of a universe of noise. I don’t really go into much detail on it because it should be a relatively simple concept, and even if not, it changes just like dynamic range and has the same net effect.
For most objects I have found that ISO 800 on the D7000 is fairly acceptable, this gives you to about five billion colors total. I will say however that as I am getting better at stretching images and coaxing detail out of them I am starting to shoot a lot more at ISO 400 for about forty billion colors, or eight times the number of colors.
Using the ideas in Part 1 of my series you need to shoot to get the histogram on the left hand side of the graph but with clear separation from the left edge, this provides a good signal while minimizing any skyglow from light pollution and then adjust your ISO to the lowest setting you are willing to put up with that can give you reliable good images.
Section 8: Post processing
Once you have all your images you need to process them to make one final image. While this topic could easily fill multiple full blown books my goal here is just to give you enough to get started and let you add to your knowledge and skillset as you move along in your AP journey.
The first thing you have to do with the images is stack them. Very basically what this does is take a specific pixel in each image and see how it changes, or doesn’t change, from one image to the next. If the values for this pixel do not change, or change very little then the value is left alone. If the value changes in one image drastically such as when a satellite passes through the image, then that is ignored and the average value for the rest of the images is used instead. If the value changes randomly from image to image, it is considered noise and either rejected or averaged out. Remember, this is a very basic overview, there are many types of stacking which do wildly different things but the general idea remains the same.
What this has the effect of doing is removing noise and increasing the signal to noise ratio to help you pull out a faint object from a fainter background. As we discussed in Part 1 this becomes easier with more frames for the software to look at in order to figure out what is noise and what is signal, to a point. A good place to stop for most objects is about 20 images. Fainter objects and objects that require more total exposure may require more images.
Recapping from Part 1 why 20 images is about right is because improvements to the SNR of an image is inversely proportional to the square of the number of images. 2 images gives you a 100% increase in SNR over 1 image, 4 gives you a 50% increase over 2, 16 gives you a 25% increase over 4, 32 gives you a 12.5% increase over 16, and so on. Note as you double the number of images, the percentage increase in your SNR is halved. This also explains why with very faint objects, you need to capture as many frames as you can stand. For example the last time I shot the Iris nebula, NGC7023, I shot 70 lights of which I kept 69.
This number applies to all images, lights, darks, flats and bias. Only lights really need to be increased past this number. I typically shoot for 25 of every type except lights for which I start at 20 and go up based on my needs for that specific target. I picked 25 because it is a good easy number that allows for several failures before I drop below 20 of each type.
Virtually everyone I know started stacking with a program called Deep Sky Stacker (DSS for short). Partially because it is an excellent starter program for this use, and partially because it is free.
DSS allows you to take all your lights, darks, bias and flats and combine them into one image. I will note here that DSS is NOT very good at anything but stacking so do not do any stretching, saturation boost, etc with it. A great thing about DSS is you can get pretty reasonable results from most targets by using the suggested stacking parameters. The developers have done a good job is making recommendations which you can follow along with. Once you are done here you can save the output as a 16bit TIF file for further processing.
Now here comes a problem. We need to take this 16bit TIF and stretch it in a graphics program. The problem arises in that we need a 16bit editing package and that means commercial applications. Photoshop ($699) of course will do this without problem, Photoshop Elements ($99) can do this with enough plugins and tweaking, I have heard that Corel Paintshop Pro ($40) can handle 16bit images but I have not tried it. Gimp, the popular freeware image editing software for Windows/Mac/Linux is only 8bit from what I have seen so is not suitable. I have found that the majority of people doing this who are fairly serious wind up using Photoshop. I know, that’s a lot of money, but what are you going to do.
There is another option to some of this and that is a dedicated astronomy post processing (PP for short) application such as Images Plus ($179) or MaximDL (starts at $299). These applications can do your stacking, stretching and many other functions all in one application. One advantage here is that some PP apps do the stacking and stretching in 24bit or even 32bit data so they can reveal more detail than even working in Photoshop!
Other things that dedicated AP PP apps provide is typically gradient removal for images that are shot into light domes or near light pollution, deconvolution to really bring out details in galaxies and nebulas, background neutralization to give nice even neutral colored backgrounds, and color calibration so that your stars have some semblance of color to them and targets don’t come out some weird color. This of course is just the tip of the iceberg so to speak, there is so much more that can be done in a dedicated AP PP app.
Eventually, if you are really serious about AP, you will have some form of dedicated PP application such as Images Plus and Photoshop, you may even have something like Adobe Lightroom ($149) to organize your images, make them easier to export to web/photobucket/blogs/etc, and to make cropping for specific sizes and ratios the easiest thing you have ever seen.
A typical workflow may consist of stacking/stretching/sharpening and noise reduction in Images Plus, then copy that image into Lightroom. Now it is cropped, has the clarity boosted slightly and maybe a little bit of saturation boost, then click on Edit In Photoshop. Once there any final tweaks are performed and it is saved back to Lightroom. Then the image is exported to whatever final destination you desire (for example, right click on the image, click Export, Click Photobucket, select the gallery, then click export).
When you first start out you will undoubtedly stack your images, give them a quick stretch, boost the heck out of the saturation to get more color, then run some form of noise reduction software. All this will take you about 30 minutes or so. As you progress you will add steps, stacking will take longer as you get more data, and you will find yourself spending more time in PP than in capturing the image to start with! Ah how we learn. When I first started I could shoot 10 targets in a night, sleep until 1pm, have all 10 targets posted on my website by 3pm. Oh how those images stunk. Now I shoot one, maybe two targets in a full night, then spend days processing them, and they are a little better, heh.
You have heard me mention stretching several times. This needs a little explanation and what follows is a very rough example. There are two ways to “stretch” an image, levels and curves, lets start with levels. In an image editing application you have something usually called levels, in other apps you use a histogram tool. These usually have three pointers near the bottom of the histogram that represent shadows, midtones and highlights as shown below:
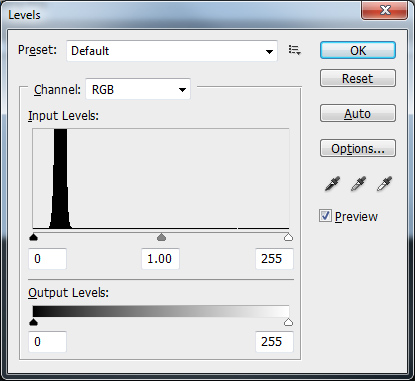
Figure(11). Levels window in Photoshop.
What we want to do to “stretch” the image is move the left most pointer (on the top histogram under the number zero) which is the one for the shadows as far to the right as we can without “clipping” any data. What this means is to move that slider to the right until just before you get to where the line in the histogram moves up for the spike.
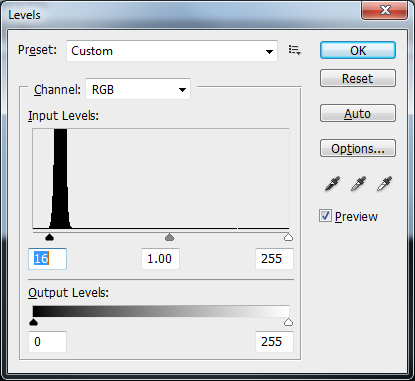
Figure(12). Adjusting levels for shadows.
Next we want to move the second, center pointer to the left until we get more detail out of the image. Be careful not to move it too far or the background will get too bright. Keep doing this back and forth until you get the best balance of object detail, dark background and least objectionable noise levels. Do not touch the right slider which is the highlight slider.
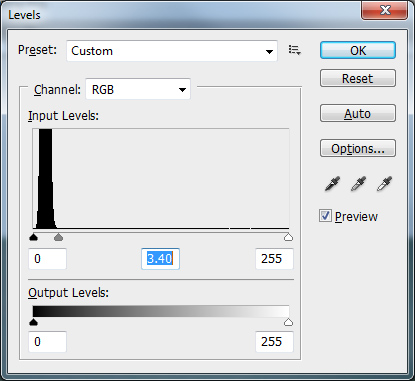
Figure(13). Adjusting levels for midtones.
The second method of stretching involves curves. This is a little more complex and should be done in very small increments or it can generate a lot of noise and artifacts in your image. Normally I would do this in Photoshop and create a new layer every time I wanted to apply a curves adjustment.
Basically you will see something similar to the screen below (in Photoshop create a new layer by copying the background, then select Image, Adjustments, Curves):

Figure(14). Photoshop curves adjustment window.
Hold down the Ctrl key on the keyboard, click on the darkest part of the background sky you can find, this is your black point. While still holding the Ctrl key down click on the brightest white star you can find, this is your white point. Now still holding the Ctrl key down click on part of the nebula or galaxy you are trying to enhance. Release the control key and press the Up arrow key on the keyboard several times. What you want is to get a small, but obvious increase in brightness/clarity of the section you are working on. Once you get this small adjustment, close the curves window by clicking OK, copy that layer to a new layer, and repeat the process. Using small steps provides the best results because you can reevaluate what area you want to stretch and get better detail. You can also realize when you mess up and just delete that layer without undoing everything you worked on.
Back before I started using a dedicated AP PP app I would sometimes use a combination of levels and curves adjustments to each image to maximize my results. Rarely did only one method provide superior results to a combination approach.
Lets assume that you want to start out with Photoshop and DSS and not use a dedicated AP PP app. You will probably need a little help with gradient removal, noise reduction and other astronomy specific issues. The answer to your prayers is a package called Astronomy Tools Action Set ($21.95 Windows/Mac) which contains tools for all this and much more. While I do not feel this package comes anywhere near the ability of a dedicated AP PP app, it does indeed bridge the gap and I still find myself using it occasionally for final touchups. I have also heard of other such plugins but am not familiar with them.
Section 9: Finding targets, session planning
Now that you have the knowledge and tools to capture and process images, how do you find them? How do you know when you can shoot what target? Excellent questions! To use a phrase from Apple, there’s an app for that!
I use a program called AstroPlanner ($45 Mac/Windows). This software allows me to set a date, select tons of different catalogs to search, search for specific object types, specific rise/transit/set times, specific magnitudes (or anything my scope can see after telling it my telescope type), from specific locations and load all the results (from a few to many thousands) and sort them by pretty much anything you could think of, up to three sort items per list at one time.
It can show me where in the sky each object is, can download images of all the objects in the list so I can actually “see” what I am looking for, print out everything from short little lists to detailed finder charts with multiple levels of details on multiple angles of view. Heck, I can even tell it to slew my telescope to the targets!
You should not have a problem finding what you want because AstroPlanner has access to 132 catalogs which contain some 710,000,000 objects. Eventually I may upgrade to another package like SkyTools Pro, but for the foreseeable future, this program should keep me busy for many years.
Another package that does roughly the same thing is Deep-Sky Planner ($65 Windows) which has a slightly larger catalog at 1 million objects and tighter integration with planetarium programs.
The most expensive package I have seen is SkyTools ($99-$179 Windows) which incorporates many more objects, including 500+ million stars down to 20th magnitude and many features aimed at visual observers such as difficulty ratings for splitting doubles. It even includes some exposure calculations for AP although I would personally take those with a grain of salt.
Don’t confuse these apps with features in smaller apps that show you what targets are up tonight. Some of these only include targets that can be seen visually with a small scope, some of them are limited to Meisser objects only, and some do not allow any searching or sorting. Most of them will not print out detailed finder charts.
I am sure there are many more planning apps, maybe even some that are free. I have tried to provide information on ones I have actually seen people use instead of just blasting out a list of software no one actually uses for anything.
Since I typically will spend an entire night, from sunset to sunrise, imaging, I tend to plan far in advance. Before a new month arrives I will typically use AstroPlanner and TheSkyX to locate targets I want to image, then I make an Excel spreadsheet containing several “target packages” which are all night sessions planned as to what time I will start imaging what target, when I will switch targets, times for meridian flips, etc. In addition I include alternate targets and fun small targets if I have a short amount of time to do something while waiting for something else.
What this allows me to do is have roughly four full nights of targets planned and many alternates in case I can not shoot the primaries for whatever reason (I have had nights where everything to the east was covered in clouds but the west was clear as could be) already printed out, inside a clear sleeve (dew kills paper you know) and in my laptop bag ready to go. So when a clear night good for imaging arrives, I do not have to waste time making lists or hunting for targets, I just grab and go!
You will find that when doing serious long exposure AP work planning your sessions becomes crucial. You need to be aware of meridian flips, plan enough time to reacquire and recenter your target after a flip, plan for time to do flats immediately after taking lights of a specific target and much more. It will take you a while to get everything ironed out but once you do, you can spend your time waiting for a run to finish watching TV on your tablet, doing visual with a second scope (what? I failed to mention you should have a second scope? LOL!), or chatting with other people out imaging with you.
Section 10: Astrophotography with camera lenses
Once in a while you might want to capture a larger expanse of the sky than your telescope will allow and it occurs to you that you could just bolt your camera and lens to your mount or telescope and take long exposures that way. Absolutely!
Many of the same things you learned about taking long exposures through your telescope remain exactly the same, the one big difference is that with your camera lens you can set an f-stop whereas on your telescope your f-ratio is not adjustable. Most people will tell you to open the lens up to its maximum opening, or smallest f-stop number. For some lenses this could be f/1.8, for others, f/2.8, still others may have a maximum of f/4 or f/5.6, The problem with this statement is that these people are obviously not photographers, photographers would tell you to never do that unless you have no choice. The only time a photographer uses the maximum aperture on a lens is where you want to provide maximum separation from the background (small aperture numbers allow for very narrow depth of field, or very little in focus) or when the light is so low they have no choice to stop action like in night sports.
The problem here is that the further you open a lens up towards its maximum the less focused the image becomes. Any lens with a maximum aperture of f/1.8 will be “softer” at f/1.8 than at f/4. It is the maximum of the lens that is the concern, not the actual aperture number. So a lens with a maximum aperture of f/1.8 will be far sharper at f/4 than a lens who’s maximum aperture is f/4 shot at f/4. Make sense?
There is another side to this of course. Once you pass f11 or so on most lenses you start to get what is called diffraction which again, starts to blur the image. Lenses are typically sharpest right in the middle of their range. So if we assume that a lens has the marked aperture settings of 2.8, 4, 5.6, 8, 11, and 16 either f/5.6 or f/8 would be the sharpest the lens could be. Generally speaking opening up to f/4 on this lens would not be too bad so you could use it if you like.
So why should you care about sharpness? Simple, if you don’t care about sharpness, why are you worried about focusing? That is what focusing is, it brings the image together to make it sharper, more defined. Unfocused stars are no longer sharp little points of light, just like lenses shot at their maximum aperture. Stars are so far away they appear as points of light, knocking them out of focus or shooting at an incorrect aperture makes them swell up like blowfish.
Another thing to remember when using your camera and lens on your telescope is to make sure the entire assembly is balanced together. I have seen people balance their scope and get all set up, then bolt a DSLR and huge lens to the top and then wonder why the mount isn’t tracking correctly. Well DUH!
Next we have the issue of focusing. Many camera lenses will actually let you focus past infinity. Since infinity is… well… infinite, you can see where this is a bit of a conundrum. The trick is to disable autofocus and use your live view to zoom in as far as you can (do NOT zoom your lens if using a zoom lens, leave it where you want it to take the pictures, lens zoom can change focus!) and focus by making the stars as small as possible. Once this is done, make sure you do not touch the focusing ring on your lens and start shooting.
Lastly I want to touch on something else a non-photographer would probably overlook. Large lenses attached to camera bodies should not be mounted on a telescope, or a mount, by a tripod thread to the body. The problem is that most cameras today have plastic outer shells including where the tripod mounts, and maybe even the lens mount. When you mount a large heavy lens to it and then support only the camera body from the tripod socket you are just asking for something to break. Most large lenses come with a tripod collar that has a socket for mounting onto a tripod, use that instead of the one on the camera.
Section 11: Brand specific DSLR considerations
There are many different brands of DSLRs including Canon, Minolta, Nikon, Olympus, Pentax, Sony and others. You will see a lot of people using Canons, followed closely by Nikons. Canons clearly have the most software support for astrophotography, and you will hear many people say you should only consider Canons for this reason. Well, do you base your car buying decisions on what make of car your auto parts store has the most parts for? Do you even have a clue as to what make that is? Thought not.
You can shoot with any brand of camera you happen to own, there are however some considerations for different manufacturers.
The first one that jumps out is Sony. They have had some issues with what is called Amp Glow. What this means is the camera picks up light from what looks like the imaging sensor itself glowing. It usually starts in one corner and quickly spreads over the entire image area. This kind of gradient can be very difficult to remove. Amp glow can be minimized by taking shorter exposures and making sure you take flats. I would not purchase a Sony camera if I knew I was going to do some AP work but if you already have one you can mitigate some of the issues.
Nikon cameras have an issue in that unless you purchase a special adapter you are limited to 30 second exposures. Shoestring Astronomy has both USB (preferred) and IR (lower end cameras) links that allow for bulb capabilities for any length exposures. If you are purchasing the camera for AP work, or AP in addition to regular photos, I would suggest a D5000 or higher (D5100, D5200, etc), D90 or D7000. The D300/D300s, D700/D800 and D3/D4 series all work as well but are far more expensive with no real gains for AP work. Older Nikon bodies are not really recommended as their light sensitivity coupled with other processing factors make them less than idea, like most older cameras from other manufacturers.
As for other manufacturers I have heard nothing negative. What you need to check is first, if the processing software you want to use can handle the raw files for that camera. Then, can you find a T-Ring for that brand. Next is can some camera control software like Images Plus or MaximDL run the exposures of the camera. Then I would check with other people using that brand of camera and see if there are any known issues.
If I was purchasing a camera now and had both regular photography and AP in mind I would go pick up something like the Canon 60D and the Nikon D5200 and play with both of them, go through the menus, take a few shots and see which one “called my name”. Either one would be excellent for both tasks so the main concern is how well you will like using it and how comfortable it is to you.
If I was purchasing a camera specifically for AP and nothing else, and had nothing to start with, honestly I would probably go with a CCD instead of a DSLR. There are some great little CCD cameras out there like the Orion G3 series in either color or monochrome you can get for $499. For that price you get a cooled camera which can greatly decrease noise in your images, it is already “modified” so it has great response to Ha and SII, and it is smaller and lighter than a DSLR.