
Astrophotography is a fascinating hobby that allows us to capture the beauty and vastness of the cosmos. One of the most crucial aspects of this art form is achieving proper focus on celestial objects. In this comprehensive guide, we will discuss various methods, tools, and techniques for focusing in astrophotography, including the use of a Bahtinov Mask, manual focus, and software-assisted focusing.
Introduction to Focusing in Astrophotography
Focusing is a critical step in astrophotography, as it determines the clarity and sharpness of the final image. Achieving perfect focus can be a challenging task, particularly when dealing with faint and distant objects in the night sky. There are several methods and tools available to help astrophotographers achieve optimal focus, and we will delve into the most commonly used techniques in this guide.
Factors Affecting Focus
Several factors can affect the focus in astrophotography, including:
- Ambient temperature: Temperature changes can cause the focus to shift, as the optics and mechanical components of the camera and telescope expand or contract. You should never try and focus a telescope or camera lens when its temperature is substantially different than the air around it. They should be allowed to ‘equalize’ first, which depending on the lens or telescope and temperature differential, can take as little as 15 minutes, or many hours. This is why astrophotographers typically set up during the day and allow their equipment to equalize until it is time to start shooting that night.
- Optical quality: The quality of the optics in your camera lens or telescope plays a significant role in achieving sharp focus. Also, as a general rule, the fewer optical objects in the path of the light, the sharper your image will be.
- Focal length and aperture: The focal length and aperture of your camera lens or telescope will determine the depth of field and the amount of light reaching the sensor, which in turn affects the ease and accuracy of focusing. On camera lenses, the aperture usually provides sharper images close to the center of the aperture range. For example, a lens that ranges from f2.8-f32 is usually sharpest around f8 or f11. The most significant improvement usually occurs at the ends so moving from f2.8 to f4 is usually a bigger improvement than moving from f4 to f5.6. Also, as a general rule, an f4 lens at f4 is usually sharper than an f2.8 lens at f2.8, but not quite as sharp as an f2.8 lens at f4.
- Atmospheric conditions: Turbulence in the Earth’s atmosphere can cause stars to appear blurry or distorted, making it difficult to achieve precise focus. Particles in the atmosphere can also cause serious issues whether those particles are dust, smoke, or even water vapor.
Focusing Methods
There are various methods available for focusing in astrophotography, each with its advantages and drawbacks. We will discuss some of the most popular methods in the following sections.
1. Manual focus using your camera lens’ scale
This is only when using your camera with a camera lens attached, specifically one that can be focused manually.
These lenses often have a scale on the lens barrel that shows the distance to the object you want to be in focus, and there is typically an infinity symbol ∞. Lenses often will allow you to move the focusing ring slightly past the infinity symbol, my guess is that Buzz Lightyear was on their design team.
Different lenses will focus at infinity at different points. Just because the pointer on your lens shows it is set to infinity, does not mean it is really focusing there. guessing again here I imagine that people taking pictures and needing to manually focus at an object that is millions of light years away is probably not really on the mind of the lens designers so accuracy here is not on the top of the list of things they worry about. The cheaper the lens, the more this is probably true.
My higher-end Nikon lenses tend to be fairly accurate here, Sigmas and Tamrons, not so much. Any way it works you will need to adjust a little to get it right using one of the other methods listed here. Do not just set the lens at infinity and think you are done.
2. Focusing by Eye
Focusing by eye involves looking through the viewfinder of your camera or telescope and adjusting the focus manually. While this method may seem straightforward, it is often inaccurate and relies heavily on the user’s eyesight and judgment. Focusing by eye is not recommended for astrophotography, as it is difficult to achieve consistent and repeatable results.
3. Magnifier / Right Angle Finder
Using a magnifier or right-angle finder can improve the accuracy of focusing by eye. These devices attach to the eyepiece of your camera or telescope, providing additional magnification for more precise focusing. However, they can also make the view dimmer and are sensitive to the position of the observer’s eye. Also, every extra attachment or lens you add into the path of the light inherently makes the image less sharp and so makes achieving a final sharp image more difficult.
4. Digital Zoom Trial and Error
This method involves taking short test exposures and examining the images on your camera’s LCD display. By adjusting the focus and comparing the results, you can gradually refine the focus until the stars in the image are as sharp and small as possible. This approach can be time-consuming but offers the advantage of using actual images from the camera sensor to determine focus.
This is one of the most common methods for newcomers to the hobby and while it may seem like it should achieve sharp focus, in reality, it does not.
5. Live View Focusing
Live View focusing is a popular method that involves using the camera’s Live View mode to display a real-time image on the LCD screen. By zooming in on a bright star and adjusting the focus, you can achieve a precise focus more quickly and easily than with other methods. This technique is particularly useful for DSLR cameras.
For what most people think of as astrophotography, this is another one of those that seems like it should work really well, but in the end, does not. When compared to using a focusing mask, this method falls far short. I too was one who swore by this method, until I started using a mask.
Where this is very useful, is finding where the infinity focus on your lens is when using a standard camera lens shooting widefield (large areas of the sky which may or may not include foreground objects/landscapes). I will often use this method to set the focus on widefield shots and then use masking tape to hold the ring in place so it does not move throughout the night.
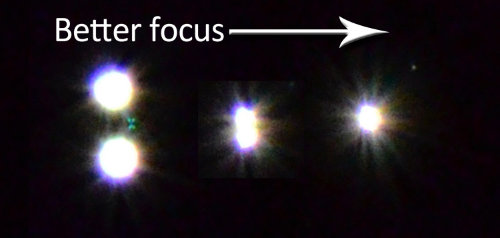
6. Bahtinov Mask
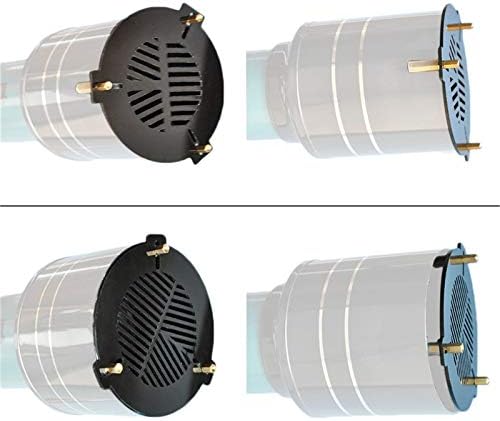
A Bahtinov Mask is a specialized focusing tool that creates a diffraction pattern when placed in front of the camera lens or telescope objective. The pattern helps you achieve critical focus by adjusting the central spike in the pattern to be centered between the “X” formed by the other spikes. The Bahtinov Mask is a highly effective and accurate method for focusing in astrophotography.
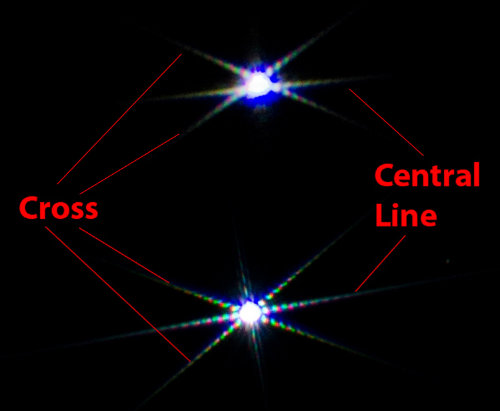
Of all the methods here, this is the one that I have personally seen achieve the sharpest images, and it does so consistently.
7. Hartmann Mask

The Hartmann Mask is another focusing aid that uses two or more small apertures to create diffraction patterns. By placing one of these over the aperture of the telescope and adjusting the focus until the patterns merge into a single sharp point, you can achieve optimal focus. While the Hartmann Mask is less popular than the Bahtinov Mask, it can still be an effective tool for focusing and is much better than attempting to focus with your eyes.
The nice part about the Hartmann mask is that anyone can make one very quickly and inexpensively. While the Bahtinov mask is more effective in my experience, and the method I always use, it requires a much more complex and precise mask which is not that easy to make.
8. Autofocus
I should start by saying that autofocus in astrophotography does not mean using your camera’s autofocus, that absolutely does not work. Autofocus in astrophotography requires a combination of motorized focusers and specialized software. The software measures the size of stars in the image and adjusts the focus accordingly. Autofocus systems can provide highly accurate and consistent focus, particularly for long exposures and high-resolution imaging.
This is the method used by serious astrophotographers as the focus can not only be set to the sharpest possible focus but can be continuously adjusted over long periods of time to compensate for changing atmospheric conditions, temperatures, etc. It can also be set to sound an alarm and stop taking images when the conditions deteriorate to where your images would no longer meet your quality standards.
Focusing Tools and Accessories
In addition to the methods discussed above, various tools and accessories can assist with focusing in astrophotography:
- Motorized focusers: These devices attach to your telescope or camera lens and allow for precise, automated adjustments in focus. There are models for specific telescopes like this one for Celestron SCTs for generic models.
- Focusing aids: Various focusing aids, such as the Bahtinov Mask and Hartmann Mask, can help you achieve accurate focus quickly and easily. Some you can make yourself, some you can buy for very little.
- Software: Astrophotography software, such as Astro Photography Tool and many astrophotography capture packages, can assist with focusing by providing real-time feedback and analysis.
Tips for Successful Focusing
To achieve the best focus in astrophotography, consider the following tips:
- Be patient: Take your time and make small adjustments to your focus to ensure the best results.
- Check focus regularly: As temperature and atmospheric conditions change, your focus may shift. Periodically check your focus throughout your imaging session to maintain optimal results.
- Use the right method: Choose the method that works best for your equipment and conditions. Experiment with different techniques to find the one that provides the most accurate and consistent focus.
- Practice: Like any skill, focusing in astrophotography requires practice. The more you practice, the more adept you will become at achieving sharp focus.
Conclusion
Focusing is an essential aspect of astrophotography that can significantly impact the quality of your images. By understanding the various methods and tools available, such as the Bahtinov Mask and autofocus systems, you can optimize your focus and capture stunning images of the night sky. With patience, practice, and the right techniques, you can master the art of focusing in astrophotography and achieve consistently sharp and detailed images.
The biggest jump in the quality of my images, when I was starting out, was switching from using a zoomed-in live view to using a focusing mask. I bought a plastic Bahtinov mask from Amazon and it was easily one of the best purchases I have ever made in this hobby.