
Achieving precise polar alignment on an equatorial telescope mount is a crucial step for any stargazing enthusiast, especially when it involves astrophotography. In this guide, we will delve into the importance of polar alignment, the equipment you need, and a step-by-step process to help you align your telescope accurately with the celestial poles. We will be focusing on the procedure for the Northern Hemisphere but other than where you aim your telescope, the basic procedure is the same for the Southern Hemisphere.
1. Understanding Polar Alignment
When using a telescope you may notice that the object you view moves out of the eyepiece rather quickly. This can happen even on telescopes with a “tracking” mount or a mount that is supposed to follow objects across the sky. This is most likely due to your telescope’s polar alignment being off.
Polar alignment is the process of aligning your telescope’s equatorial mount with the motion of the celestial sphere. This is where everything in the sky seems to rotate around a specific point in the sky, the North Star in the Northern Hemisphere. The easy way to think of the celestial sphere and its motion is to think of yourself in a large room sitting in an office chair. Now spin the chair around 360 degrees and it appears as though the room is spinning when in fact, the room is stationary and it is you that is spinning.
By ensuring that your equatorial mount rotates on the same axis as the Earth, you can accurately track celestial objects for extended periods without any noticeable drift. This precise alignment allows for clear, sharp, and stable images in both visual observation and astrophotography.
2. The Importance of Polar Alignment
While many tracking telescopes can keep something in the eyepiece for a short time while you view it, even without accurate alignment. Without accurate alignment, objects may drift out of view, leading to frustration and wasted time.
Polar alignment is convenient for visual astronomy as you can not only view the object for longer periods of time without having to adjust your telescope, but less motion of the object in the eyepiece means you will get a sharper view and see more detail.
While it may be nice for visual astronomy, it is essential for astrophotography as it allows your telescope to track celestial objects with high precision without which your images will be smeared, dim, and contain odd-shaped objects. Improving your telescope’s ability to track objects for extended periods is the cornerstone of astrophotography.
3. Equipment Setup
Before diving into the polar alignment process, it is important to ensure that your equipment is set up correctly. This includes having a suitable German equatorial mount, a reticle eyepiece (one that has crosshairs in it, preferably illuminated), a polar finder scope, and a tripod. Make sure that your tripod is stable, and that your mount and telescope are securely attached.
A polar finder scope, or polar scope, is a small telescope usually built into the center of the telescope’s mount. This location allows for precise alignment of your mount’s center of rotation with the celestial sphere’s center of rotation.
If you are doing astrophotography, you can use your camera instead of the reticle eyepiece to center the telescope on objects.
Some telescopes may not have a polar finder scope and instead use a feature in their controllers that can set polar alignment by using several “alignment stars”. The Celestron version of this feature for example is called All-Star Polar Alignment.
4. Placing the Telescope Mount
The absolute first step is to point the tripod for the mount pointed north. I use a simple orienting compass for this because I don’t like pulling my phone out all the time and find it easier to use. Simply lay the compass on top of the tripod legs and get the front leg (sometimes marked with a N for north) pointing pretty close to north. You do not need to be exact here but do try and get reasonably close as it just makes things moving forward a little easier.
You may notice that the tripod legs of most telescopes extend, and you may be tempted to extend them most, or all of the way to make viewing easier. This can be a mistake as the more extended the legs are, the less stable the mount will be. Now this may not matter much when you are just taking a quick look at the moon or something, it can be a critical factor when doing long-exposure astrophotography.
An often overlooked item is the tightening of all the various knobs and screws. You want to have these as tight as possible, without damaging anything. In other words, you want to use the minimum amount of force to make the knob or screw hold firmly all night. Too tight and you might break something, too loose and things will slip. This may take a little trial and error but it is absolutely worth it.
Ensuring that your telescope mount is level is crucial for accurate polar alignment. An uneven tripod can lead to inaccurate altitude readings and may cause your mount to shift during observation. Many German equatorial mounts have a built-in bubble level to assist with leveling. It’s a good idea to place a level on the tripod before attaching the mount and ensure it’s level on each axis.
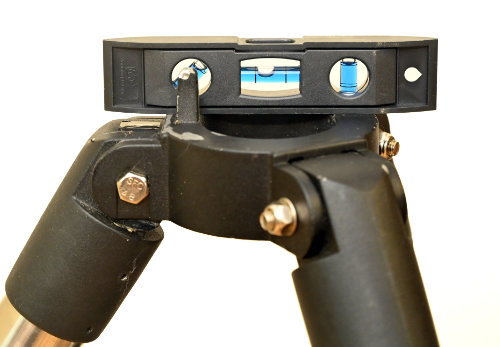
Before leveling, make sure that each foot of the legs is solidly on the ground. Concrete is the best but you do not want one or more of your legs on ground that may sink or shift even a small amount during observation or taking images as this small amount of motion can dramatically alter your alignment.
I use the bubble level on the mount, if it has one, as a guide. To really level well I make sure the tripod legs are stable and without the mount attached I use a small torpedo level with the ends pointing north and south, level the legs, then switch the level to east and west and re-level. You level the mount by adjusting the height of the legs, which is why it needs to be done in two perpendicular directions.
I repeat this process until the base is leveled in both directions.
5. Aligning with Polaris – The North Star
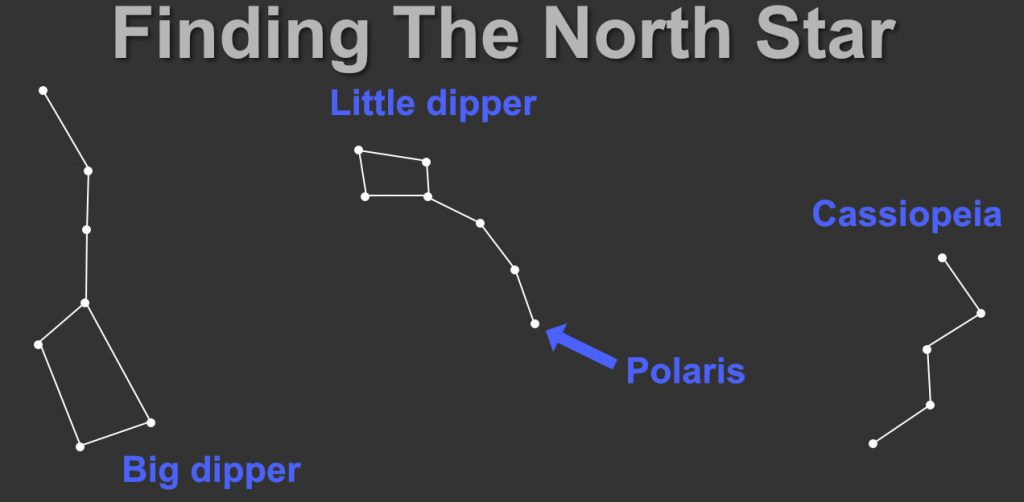
For stargazers in the Northern Hemisphere, the North Star, or Polaris, serves as a reference point for polar alignment. Start by roughly aligning your telescope mount in the direction of the North Celestial Pole. You can use the two outer stars in the Big Dipper constellation to help locate Polaris, as it is much brighter than any surrounding stars in the area.
You then look through your polar scope and point it at the north star. Most polar scopes have an image inside of them showing the star pattern so you can align the center of the mount with the stars. This is important because you are aligning your mount with the north celestial pole which is close, but not exactly where the star Polaris is.
In order to move the objects you see in your polar scope to match the image painted inside your scope, you need to use the following two methods.
6. Adjusting Altitude and Latitude
Once your tripod is level, you’ll need to find your location’s latitude and longitude coordinates. Your latitude coordinates will be used to adjust the altitude (up-and-down) position of your telescope mount to align with the North Celestial Pole. This can be easily done by using your phone or tablet as they usually have a compass or GPS feature which will give you this information.
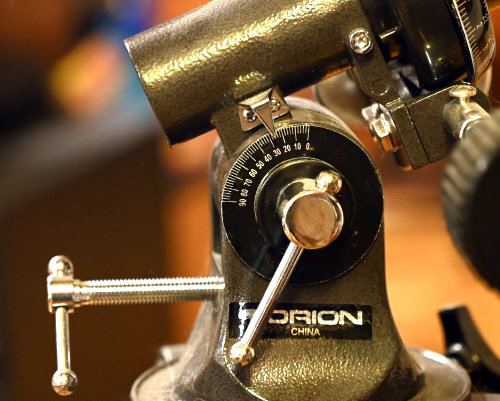
Your mount should have a latitude scale on one side of your mount, indicating the current latitude alignment. Adjust the mount’s altitude adjustment bolt(s) to match your current latitude. In the image above, the bolt on the left side bottom of the image is turned clockwise to raise the altitude (increase the latitude shown on the scale) and counter-clockwise to lower it.
No telescope I have ever used had an accurate latitude scale, but it usually gets me close enough to see Polaris in the polar scope. I can then fine-tune the latitude adjustment while looking through the polar scope.
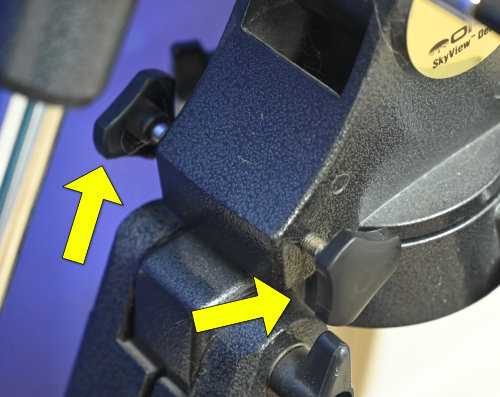
7. Adjusting Azimuth
After setting the correct latitude, you’ll need to adjust the azimuth of your mount (left and right) to fine-tune the polar alignment. Your mount should have azimuth adjustment knobs that can be loosened and tightened to move the mount left or right. Keep adjusting the knobs until Polaris appears in the approximate horizontal plane, as displayed in your polar scope, alignment app, or other software.
When you are done with this step, if your polar scope has an image of the stars around Polaris and a dot or crosshairs where Polaris should be, Polaris should be on that dot or in those crosshairs. Keep in mind that if, for example, your polar scope shows the constellation Cassiopeia, it is not necessary to have both Polaris where it is supposed to be, and Cassiopeia where it is shown. Stars and constellations other than Polaris are there just to help you find your way.
8. Utilizing Polar Alignment Apps and Software
To make this process easier, or if you do not have a polar scope with an image in it, consider using a mobile app or software that provides the exact position of Polaris relative to the North Celestial Pole. Examples of such apps include PolarFinder for Android users and Polar Scope Align Pro for iPhone users.
These apps use your device’s GPS to calculate the position of Polaris based on your location. You can then adjust your telescope mount accordingly to mimic the location displayed in the app.
9. Advanced Polar Alignment Techniques
For those looking to achieve even greater accuracy in their polar alignment, there are additional methods and tools available. Some of these techniques include:
- The Drift Align method using PHD2 guiding software
- The SharpCap polar alignment feature
- The QHY PoleMaster electronic polar alignment scope
- The ZWO ASIAIR wireless controller and dedicated smartphone app
These advanced methods can provide improved auto guiding (a method using a camera to help automatically adjust the tracking of your mount to increase its accuracy), allowing for longer exposures without tracking errors.
10. Final Thoughts and Tips
Achieving precise polar alignment is an essential skill for any stargazing enthusiast, particularly for those interested in astrophotography. With practice, you’ll quickly become adept at aligning your telescope accurately with the celestial poles. Remember to start with a solid foundation and accurate leveling to make sure all your hard work lasts all night long.
There are a lot more adjustments and fine-tuning that can help get the most out of astrophotography. Stay tuned here for more on that, or you can find all of this and more in the excellent book Getting Started: Using an Equatorial Telescope Mount by Allan Hall.
This is good information. But I’ve yet to find article or YouTube video on how to actually use the setting circles on a eq mount. I have an Orion Star blast 4.5eq and had to teach myself on how to use the right ascension and declination setting to find objects in the night sky.