

When choosing budget refractor telescopes, there are a number of things you need to take into consideration. Most people think price and magnification, part of that is a consideration, while the other part is just false. Let’s take a look at the real factors that should guide you when choosing budget refractor telescopes.
Key Features
There are several key features that should influence your decision, these are what will determine what you can view, how well you can view them, and how much effort you will have to put into it.
Personal Choice
Before we get into all the specifications and recommendations to help you along your way, there is one thing I heard someone say a while back that really stuck with me, and that is:
No matter how good a telescope is, if you don’t want to take it out and use it, it is worthless.
What this means is that you could spend thousands of dollars on a telescope that can do a lot of things really well, but if it is too heavy, too complicated, or just too much of a pain in the butt to take out and use, then you wind up not using it and therefor, it is useless to you.
On the other hand, if someone buys a cheap pink telescope in the toy section at the grocery store but takes that telescope out every clear night and looks at things, then for all intents, that little pink $50 scope is better than that other huge multi-thousand dollar telescope collecting dust.
Like a lot of things in life, it isn’t what you could do with something, it is about what you have done or are doing with something.
So really, how does that affect choosing budget refractor telescopes? Simple, let your feelings help you pick out what you want. If it looks too big, get something smaller. Think about where you are going to use the telescope and how you will get it there. Will it fit in your car? Want a black optical tube instead of a white one, look around and see if you can find a black one that fits what you want. Don’t like the name on the side of the telescope? Get a different brand or put a sticker over it.
These things matter and are the single most overlooked “specification” when choosing budget refractor telescopes, or for that matter, a lot of things in life.
Aperture
The aperture of a refractor telescope is the diameter of the front element of glass. This dictates how much light the telescope can collect as well as the maximum “magnification” you can achieve, and therefor what types of objects you can see. Why? Virtually any telescope is going to allow you to see the moon and stars, most will work with the Orion Nebula, Saturn, and Jupiter. If that is all you want, then a super-cheap one might be all you need.
On the other hand, if you want to see a lot more detail in the Orion Nebula, the moons of both Saturn and Jupiter, and a whole host of faint nebulae, then you might want to up your game a little.
Most people do not understand that the really hard part in astronomy is not magnification, it is gathering light. What good is awesome magnification if it is too dark to see what is being magnified?
Super Small <70mm
These telescopes are often seen in department stores, grocery stores, sporting goods stores, etc. They are also the most popular telescopes seen at resale shops and in garbage dumps. The simple reason for this is that they provide little improvement overlooking through a paper towel tube.
When looking at something this small and cheap, you are not only getting horrible cheap plastic optics in both the telescope tube and eyepieces, but the mount (tripod or whatever holds it up) is probably super short and flimsy, making viewing even worse (we talk more about that later). This means even if the telescope was reasonable, you couldn’t use it because it would be shaking and wobbling all over the place like a hyperactive child on too much caffeine and sugar after trick-or-treating.
I can’t tell you how many times I have heard “I just want something cheap to see how I like astronomy”, or “I don’t want to spend a lot of money just to find out my child isn’t interested in astronomy.” Let me assure you, if you start with this telescope, they will not be interested in astronomy, not at all. In fact, this is the number one reason I have heard that kids give up on astronomy when asked.
Before the experts out there start commenting about what an idiot I am, there are specialized telescopes this small that have unique uses that are excellent. A great example of this are dedicated solar telescopes or wide field astrophotography scopes. Neither of those are for beginners, so I won’t be discussing them here.
Small or Travel Telescopes 70mm
A reasonable 70mm telescope is about the minimum I would recommend for anyone to start out with who either has no real interest in astronomy or is a small child. If you get a good one of these, they can provide good views of the moon and stars, and a little of the Orion Nebula. You could also make out the rings of Saturn and see Jupiter as a large star.
The trick here is to get a good one, not the cheapest one you can find. Celestron makes a nice 70mm travel telescope which fits the bill. Stay away from virtually anything you find in a brick and mortar store unless it caters to more serious telescopes and has a knowledgeable sales staff. Also stay away from anything sold at TJ Maxx, JC Penny, Kohls, or Macy’s. They are fine stores for your clothes, but that is about it.
These can be great to take on trips, just throw them in the trunk and go. Most of them, especially the better ones, come with either nice cases, or like the Celestron, a nice backpack.
Real telescopes 80-102mm
Here is where you start to get into telescopes for kids, young adults, or adults who have a real interest in astronomy, or you want to instill one in them. This is where you can really show people things in the night sky. They collect enough light to be able to view quite a few nebulae, as well as handle enough magnification to start to make out a little detail on Saturn and Jupiter on good nights.
Larger Telescopes >102mm
Now we are getting into telescopes for people with a serious interest in astronomy, and those who want to purchase a telescope to use for the next twenty years. Many of these telescopes come do not come with a mount or accessories and are referred to as OTA only, Optical Tube Assembly only.
These are usually of higher quality than the smaller ones, are heavier, and include better components. They will provide better views, particularly of nebulae. The Orion Nebula will just jump out at you and present some amazing detail with one of these, while other faint nebula that you could not see before will suddenly become quite visible.
I use a 127mm doublet for most of my visual astronomy, and I am in awe every time I pull it out and use it. It just never gets old.
Focal Ratio
The focal ratio of a telescope is the telescope’s focal length divided by its aperture. So if you have a 1000mm focal length and a 100mm aperture, then you have a f10 (the f stands for focal ratio) telescope. Some telescopes will list both the focal length and focal ratio, some will only list one or the other. With this formula you can calculate either one.
When choosing budget refractor telescopes, most people want the most magnification they can get. They want to see Saturn filling up the eyepiece. Unfortunately, those people will never see that unless they visit a astronomy star party with some people who have serious equipment.
The rest of us are going to have to be reasonable with our expectations. We can start by saying that yes, you can see some detail on Saturn and Jupiter, and yes it is exciting. But we probably want to see more than that. To that end, we need to choose a focal ratio that fits with what we most want to do.
Fast scopes <f7
These telescopes are used for wide-field observations, meaning viewing a large part of the sky at once. They are excellent for viewing the Milky Way, large nebulae, open clusters, watching for meteors, viewing the moon, etc. They are not very good at viewing planets, globular clusters, etc.
Midrange Telescopes f7-f8
These are the Swiss Army knives of refractor telescopes and are pretty good at everything. Almost every serious amateur astronomer I know has at least one telescope in this range if not more. I have three.
A telescope in this range can easily fit most nebula in the field of view, can view the entire sun (with correct filters of course) or moon in, and still gives you excellent and detailed views of Saturn and Jupiter including their moons. Of course, with the correct aperture and eyepieces.
Slow Telescopes f9-f12
The most common telescopes in this range are f11 telescopes such as the Celestron AstroMaster 90EQ. They go up even higher like the f13 of the Celestron AstroMaster 70EQ.
Telescopes in this range are usually really good at planets, globular clusters, and details on the moon. They can also be usable with some other targets including open clusters and nebulae with wider eyepieces such as the 25mm most of them come with.
This is probably the most common range for beginner telescopes and a good portion of the reason is that they can provide good views of Saturn and Jupiter without having to purchase more eyepieces.
Optical quality
Refractor telescopes, especially at the beginner level, have either one element, or one group of elements, at the front of the telescope tube. These elements can be of different types of glass, have different coatings, and come in single, doublet (two pieces of glass), or triplet (three pieces) configuration. Very special telescopes may even have more!
Achromatic
This is almost always either one or two pieces of glass, and may or may not have any coatings on them. These are the least expensive type of refractor telescopes. Achromatic refractors suffer from chromatic abberations which is a violet or blue glow around bright objects such as the moon or bright stars. Higher-end Achromats may have coatings to help with this, and you can use a minus violet filter to help reduce the effects.
ED (Extra-low Dispersion)
This can be a single or two pieces of glass but is of much higher quality than Achromatic. It provides sharper images and has far less chromatic abberation as well. There are some telescopes with very high quality ED doublet configurations that are considered APO (see the next section) and provide outstanding images.
These are substantially more expensive than Achromatic telescopes but when choosing budget refractor telescopes that you plan on using for twenty years or more, this is a nice upgrade to have.
APO (Apochromatic)
Apochromatic telescopes are at least doublets and usually triplets that have excellent color correction. They provide the highest contrast, sharpest, and most defined images available. Virtually all serious astrophotographers who use refractors use APOs. These are also the most expensive, by far.
I don’t list APOs because they are something you should consider when choosing budget refractor telescopes, but you may want to know why one telescope is $300 and another is $3000. This is a prime reason for that price disparity.
Flourite
Ummmmm, yeah, about this stuff, slightly better than APO but refractors with this kind of glass typically start at over $2,000 for a tiny 65mm or 70mm. Larger ones jump to $4,000+ fast. I only mention it here in case you see it on a website and wonder what it is. It is, absolutely, the best of the best. In all my years I have actually seen one in the field.
Mount and Stability
A lot of people do not really consider the mount when they are choosing budget refractor telescopes, after all, all it does is hold the telescope so you can look through it, right? Well, yes, but stop and really think about that for a second.
Take your phone out, turn on the camera, point it at your neighbor’s house across the street, zoom all the way in as far as your camera will go, now hold that out at arms length and keep it stable. See how things are jumping around and how hard it would be to read something with that jumping going on? OK, now that is probably at about 15x or so, and a typical f8 telescope with the 25mm eyepiece they often come with is about 28x. If you have one of the 1000mm focal length telescopes that a lot of beginners use, that jumps to around 40x.
At these high magnifications even a slight movement can make it look like you are seeing a smeared watercolor painting instead of Saturn. In astrophotography we always say that the mount is 50% responsible for the quality of your images, the other 50% is the telescope, camera, filters, alignment, weather, and skill combined. And we aren’t kidding.
Altitude Azimuth (Alt-Az) Mounts
The Alt-Az mount is what you have when you use just a regular ole tripod. It moves up, down, left, and right. The least expensive telescope kits include this kind of mount and especially in the least expensive of them, this is just junk.
That isnt to say that there are not good alt-az mounts, there are excellent ones like this Sky-Watcher AZ5 mount for manual use, or this iOptron AZ Mount Pro for a go-to mount. I personally have the Sky-Watcher AZ5 and it is an excellent mount that I love to use.
When looking at the mount you want to make sure it doesnt look spindly, in other words, it looks like it would be very stable. Super skiny legs or a really tall tripod with a long neck are signs that you will not be happy with the telescope no matter how good it is. Nice and heavy tripods like the ones like the one included with the Celestron StarSense DX 102AZ are very stable and allow the telescope to provide excellent views.
Why an Alt-Az mount instead of an EQ? They are fast and easy to set up. I often have a big EQ mount astrophotography rig running and while it spends hours imaging I need something to do. Instead of spending a bunch of time and effort setting up a second EQ setup, I just whip out a manual Alt-Az mount and start viewing. Easy peasy.
Equitorial (EQ) Mounts
EQ mounts can be just like Alt-Az mounts in that there are some really cheap ones out there that are just plain junk. The first one that comes to mind is the Celestron PowerSeeker 80EQ. If they had put that mount on a little shorttube 80 or smaller it might not be so bad, but that long refractor on that little aneorexic mount just makes for a horrible experience.
Now step up to the Celestron AstroMaster 90EQ and that is a whole different mount. Much stronger and more stable than its little brother which makes using this telescope a joy.
But why an EQ mount instead of Alt-Az? First, because it allows you to learn about declination and right ascension, the navigation coordinates system for the sky. When reading books or astronomy related websites you will run into the fact that they tell you where to look for something (say a comet, asteroid, etc) by giving you the coordinates. If you learn this system which all EQ mounts use, then finding objects is quick and easy.
Second, because if you look at an object more than a few seconds you will notice it moves, quickly exiting your field of view. With an Alt-Az mount you need to move the telescope a little left or right, then a little up and down, all at the same time. It is frustrating to do for very long.
With an EQ mount, properly aligned, you turn one knob to keep it in the center of the eyepiece making looking at objects substantially easier.
This is because the objects in the sky don’t move up, down, left, right, they move around the Earth. This motion is slightly different depending on where you are on the planet and so needs to be adjusted for that latitude. EQ mounts are made just for this.
Manual vs Push-To vs Go-To
There are three types of mounts which each has their own pros and cons.
Manual mounts are mounts that have no electronics or guidance in them at all. There are both Alt-Az and EQ manual mounts available as manual mounts. Virtually all inexpensive beginner telescope packages are manual mounts.
The good is that these mounts force you to learn how to navigate the night sky. This seems like a real pain when you start, but once you get the hang of it, it becomes a blast. You can be talking to someone and point up at the sky right where an object is without having to grab a phone or tablet and look it up. This is the mount you want if you really want to learn astronomy. A good example here is the Celestron AstroMaster 90EQ.
Push-to mounts are a little different in that they too have no motors, but they have a way to tell you where to point the telescope to get it pointed to an object. Many of these are very accurate, getting the object right in the middle of a 25mm eyepiece on the first try.
The advantage here is that you save a lot of money as opposed to a Go-To mount, but you can still find objects easily and quickly. These are excellent for getting people interested in astronomy as they will give you a huge catalog of objects making it much harder to get bored or frustrated. An excellent example of a push-to is the Celestron StarSense Explorer DX 102AZ which uses your smartphone as the navigation computer.
Go-To telescopes are the ultimate in convenience, being able to press a button and have the telescope point itself to a target with no assistance from you. Of course you pay for this convenience as these mounts are more expensive than either the manual or push-to (for the same class of mount).
One thing to watch out for with these is sometimes you need to perform an alignment before it will point correctly. Some newer ones just need to be level, some older ones need to be level, pointing north, have a polar alignment done, and then do a two or three star alignment. Be sure to ask or check what the alignment proceedure is so you know what to expect.
Recommended Telescopes
When reading about telescope recommendations you have to remember that your needs and preferences may not align with whoever is writing the article. What follows is not a “you should buy this telescope” section, it is a list of telescopes I have personal experience with that I know are good telescopes. Again, if you are buying a wrench set at your local hardware store, and someone tells you a particular hammer is the greatest ever made, that’s great and all but not what you want. If one of these fits with what you want, then great!
Best all manual
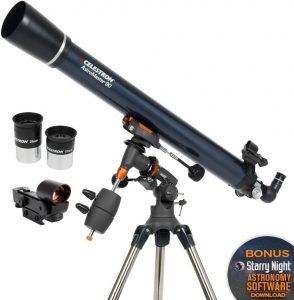
Yup, you have seen this pucture in this article before, because I really like it. This is the Celestron AstroMaster 90EQ. It has a longer focal length than I would really like but the build quality, performance, and included accessories are outstanding for the price. This is one of the few kits where I would not replace a thing right off the bat.
While the eyepieces are basic, they are of good quality and should last a while. Don’t buy more of them, buy something nicer when it is time to add, but for starting out they are fine. The mount is the real highlight here, solid, easy to use, and reliable. I also prefer red-dot finders so having one included in this packages is just awesome.
Along with all of that, you get a free copy of Starry Night astronomy software to help you plan your sessions and find objects to view.
Best Push-To

The Celestron StarSense 102AZ has my vote for best Push-To telescope and honestly, for best overall when choosing budget refractor telescopes. This is because it is just about the perfect size in both aperture (102mm) and focal length (812mm) and includes some amazing things to really get you interested, and keep you interested in astronomy.
Start with the obvious, the StarSense. This allows you to use your phone mounted on the side with a free app that gives you the Push-To functionality to thousands of targets in the night sky. This gets you hooked fast, and keeps you coming back for more by making finding things extremely easy.
Once the Push-To gets you to the object, the red-dot finder lets you zero in quickly while the included eyepieces give you really good views of pretty much any object you look at. Eventually you will want to upgrade the eyepieces but this can be way down the line.
Best Go-To

The Sky-Watcher AZ-GTe with StarTravel 80 Refractor is my pick for best Go-To when choosing budget refractor telescopes. This kit has everything you need for a reasonable price and includes some really neat features that you will be hard pressed to find in another budget package.
Starting with the mount; Sky-Watcher makes some incredable mounts and this one is no exception. This is basically the same mount they use with many other products as it has proven to be accurate and robust. It also runs off AA batteries! This makes it super portable while still being amazingly stable.
But the mount isn’t done impressing yet, it has its own wifi hotspot that allows you to connect your phone or tablet to it to controll the mount. This is great for finding objects and simply tapping on the screen to have your telescope point right where you want it.
The telescope is excellent as well, although the smallest of my recommendations running just 80mm. At 400mm of focal length it is also pretty wide field excelling at open clusters, the moon, and larger nebulae such as Orion.
Accessories to Improve Your Experience
Telescopes are one piece of the puzzle, there are many other things that can improve your experience and/or expand your capabilities. Sometimes one little upgrade or addition is all it takes to open up a whole new world.
Eyepieces
With a refractor telescope, your eyepiece is 50% of the optics in your telescope. That’s right, half of the parts that determine what you see in your telescope is that little eyepiece you put in the back. This means that it has the capability to make a larger difference than just about anything else you could upgrade or add to your telescope.
Most beginner telescopes come with inexpensive eyepieces. Lower end telescope kits can come with some pretty aweful eyepieces while higher end kits can have some really descent beginner eyepieces. Either way, the best you are going to get is descent. You can make it better.
Eyepieces run from around $20 to over $1,000 each. As a beginner there is no reason to get rediculous with this as you do not have enough experience to get much out of an extremely high-end eyepiece, and even if you did, that beginner telescope can only do so much (the front optics is the other 50% of the image!).
Upgrading to a $80-$100 eyepiece will really open your eyes and make you want to throw those beginner eyepieces in the garbage. They have sharper views, more contrast (so you can see dimmer things against the black of space), more eye relief (so you don’t have to slam your eye into the eyepiece to see anything, particularly if you wear glasses), and give you a wider field of view which really enhances the feeling like you are out there.
The biggest mistake I see people make with eyepieces is buying too many. Yep, beginners think they need 5, 6, or even 10 different eyepieces to be able to cover every object. Poppycock! Three good eyepieces will cover 99% of everything most people will ever view very well. Two good eyepieces will cover 75%. I recommend starting with something like a 25mm and a 12mm for most beginners. Then if you decide you really want to add one, you will have some experience in knowing what you really need.
Yes, the smaller the number the more magnification, but also the more distortion or blurryness you get. A smaller but sharp object is better than a large blurry mess.
Filters
I normally do not recomment filters for beginners, but there are three exceptions to that rule: light pollution, moon, and a red filter if you are wanting to spend time looking at Mars.
The light pollution filter can substantially improve your views of nebulae as well as make modest to good improvements on pretty much all other objects. It does this by filtering out the wavelengths of man-made light sources such as streetlights, signs, and billboards. Some even filter out some of the light from the moon helping to reduce the glow around the moon that can obscure objects around it.
A moon filter is basically a ND filter that blocks a percentage of the light coming from the moon. This can be a problem as telescopes first and foremost collect and amplify light, and the moon reflects sunlight. The result of looking at the moon through a telescope can range from being a little annoying, to being extremely painful depending on your telescope. Using a moon filter cuts that down to a more manageable level. Using a circular polarizing filter accomplishes that, and also filters out stray light at off angles making the image not only darker, but quite a bit clearer as well.
When looking at Mars, one of the difficult things is the fact that it looks mostly gray and picking out the differences in those grays can be hard. A red filter can help increase the contrast between those particular grays to help you pick out details you may not be able to see without one.
Choosing Budget Refractor Telescopes Conclusions
I like refractors, they are easy to use, easy to set up, require a minimum of cool-down time, never require collimation, and provide excellent views. Do they provide the best views in astronomy? Probably not, especially not at the beginner level. But considering the ease of use and maintainence, they are the most likely to actually get used and that accounts for a large part of getting into and enjoying the hobby.
Will you eventually get rid of refractors and go to reflectors? Some people absolutely do, some people don’t, and some people keep both types. When I go out to do visual or astrophotography my first, second, and third choices are refractors unless I am doing something very specific. I have a nice Dobsonian that hasn’t been outside in years. I just prefer my refractors and do you remember what I quoted in the beginning about using the telescope you like?