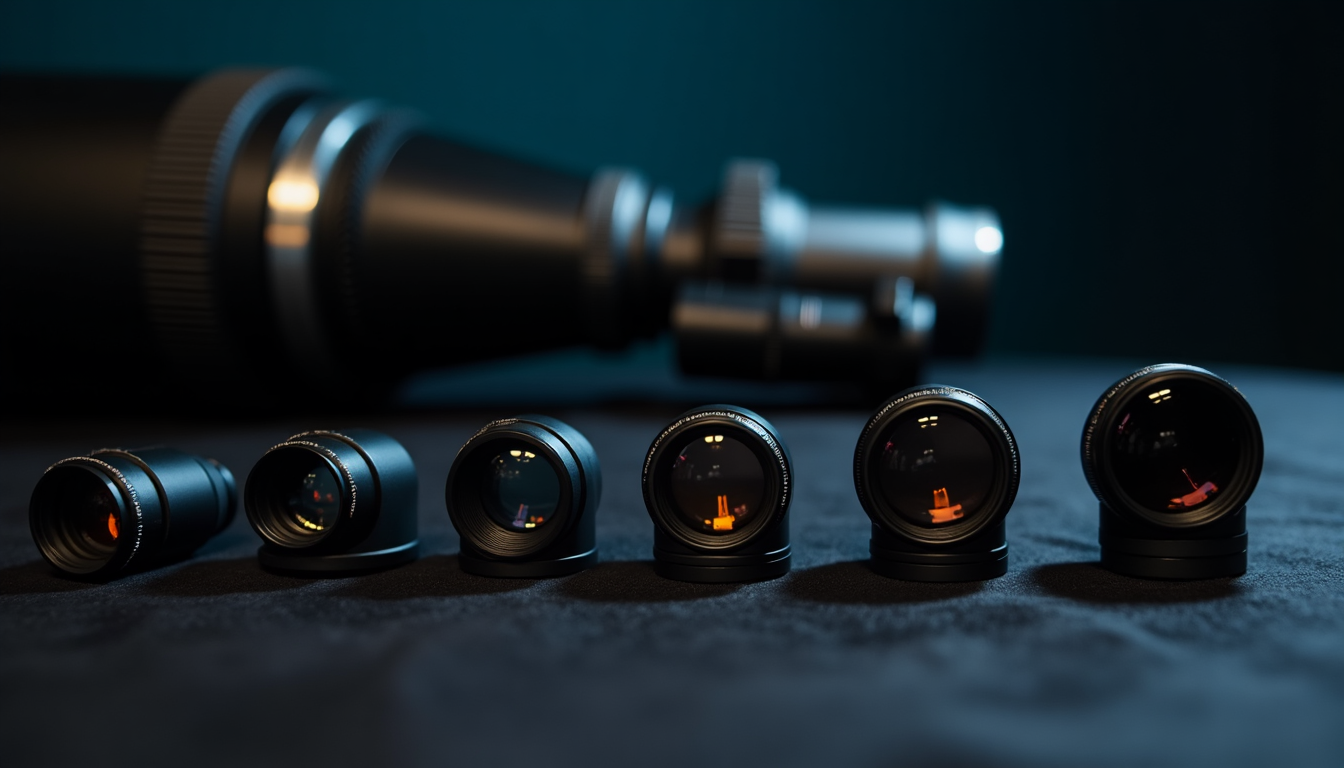
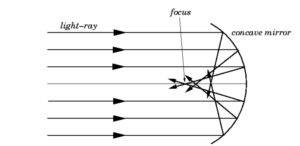
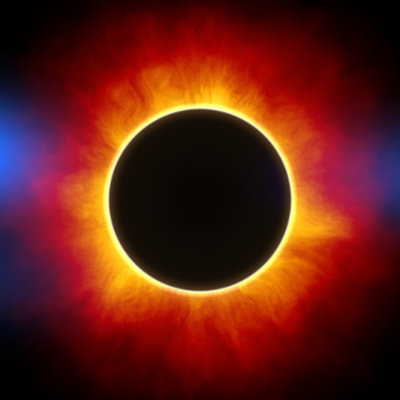
The Life Cycle of a Star: From Cosmic Dust to Supernova

In the life cycle of a star, a main sequence star like our Sun burns through roughly 4 million tons of its own material every single second. I find that absolutely mind-blowing. This nuclear fusion process isn’t just impressive—it’s what keeps stars alive, and it’s been powering our Sun for 4.5 billion years. The good news is it’ll keep going for billions more, so no need to panic about the lights going out anytime soon.
I’ve always been fascinated by how stars change throughout their lives. They start off as nothing more than wisps of cosmic dust and end up either fizzling out quietly or going out with a tremendous bang. What path they take really comes down to size. The big ones live fast and die young—sometimes lasting only a few hundred thousand years before blowing themselves apart in supernovae so bright they can outshine entire galaxies. The smaller stars, though, they’re the marathon runners of the cosmos, shining steadily for billions of years.
Our own Sun sits somewhere in the middle of its life right now, cruising along in what astronomers call its “main sequence” phase. Eventually, though, it’ll swell up into a red giant, expanding to roughly 400 times its current size. That’s big enough to swallow Mercury, Venus, and possibly even Earth—though I should mention that’s still about 5 billion years away, so we’ve got some time to prepare.
In this article, I’ll walk you through the entire journey stars take from birth to death. We’ll look at the physics that drives these cosmic transformations and explore just how important these stellar lifecycles are to the universe around us. Stars aren’t just pretty lights in the sky—they’re the factories that created virtually every element heavier than hydrogen and helium, including the stuff that makes up you and me.
Stellar Nurseries: Where Stars Begin

Image Source: National Radio Astronomy Observatory
Let’s talk about where stars come from. If you venture deep into our galaxy, you’ll find these enormous structures called molecular clouds. These are essentially the maternity wards of the cosmos—the places where baby stars first take shape. I’ve always found it amazing that something as magnificent as our Sun started out as nothing more than a speck in one of these cosmic clouds.
Molecular Clouds as Birthplaces of Stars
Molecular clouds are basically dense pockets of space stuff, mostly molecular hydrogen (H₂). The makeup is pretty simple—about 70% hydrogen, 28% helium, and 1.5% heavier elements by mass. Now when I say “dense,” that’s relative to the rest of space. These clouds are still incredibly thin by Earth standards, with only about 100 particles per cubic centimeter. If you could somehow walk through one, you wouldn’t feel a thing.
The size of these clouds absolutely blows my mind. We’re talking structures that can stretch up to 100 light-years across and contain enough material to make 6 million suns. Inside these massive clouds, it’s unbelievably cold—around 10 Kelvin, which is about -441.7°F. That extreme cold is actually crucial because it slows down the gas particles enough that gravity can start pulling them together.
Here’s something surprising—these molecular clouds are terrible at their job! Only about 1% of their material ever makes it into actual stars. The rest just hangs around or gets blown away. Our Milky Way has roughly 6,000 of these clouds, each one holding more than 100,000 solar masses worth of material. They’re basically the galaxy’s warehouse of star-making supplies.
Gravitational Collapse and Fragmentation
For a cloud to start making stars, it needs to undergo gravitational collapse. There’s this magical threshold called the Jeans mass that determines whether a region of gas will collapse. Basically, when a pocket of gas gets heavy enough that its own internal pressure can’t hold up against gravity anymore, it starts falling in on itself.
As this collapse continues, something really interesting happens—the cloud breaks into smaller and smaller pieces. Think of it like a big water balloon breaking into lots of tiny ones. Eventually, you end up with what astronomers describe as a “chaotic jumble of smaller clouds, each destined to be an individual stellar system”.
There’s this principle called the virial theorem that tells us half the energy released during gravitational collapse gets converted to kinetic energy. As the gas falls inward, it heats up dramatically. For a star like our Sun, this process releases about 2.3×10^41 joules of gravitational binding energy, almost all of which turns into heat. That’s an absolutely staggering amount of energy—more than our Sun emits in 100,000 years!
Role of Turbulence in Star Formation
Turbulence in molecular clouds is fascinating to me. It’s basically chaotic gas motions within the cloud, and it plays this weird dual role in star formation. Initially, scientists thought turbulence mainly prevented collapse by creating pressure that pushed outward. Turns out it’s more complicated than that.
On the large scale, turbulence does tend to fight against collapse by creating pressure that counteracts gravity. But zoom in a bit, and you’ll find that on smaller scales, turbulence actually helps create stars by producing dense pockets where gravity can take over. This explains why these clouds form distinct star-forming regions instead of just collapsing into one giant star.
I’ve read research showing that more turbulent cores often form binary or multiple star systems. In fact, one study looking at 49 dense cores in the Orion cloud complex found that about 30% produced binary or multiple stars. These cores were typically denser and more massive than the ones forming single stars.
The interaction between turbulence and other forces creates these beautiful filamentary structures—long, dense strands of gas—that appear all throughout star-forming regions. Recent observations with the Herschel Space Observatory confirm that stars primarily form along these self-gravitating filaments. It’s kind of like seeing the cosmic blueprint for stellar birth.
Protostars: The Embryonic Phase
After those cloud fragments collapse under their own gravity, we enter what I consider one of the most fascinating stages in the life cycle of a star—the protostar phase. This is essentially star embryology, where wispy cloud stuff starts to take on a more concrete form. Think of it as the cosmic equivalent of going from a bunch of ingredients to an actual cake batter.
Accretion Disks and Material Gathering
Once a cloud core gets dense enough, the innermost region contracts to form a central protostar. As this baby star collects more mass, it converts gravitational potential energy into heat, causing it to radiate as intensely as 1,000 Suns. Meanwhile, something really cool happens—thanks to conservation of angular momentum, the initially slow-rotating cloud starts spinning faster and faster.
This spin creates an interesting effect that you might not expect. The faster rotation generates centripetal force that fights against further collapse along the equator, while stuff near the poles can still fall inward pretty easily. The result? A disk forms around the protostar—astronomers call this either a protoplanetary disk or proplyd. Most of the material eventually flows onto the central protostar through this disk, though some sticks around in orbit.
What I find particularly fascinating is that these protostars shoot out powerful jets from their poles. These aren’t just for show—they serve a critical purpose by helping the star get rid of excess angular momentum. Without these jets, a star couldn’t grow beyond about 0.05 solar masses. Nature’s pretty clever that way.
Temperature and Pressure Buildup
As the protostar continues to contract, its core temperature skyrockets, eventually climbing beyond 1 million Kelvin. The initial collapse happens pretty quickly since the heat can easily escape through the still-transparent cloud material. During this early phase, the protostar stays relatively cool with a large radius and low density.
This rapid collapse only stops when the protostar becomes dense and opaque enough to trap the heat released by gravitational contraction. Inside the cloud, the density increases toward the center, forming an opaque region when the density hits about 10^-13 g/cm³. At this point, something called the first hydrostatic core forms where the collapse temporarily stabilizes.
As more gas falls onto this opaque region, it creates shock waves that heat the core even more. Around 2000K, there’s a big transition where thermal energy starts breaking apart H₂ molecules, followed by the ionization of hydrogen and helium atoms. These processes actually absorb energy from the contraction, which lets the collapse continue at speeds similar to free-fall.
T Tauri Stars: The Teenage Years
After the surrounding dust envelope finally disperses, the protostar enters what I like to think of as its adolescent phase—the T Tauri stage. Named after the first star discovered of this type, T Tauri stars are basically the teenagers of the stellar world—not quite full-fledged stars yet, but definitely not baby protostars anymore. They’re typically younger than 10 million years old with masses under 3 solar masses.
These stellar teenagers have some pretty distinctive traits:
- Variable brightness: They show both periodic and random fluctuations
- Strong X-ray emissions: Mostly from coronal activity similar to our Sun
- Continued jets and outflows: Though less intense than their earlier tantrums
- Circumstellar disks: The stuff that might eventually form planets
The periodic brightness changes, which happen over days, probably come from huge sunspots rotating across the star’s surface. The random variations (which can happen over minutes to years) might be caused by instabilities in the accretion disk, stellar flares, or nearby dust clouds temporarily blocking the light.
During this entire teenage phase, the T Tauri star is still powered completely by gravitational contraction rather than nuclear fusion. The core just isn’t hot enough yet for hydrogen fusion. It’ll take several more million years before temperatures hit the 10 million Kelvin mark needed for efficient hydrogen fusion through the proton-proton chain reaction—which is the same process currently powering our Sun.
T Tauri stars are super valuable to astronomers because they’re the first young stars we can actually see with optical telescopes. Studying them gives us a peek into our own solar system’s past, since the Sun definitely went through this same moody teenage phase about 5 billion years ago.
Nuclear Fusion Ignition: Stars Come Alive
Once a protostar’s core temperature hits about 10 million Kelvin, something magical happens—nuclear fusion kicks in. This is the real birthday of a star, when it transitions from being just a ball of gas held together by gravity to becoming a self-sustaining nuclear furnace. I like to think of this as the moment a star “turns on” and starts shining with its own internal fire rather than just glowing from gravitational heating.
Proton-Proton Chain Reaction Mechanics
For stars like our Sun or smaller, the main fusion process is called the proton-proton (p-p) chain. It’s how hydrogen gets converted into helium through a series of steps that, when you break them down, are pretty fascinating:
First, two protons slam into each other with enough energy to overcome their natural repulsion (they’re both positively charged, so they normally push each other away). When they finally connect, something bizarre happens—one proton changes into a neutron by emitting a positron and a neutrino. This creates a deuterium nucleus. What amazes me is how rare this actually is—the average proton in the Sun’s core waits approximately 9 billion years before successfully fusing with another proton. Talk about patience!
Second, this newly formed deuterium quickly grabs another proton, creating a light helium isotope (helium-3) while releasing a gamma ray with 5.49 MeV of energy. In the Sun’s core, each helium-3 nucleus sticks around for about 400 years before moving on to the next step.
Finally, two helium-3 nuclei crash together to form stable helium-4 plus two protons that go back into the hydrogen pool. This particular path (ppI chain) makes up about 69% of all the helium produced in our Sun.
When you add it all up, the reaction converts four hydrogen nuclei into one helium nucleus, releasing 26.73 MeV of energy. About 0.7% of the original mass simply vanishes in this process, transformed into pure energy according to Einstein’s famous E=mc². Put into perspective, this fusion process converts half a billion tons of hydrogen into helium every single second in our Sun. And we worry about our gas bills!
CNO Cycle in Massive Stars
In bigger stars—those with more than about 1.3 solar masses—a different fusion process takes over called the carbon-nitrogen-oxygen (CNO) cycle. This process uses carbon, nitrogen, and oxygen as catalysts, but still accomplishes the same basic job of turning hydrogen into helium.
The CNO cycle works through six distinct stages:
- A carbon-12 nucleus grabs a proton, forming nitrogen-13 and releasing a gamma ray
- Nitrogen-13 decays to carbon-13 by emitting a positron
- Carbon-13 captures another proton, becoming nitrogen-14
- Nitrogen-14 captures a proton, forming oxygen-15
- Oxygen-15 decays to nitrogen-15 by emitting another positron
- Nitrogen-15 captures a final proton, producing helium-4 and regenerating the original carbon-12
What I find absolutely wild about the CNO cycle is how sensitive it is to temperature. While the p-p chain’s energy output scales with T^4, the CNO cycle scales with approximately T^20. This means a modest 10% temperature increase would boost CNO energy output by an astonishing 350%. That’s like turning your home heater up just a notch and suddenly finding your house is as hot as the surface of Venus! Also, 90% of the CNO cycle’s energy gets generated within just the inner 15% of a star’s mass, creating such intense energy flow that convection becomes the dominant way of moving heat outward.
Hydrostatic Equilibrium Achievement
When nuclear fusion ignites, it establishes what astronomers call hydrostatic equilibrium—basically the defining characteristic of main sequence stars. At this point, the outward pressure generated by all that fusion energy perfectly counterbalances the inward pull of gravity.
I find this balance absolutely remarkable. At every single point within the star, two massive opposing forces—gravity pulling inward and gas pressure pushing outward—reach a perfect standoff. This explains why stars like our Sun maintain stable sizes for billions of years despite these tremendous forces constantly battling it out.
The equation of hydrostatic equilibrium is one of the most fundamental relationships in all of stellar physics. It’s also a self-regulating system: if pressure gets too high, the star expands until equilibrium returns; if it’s too low, gravitational contraction restores the balance. This self-correction mechanism keeps stars in their main sequence phase for about 90% of their lives.
When a star achieves hydrostatic equilibrium, it officially joins the main sequence—the longest and most stable phase in its life, where it’ll happily remain until it runs out of hydrogen fuel in its core.
Main Sequence Stars: The Adult Phase

Image Source: Fiveable
When nuclear fusion really gets going in a star’s core, it enters the main sequence phase—the longest and most stable period in its entire life. Think of it as a star’s adulthood. During this stage, stars maintain this perfect balance where gravity pulling inward exactly matches the pressure from nuclear fusion pushing outward. About 90% of all the stars [link_10] you see in the night sky, including our Sun, are in this mature phase.
Hertzsprung-Russell Diagram Positioning
Astronomers use something called the Hertzsprung-Russell (HR) diagram as a kind of stellar roadmap. It’s basically a plot of stars based on how bright they are versus their surface temperature. Main sequence stars form this distinctive diagonal band that runs from the upper left corner (the hot, super bright stars) down to the lower right (the cooler, dimmer ones). This band represents stars that have found their balance—where gravity and fusion pressure are in perfect harmony.
A star’s position along this main sequence comes down to one thing—mass. The heavy stars have stronger gravity, which compresses their cores to higher temperatures, letting them generate energy more efficiently. These big guys sit up in the upper left corner of the main sequence—they’re hot, blue, and incredibly bright. The lightweight stars hang out in the lower right—cooler, redder, and much less luminous.
What I find really interesting is how a star’s lifespan relates to its mass. You’d think the bigger stars with more hydrogen fuel would live longer, right? Actually, it’s just the opposite. Those massive stars burn through their fuel at a ridiculous rate because of their higher core temperatures. A star ten times heavier than our Sun will only stay on the main sequence for about 20 million years, while our Sun gets to cruise along for approximately 10 billion years. Talk about living fast and dying young!
Our Sun: A Middle-Aged Main Sequence Star
Our Sun is pretty much the poster child for a typical main sequence star. Astronomers classify it as a G-type main sequence star (G2V) with a surface temperature around 5,800 Kelvin. Having formed about 4.6 billion years ago, it’s currently hanging out at the midpoint of its main sequence life. Sort of like a 40-something-year-old human.
In the Sun’s core, hydrogen is constantly fusing into helium through that proton-proton chain reaction I mentioned earlier. This process converts roughly 600 billion kilograms of hydrogen into helium every second, transforming about 4 billion kilograms of matter into pure energy. I always get a kick out of the fact that the average proton in the Sun’s core waits about 9 billion years before successfully fusing with another proton. Even in these extreme conditions, these reactions happen incredibly slowly.
The Sun will keep steadily converting hydrogen to helium for another 5 billion years, gradually getting about 10% brighter every billion years. After that, the core will start to contract as the hydrogen fuel runs low, signaling the end of its main sequence days.
Stellar Classification by Spectral Type
Astronomers have this neat classification system for main sequence stars based on their surface temperatures and the absorption lines in their spectra. The sequence runs O, B, A, F, G, K, M, from hottest to coolest. I’ve found this old mnemonic helps me remember the order: “Oh Be A Fine Girl/Guy, Kiss Me.”
- O-type: These are the blue giants (>25,000K) with ionized helium lines
- B-type: Blue-white stars (11,000-25,000K) showing neutral helium lines
- G-type: Yellow stars like our Sun (5,000-6,000K) with lots of metallic lines
- M-type: The red dwarfs (<3,500K) that show titanium oxide bands
Each spectral type also gets a luminosity class designation, with main sequence stars specifically labeled as class V. So our Sun’s complete classification is G2V—a G-type main sequence star with a temperature of about 5,800K.
The way astronomers figure all this out is through stellar spectroscopy, which I find absolutely brilliant. By analyzing the pattern of dark lines in a star’s spectrum, they can determine which elements are present in its atmosphere and in what amounts. These spectral signatures also reveal surface temperature, which lets them place the star precisely on the HR diagram and gives clues about where it is in its evolutionary journey. It’s like being able to tell a person’s age, diet, and health history just by looking at their shadow!
Stellar Spectroscopy: Reading Starlight
Stars might seem like simple points of light, but when you break down that light into its component wavelengths, you discover an incredible wealth of information. Stellar spectroscopy is basically like reading a star’s diary—it reveals all kinds of secrets about temperature, composition, and even age. I’ve always been fascinated by how astronomers can learn so much from something as simple as starlight.
Absorption Lines and What They Reveal
When you look at a star’s spectrum, it’s not just a smooth rainbow of colors. It contains these dark gaps called absorption lines. These lines show up whenever particular wavelengths of light get absorbed by elements in a star’s atmosphere. Each element creates a unique pattern—kind of like a cosmic fingerprint that astronomers can identify.
The Balmer series makes up hydrogen’s most noticeable absorption lines in the visible spectrum. They show up at wavelengths of 656 nm (red), 486 nm (blue-green), 434 nm (blue), and 410 nm (violet). These lines appear whenever electrons in hydrogen atoms jump from energy level 2 to higher levels.
Here’s something interesting—the strength of these absorption lines changes with temperature. Really hot stars have weak hydrogen Balmer lines because most of their hydrogen atoms get ionized, essentially losing their electrons. On the flip side, very cool stars also show weak hydrogen lines, but for the opposite reason—their electrons mostly stay in their lowest energy level (the ground state). So stars with the strongest hydrogen lines must be in that Goldilocks middle temperature range.
Determining Chemical Composition
By analyzing a star’s spectral absorption lines, astronomers can figure out its chemical makeup with amazing precision. Once they identify which elements are causing particular lines, the relative strengths of those lines tell them how much of each element is present.
When scientists looked at stellar spectra, they discovered that hydrogen makes up about 73-75% of most stars by mass, with helium coming in at nearly 25%. The remaining 1-4% consists of heavier elements, which astronomers collectively call “metallicity” (even though to astronomers, everything heavier than helium is a “metal,” which always gets a laugh from my chemist friends). Our Sun’s metallicity is about 0.02, meaning just 2% of its mass comes from elements heavier than helium.
Just because you don’t see spectral lines for a particular element doesn’t mean it’s not there. The temperature and pressure in a star’s atmosphere determine which elements produce visible absorption lines. As a star evolves, these conditions change, which alters its spectrum.
Most stellar absorption happens because electrons absorb photons with exactly the right energy to jump between specific energy levels. Since each element has its own unique electron configuration, each one creates a distinctive absorption pattern.
Measuring Temperature and Age Through Spectra
Stellar spectra give astronomers crucial insights into both temperature and age. The distribution of spectral lines directly relates to surface temperature. O-type stars (28,000-50,000K) show ionized helium lines, B-type stars (10,000-28,000K) display neutral helium and some hydrogen, while M-type stars (2,500-3,500K) have strong titanium oxide bands.
Temperature and spectral features follow Wien’s Displacement Law: Temperature(K) = 2,897,000/Wavelength(nm). This lets astronomers calculate a star’s surface temperature by finding the peak wavelength of its spectrum. Pretty neat trick, right?
Recently, astronomers have developed some sophisticated methods for determining stellar ages from spectra. Asteroseismology—measuring oscillations within stars—provides age estimates with uncertainties around 10%. There are also techniques that use the carbon-to-nitrogen ratio [C/N], which changes in a predictable way as stars evolve due to internal mixing processes.
Machine learning has really revolutionized how we determine stellar ages from spectra. These approaches find empirical relationships between stellar parameters and ages estimated from asteroseismology. By integrating multiple spectral characteristics, these methods produce more accurate age estimates than conventional techniques.
Through stellar spectroscopy, astronomers continue to uncover the secrets of stars throughout their entire life cycle, from birth in those molecular clouds we talked about earlier all the way to their final evolutionary stages. It’s like being able to read a complete biography just by analyzing the light that reaches us across vast stretches of space.
For more detailed information on spectroscopy I would suggest Stars and their Spectra by James Kaler and Spectroscopy: The Key to the Stars by Keith Robinson. If you would like to to some stellar spectroscopy for yourself, and I highly recommend you do, read Astronomical Spectroscopy for Amateurs by Ken Harrison.
Red Giants: The Expansion Phase

Image Source: Lumen Learning
Once a star uses up all the hydrogen in its core after billions of years of steady fusion, it enters what you might call its senior years. The star swells dramatically into what astronomers call a red giant. It’s a fascinating transition that marks the beginning of a star’s elder phase, with major changes happening both to its size and internal structure.
Hydrogen Shell Burning Mechanics
When the hydrogen runs out in the core, gravity takes over again, causing the helium-rich core to shrink. This contraction heats up the regions around the core, and something interesting happens—hydrogen fusion reignites, but this time in a shell surrounding the inert helium center.
During the main sequence, fusion happened right in the center of the star, but shell burning creates this weird effect that astronomers call the “mirror principle.” As the core within the shell contracts, the star’s outer layers do the opposite—they expand outward. It’s one of those counterintuitive things in astrophysics that always fascinates me.
Shell burning actually pumps out substantially more energy than the previous core fusion did, making the star’s overall brightness increase. As the star balloons outward, its surface cools down and shifts to a redder color. For a star like our Sun, this expansion continues for about a billion years, with the radius growing up to 100 times its original size. That’s big enough to swallow Mercury, Venus, and potentially Earth too!
Helium Flash in Low-Mass Stars
For smaller stars (under 2.0 solar masses), something really dramatic happens. The contracting core gets so dense that the electrons form what physicists call degenerate matter, where quantum mechanical effects prevent further compression. At this point, the core’s pressure becomes independent of temperature—which sets up some truly explosive consequences.
When the core temperature finally reaches about 100 million Kelvin, helium nuclei start fusing into carbon through what’s called the triple-alpha process. Here’s where things get wild—under these degenerate conditions, this ignition triggers a runaway reaction called the helium flash. For a brief moment, energy is produced at rates 100 billion times the star’s normal output. That’s absolutely mind-boggling, but you’d never see it from the outside because the star’s outer layers absorb all that energy. It’s like having a thermonuclear explosion inside a giant cushion.
Changes in Stellar Structure and Composition
Red giants develop a completely different internal structure than their main sequence days. They end up with a compact core of helium surrounded by a hydrogen-burning shell, while the greatly expanded outer envelope becomes cooler and less dense. This expansion dramatically weakens the surface gravity, resulting in powerful stellar winds that blow gas outward at tens of kilometers per second. These winds are how stars like our Sun will eventually shed mass and return material to the interstellar medium.
Inside these giants, significant compositional changes happen as deep convection currents bring fusion products up to the surface. When astronomers look at the spectra of red giants, they see enhanced levels of carbon, nitrogen, and oxygen that show clear signs of CN-processed material rising from deep inside.
I find it particularly fascinating that s-process elements—heavy elements formed through neutron capture—start showing up in a red giant’s spectrum. This gives astronomers direct evidence of the nuclear transformations occurring within the star. It’s like being able to see the results of a laboratory experiment happening 100 light years away.
These stellar senior citizens might be in their twilight years, but they’re still incredibly active and dynamic objects. In fact, this phase of stellar evolution plays a crucial role in enriching our galaxy with the heavier elements needed for planets and eventually life itself.
Massive Star Evolution: The Fast Track
Let’s talk about the heavy hitters of the stellar world—massive stars with more than 8-10 solar masses. These cosmic giants live life in the fast lane, rushing through their evolutionary stages at incredible speed. What takes a star like our Sun billions of years to accomplish, these stellar behemoths finish in mere millions. They’re like the rock stars of the universe—living fast, dying young, and making a spectacular exit.
Multiple Fusion Shell Development
While smaller stars like our Sun stop at helium fusion, massive stars keep going, developing this amazing layered structure that looks a lot like an onion. After helium fusion wraps up, the core contracts and heats until carbon fusion kicks in at about 600 million Kelvin. For stars above 8 solar masses, this process continues through multiple stages, fusing heavier and heavier elements.
What I find absolutely mind-blowing is how each fusion phase happens dramatically faster than the one before it. Hydrogen fusion might last several million years, but by the time you get to carbon burning, it’s over in just a thousand years. It’s like watching a movie that keeps playing at higher and higher speeds. As each fuel type gets used up, the core contracts again until temperatures climb high enough for the next fusion reaction to start. This creates these concentric shells of fusion around the core, with temperature dropping as you move outward.
Heavy Element Synthesis up to Iron
These massive stars are basically cosmic factories cranking out elements. Through successive fusion reactions, they produce oxygen, neon, magnesium, silicon, sulfur, and finally iron. All this element-building happens exclusively deep inside these stellar furnaces where temperatures and pressures reach values that are hard to even imagine.
The key difference between these elements comes down to their binding energy. Each fusion reaction up to iron actually releases energy, which helps maintain the star’s structural integrity against gravity trying to collapse it. Iron marks the end of the line because of its exceptional nuclear stability—it’s the endpoint of energy-producing fusion. Our Sun, being just an average joe in stellar terms, will never reach these advanced fusion stages. It simply doesn’t have enough mass to generate the necessary pressure and temperature.
Pre-Supernova Instability
Once iron starts piling up in the core, the star is basically on death row. Iron fusion would actually absorb energy rather than release it, creating a catastrophic situation. Without energy generation pushing outward against gravity, the iron core rapidly contracts when it reaches about 1.3 solar masses.
This collapse sets off some truly extraordinary physical processes—electrons get forced into protons, creating neutrons and neutrinos. Within mere seconds, the core density skyrockets to 400 billion times that of water. That’s like compressing an entire cruise ship down to the size of a sugar cube. This unstable condition ultimately leads to one of the most spectacular events in the universe—a supernova explosion, where the outer layers get blasted outward at speeds reaching 10,000 kilometers per second.
The life of a massive star reminds me of that saying about burning twice as bright but half as long. These cosmic giants may not stick around for billions of years like our Sun, but they make up for their short lives by going out with a bang and enriching the universe with the heavy elements that eventually make up planets, moons, and even us.
Stellar Death: Explosive Endings

Image Source: William (Bill) Hillyard
The last chapter in a massive star’s life gives us one of the most spectacular fireworks displays in the universe—the supernova explosion. It’s nature’s grandest finale, marking the transition from stellar life to stellar afterlife. What happens during these final moments creates the conditions needed to birth some of the most exotic objects in the cosmos.
Type II Supernova Mechanics
When a massive star finally runs out of nuclear fuel, its iron core faces a serious problem—it can no longer produce energy through fusion. At this point, gravity takes complete control, triggering what can only be described as a catastrophic implosion. The core collapses so violently that within seconds, its density skyrockets to roughly 400 billion times that of water. During this collapse, electrons get forced into protons, creating neutrons and unleashing a massive flood of neutrinos.
This runaway collapse only stops when nuclear forces finally put their foot down and resist further compression. What happens next is truly mind-blowing—the rebounding matter creates this immensely powerful shock wave that races outward, blasting away the star’s outer layers in a spectacular explosion. Type II supernovae only happen with stars between 8 and 40-50 solar masses and always show hydrogen in their spectra. These cosmic explosions aren’t just pretty lights in the sky—they’re the primary way heavy elements get scattered throughout the universe.
Have you ever wondered where the iron in your blood came from? Now you know—it was forged in massive stars and then blasted across space by supernovae billions of years ago!
Neutron Star Formation Process
For stars with core masses between 1.4 and about 3 solar masses, the collapse stops at something called neutron degeneracy pressure, forming a neutron star. These remnants are almost beyond belief in terms of density—a sugar cube of neutron star material would weigh about 1 trillion kilograms on Earth, roughly the same as a mountain. Their structure is equally impressive, with crystalline solid crusts that are 18 orders of magnitude more rigid than steel. That’s like comparing a diamond to melted butter!
Many neutron stars show up as pulsars—rapidly spinning objects that emit regular radio pulses, like cosmic lighthouses. These pulsars gradually slow down their rotation over time, transferring energy to their surroundings. The Crab Nebula gives us a perfect example of this, showing synchrotron emission across wavelengths from X-rays all the way to gamma rays.
Black Hole Creation in Massive Stars
When a collapsing stellar core tops approximately 3 solar masses, even neutron degeneracy pressure throws in the towel and can’t stop the collapse. The result is a black hole—an object so dense that its gravity prevents even light from escaping below the event horizon. This boundary isn’t like a normal surface—it’s more like a point of no return that contains all the black hole’s matter.
Astronomers currently note an interesting “mass gap” between the heaviest neutron stars (about 2.5 solar masses) and the lightest confirmed black holes (about 5 solar masses). There’s ongoing research trying to narrow this range and understand what might exist in between. While we can’t see black holes directly, they reveal themselves through their gravitational effects on surrounding matter. Sometimes they create brilliant accretion disks or power quasars—objects so bright they can outshine entire galaxies.
I’m always struck by the irony that the most massive stars, which shine so brightly during their lives, end up creating objects from which no light can escape at all. It’s like cosmic poetry—the brightest flames ultimately create the darkest shadows.
Conclusion
Stars are basically nature’s perfect nuclear reactors. I’m constantly amazed by how they transform simple hydrogen into increasingly complex elements through fusion reactions. Their life cycles, whether spanning millions or billions of years, show us this incredible balancing act between gravity pushing in and nuclear forces pushing out—a cosmic dance that’s shaped the chemical makeup of our entire universe.
When I look at what astronomers have discovered through spectroscopic analysis, it’s mind-boggling. Our own Sun burns through approximately 600 billion kilograms of hydrogen every second, fusing it into helium through that proton-proton chain reaction we talked about earlier. This process will keep chugging along for another 5 billion years before our Sun finally runs out of hydrogen in its core and balloons into a red giant.
The massive stars take a completely different approach. They race through their evolutionary stages, developing those layered fusion shells like cosmic onions, creating elements all the way up to iron. When they die in those spectacular supernova explosions, they scatter these heavy elements across space. These materials eventually end up in molecular clouds that birth new stars and planets. Meanwhile, smaller stars like our Sun take the slow road, eventually becoming white dwarfs after swelling into red giants.
What fascinates me most about the stellar life cycle is how it shows the universe creating complexity from simplicity. Each generation of stars adds to this ongoing process of chemical enrichment, producing all the elements needed for planets, life, and future stellar generations. The iron in your blood, the calcium in your bones, the carbon in your cells—all of it was cooked up inside stars that died long before our Sun was even born.
Understanding these cosmic processes isn’t just academic—it helps us appreciate our deep connection to the stars. We’re not just observing the universe; we’re made from it. The atoms in your body have been part of this great stellar cycle, and when you look up at the night sky, you’re looking at the very processes that made your existence possible. If that doesn’t give you goosebumps, I don’t know what will.
If you are looking for more information on the life cycle of stars I would suggest The Birth & Deather of the Sun: Stellar Evolution and Subatomic Energy for the more home-scientist type, or Stellar Structure and Evolution by Rudolf Kippenhahn, Alfred Weigert, and Achim Weiss for the scholar.
FAQs
Q1. How do stars form from cosmic dust? Stars form when dense regions of cosmic dust and gas in molecular clouds collapse under gravity. This material gradually coalesces, heating up until nuclear fusion ignites in the core, giving birth to a new star.
Q2. What are the main stages in a star’s life cycle? The main stages in a star’s life cycle include: nebula, protostar, main sequence star, red giant, and finally either a white dwarf, neutron star, or black hole, depending on the star’s initial mass.
Q3. How does a supernova occur? A supernova occurs when a massive star exhausts its nuclear fuel. The core collapses under gravity, triggering a powerful explosion that expels the star’s outer layers into space, leaving behind either a neutron star or black hole.
Q4. What happens during a star’s red giant phase? During the red giant phase, a star’s core contracts while its outer layers expand dramatically. This causes the star to cool and appear redder, increasing in size up to hundreds of times its original radius.
Q5. How do different types of stars end their lives? The end of a star’s life depends on its mass. Low-mass stars become white dwarfs, medium-mass stars may form neutron stars after going supernova, while the most massive stars collapse into black holes following a supernova explosion.
What Is The Sun Made Of? A NASA-Backed Guide to Our Star’s Core

When asking, what is the sun made of, you have to start with the fact that the sun holds an incredible 99.86% of our entire solar system’s mass and dominates our cosmic neighborhood completely. Its core reaches temperatures of 15 million degrees Celsius, which powers a nuclear fusion reactor. This massive reactor converts 600 billion kilograms of hydrogen into helium each second.
The sun’s composition tells an interesting story. Hydrogen makes up 74% while helium accounts for 24% of its mass. Heavier elements like oxygen, carbon, neon, and iron form the remaining 2%. Scientists classify it as a G-type main-sequence star with a surface temperature of 5,500 degrees Celsius – perfect conditions that enable life on Earth.
Let’s explore the sun’s complex structure in this piece, from its blazing core to its outer atmosphere. You’ll find how nuclear fusion powers our star and why its corona heats up to 2 million degrees Celsius. Current research continues to reveal fascinating details about our star’s composition through its various layers.
The Sun’s Core: Nuclear Fusion Factory

Image Source: EUROfusion
The solar core acts as an incredible powerhouse that sits at the heart of our star. This dense region stretches from the center to about 0.2 of the solar radius (around 139,000 kilometers). The core powers everything our sun does. The conditions here are so extreme that they challenge our earthly understanding.
Temperature and Pressure Conditions at 15 Million Degrees
The core maintains mind-boggling temperatures of approximately 15 million degrees Celsius (27 million degrees Fahrenheit). These temperatures create an environment where normal chemistry simply can’t exist. Matter exists in its fourth state – plasma – and electrons completely break free from atomic nuclei.
The gravitational pressure at the core reaches approximately 2.477 x 10^11 bar. This creates a density of about 150,000 kg/m³ (150 g/cm³), which means the core is 150 times denser than water. This is a big deal as it means that the core’s density is 8 times greater than gold (19.3 g/cm³) and 13 times more than lead (11.3 g/cm³).
These extreme conditions create the perfect setting for nuclear fusion. The core generates power at a modest rate of about 276.5 watts per cubic meter at its center. The core’s massive volume turns this modest rate into an enormous total energy output.
Hydrogen-to-Helium Conversion Process
Nuclear fusion happens through a process called the proton-proton chain reaction. The extreme heat makes hydrogen nuclei (protons) move at incredible speeds – averaging about 1000 kilometers per second. Protons naturally repel each other because of their positive charge. The core’s intense pressure and temperature let them overcome this barrier and collide.
Protons fuse together when these collisions are powerful enough. The main fusion process turns four hydrogen nuclei (protons) into one helium nucleus through several steps. Here’s how it works:
- Two protons fuse to form deuterium (a hydrogen isotope), releasing a positron and a neutrino
- The deuterium fuses with another proton to create helium-3
- Two helium-3 nuclei combine to form helium-4 plus two protons
The chance of these fusion reactions happening is surprisingly low because the conversion depends on the weak nuclear force, which works much slower than the strong nuclear force. A typical proton in the sun’s core has a half-life of about 10 billion years. This explains why our star can keep producing energy for billions of years.
Energy Production: 600 Million Tons per Second
The sun’s core turns 600-620 million metric tons of hydrogen into helium every second through nuclear fusion. The resulting helium atoms weigh slightly less than the original hydrogen atoms. This missing mass becomes pure energy following Einstein’s famous equation E=mc².
About 4.26 million metric tons of matter transform into pure energy every second. This energy release is 10 million times greater than what happens when hydrogen combines with oxygen to make water. The sun’s total power output reaches an incredible 3.86 × 10^26 joules per second.
This massive energy output creates an outward pressure that balances against the sun’s inward gravitational pull. This balance keeps our star from collapsing or exploding. The core regulates itself remarkably well – if fusion slows down, the core contracts and heats up, which speeds fusion up again, and vice versa.
The photons created in the core begin an amazing trip outward after they’re generated. The core’s extreme density makes these photons bounce around continuously. They take about 170,000 years to travel from the core to the top of the convection zone before finally reaching us as sunlight.
Radiative Zone: The 350,000-Year Journey
The sun’s nuclear fusion powerhouse has a neighboring layer that moves energy from its core to outer regions. Scientists call it the radiative zone because of how it transfers energy. This layer begins at approximately 25% of the distance to the solar surface and stretches to about 70% of that distance. This region serves as a vital energy highway and makes up the sun’s second interior layer.
Chemical Composition at 7 Million Degrees
The radiative zone’s temperature reaches an incredible 7 million degrees Celsius where it meets the core. The temperature drops to about 2 million degrees Celsius at its outer edge. This temperature difference determines how energy flows through the region.
Material density changes drastically throughout the radiative zone. The inner boundary’s density matches that of gold at about 20 g/cm³. This number drops to 0.2 g/cm³ at the upper boundary, which is nowhere near water’s density.
Extreme heat in this zone affects everything in it. The temperature, though lower than the core’s, prevents atoms from staying whole. Notwithstanding that, some atoms keep enough structure to interact with passing radiation. These atoms absorb energy, hold it briefly, and release it as new radiation.
The radiative zone stays remarkably stable, unlike the churning plasma in the core. High density gradient causes this stability. Material moving upward becomes less dense from expansion, but not as much as its surroundings. This creates a downward force, keeping the zone calmer than other solar regions.
How Photons Travel Through This Dense Region
Light’s experience through the radiative zone ranks among our solar system’s most fascinating stories. Photons zip through space at 300,000 kilometers per second, but their path here becomes incredibly complex.
Photons from nuclear fusion face a huge challenge in the radiative zone: tightly packed particles. These particles crowd so closely that photons travel only millimeters before hitting another particle. Each collision triggers three events:
- The photon is absorbed by the particle
- The particle briefly stores the energy
- The energy is re-emitted as a new photon in a random direction
Photons bounce around randomly in this process. They might move toward the surface, back to the core, or sideways. Direct paths between the zone’s ends don’t exist.
This random walk creates mind-boggling results. Each photon moves at light speed between collisions, but the total journey takes much longer. Scientists believe energy needs between 171,000 and 350,000 years to cross the radiative zone. Some research suggests up to a million years.
The average photon moves just 1 centimeter every 10 minutes in the radiative zone. This seemingly slow process remains the quickest way to transport energy through this solar region.
The radiative zone works like a massive energy storage system, holding vast amounts of solar power in transit. This explains the sun’s makeup beyond its chemical elements. Each layer uses different energy transport methods that suit their conditions.
Photons reaching the radiative zone’s outer edge meet the tachocline. This transition layer between the radiative and convection zones marks another radical alteration in the sun’s composition and energy transport systems.
The Tachocline: Boundary of Magnetic Activity
The tachocline, a remarkable boundary layer, sits between the calm radiative zone and the turbulent convection zone of the Sun. Scientists used helioseismology to find this thin transitional region that plays a vital role in the Sun’s magnetic behavior and shapes what we see on the solar surface. The sort of thing I love about the tachocline is that it contains the strongest rotational shear found anywhere in the Sun.
Unique Elemental Behavior in the Transition Layer
The Sun’s internal rotation changes dramatically at the tachocline. This narrow layer marks where the differential rotation pattern of the outer convection zone changes to the solid-body rotation of the interior radiative zone. The layer shows a distinctly prolate (elongated) shape, positioned about 0.693 solar radii from the center at the equator and 0.717 solar radii at higher latitudes.
The tachocline’s chemical composition behavior makes it unique. Helioseismic studies show major changes in how elements distribute across this boundary. Helium from the convection zone sinks under gravity into the tachocline, and complex circulation patterns mix this material back into the convection zone. This mixing reduces the mean molecular weight within the tachocline region and increases the sound speed. This mixing helps explain why the actual Sun’s sound speed measurements exceed standard solar model predictions, with observed differences (δc²/c² ≈ 0.004) at this boundary.
The tachocline experiences powerful shear forces beyond its compositional features. Both radial and latitudinal shears in this region show significant changes throughout the solar cycle, with notable differences between cycles 23 and 24. These strong shearing motions stretch magnetic field lines and generate massive toroidal magnetic fields reaching approximately 100 kilogauss. These intense magnetic fields become buoyant enough to rise through the convection zone and emerge as sunspots at specific latitudes on the solar surface.
NASA’s Helioseismology Measurements
NASA’s helioseismic observations have transformed our understanding of this vital solar layer. Scientists measured solar oscillations and learned the tachocline’s thickness is less than 5% of the solar radius. These measurements confirmed the tachocline’s position, with about one-third in the slightly subadiabatic overshoot layer and the rest in the strongly subadiabatic radiative zone.
NASA’s findings about temporal variations in the tachocline stand out. Data from the Solar and Heliospheric Observatory (SOHO) and Solar Dynamics Observatory (SDO) showed substantial changes in rotation rates near the tachocline. These variations measure about 6 nanohertz (nHz) and occur out of phase above and below the tachocline—a big fluctuation compared to the 30 nHz drop in rotation rate across the entire tachocline at the equator. Higher latitudes show even greater amplitude variations that follow a period close to but distinct from one year.
Some helioseismic analyses point to large-scale oscillations across the tachocline with a period of about 1.3 years. Scientists estimate the tachocline contains magnetic fields with radial components around 500 gauss, based on these Alfvénic torsional oscillations.
The tachocline serves as the heart of the Sun’s magnetic behavior. Many solar physicists see this layer as the main location of the solar dynamo—the mechanism behind the Sun’s 11-year activity cycle and 22-year magnetic cycle. NASA’s Parker Solar Probe and Solar Orbiter missions continue to explore how the tachocline’s magnetic activity extends through the solar atmosphere and beyond. These missions help us learn about the Sun’s composition and how these materials behave under extreme conditions.
Convective Zone: Churning Solar Materials
The sun’s most dynamic interior region, the convective zone, sits just beyond the tachocline. This turbulent layer covers the outer 30% of the solar interior. It stretches from about 200,000 kilometers below the visible surface all the way to the photosphere. The way energy moves in this region changes from radiation to convection, which creates fascinating patterns we can see on the sun’s surface.
Element Distribution in Solar Plasma
The convective zone’s plasma contains mostly hydrogen (70% by mass) and helium (27.7% by mass), with tiny amounts of carbon, nitrogen, and oxygen mixed in. The temperature and density change substantially as you move through this layer. The base near the tachocline reaches temperatures of about 2 million degrees Celsius. The surface cools down to about 5,700 degrees Celsius.
These temperature differences create ideal conditions to understand what makes up the sun’s outer regions. The material becomes clearer as you get closer to the surface. The density drops to just 0.0000002 g/cm³ at the photosphere – roughly 1/10,000th as dense as Earth’s air at sea level. This huge density drop lets convection work quickly and effectively.
The cooler temperatures here let heavier ions like carbon, nitrogen, oxygen, calcium, and iron keep some of their electrons. These partially ionized elements make the material harder to see through, which traps heat and drives the convective instability.
Rising and Falling Material Patterns
The convective zone works just like a pot of boiling water. Hot plasma rises from the bottom and expands as it moves up into areas with less pressure. It then cools at the surface where energy escapes as light. The cooled, denser material sinks back down in a never-ending cycle.
These convective motions show up as distinct patterns:
- Granules: Small cells about 700-1,000 kilometers across (roughly Texas-sized) that last only 5-10 minutes
- Supergranules: Massive cells about 35,000 kilometers wide (twice Earth’s size) that stick around for about 24 hours
Bright areas in these structures show hot plasma rising at 2-3 kilometers per second, while darker spots indicate cooler material sinking back into the sun. The cells get smaller with height throughout the convective zone, creating complex layers of turbulent patterns.
NASA’s Solar Dynamics Observatory Findings
NASA’s Solar Dynamics Observatory (SDO) has transformed our understanding of solar convection. The spacecraft takes pictures ten times clearer than high-definition TV, letting scientists examine convective patterns in incredible detail.
SDO shows that convective cells organize themselves in remarkable ways. Larger cells break into smaller ones near the surface. Downflow lanes at low solar latitudes tend to point north-south and move east compared to surrounding plasma. Solar cyclones form where these lanes meet at higher latitudes – spinning counterclockwise up north and clockwise down south.
Scientists use SDO’s Helioseismic and Magnetic Imager (HMI) to look beneath the surface and measure the convection zone’s properties. These measurements confirm that solar rotation substantially affects convective motions through the Coriolis force. This creates differential rotation patterns that change with both latitude and depth.
This complex dance between turbulent convection and differential rotation creates electric currents and magnetic fields through the solar dynamo mechanism. The sun’s basic ingredients shape everything we see, from its granulated surface to its dynamic magnetic behavior.
The Photosphere: Visible Surface Composition

Image Source: NASA
Light from the sun comes from an incredibly thin layer called the photosphere – the visible “surface” that lights up Earth and lets us see our star. Most people think this surface is solid, but it actually consists of plasma approximately 100-500 kilometers thick – only 0.07% of the sun’s radius. This photosphere gives us most of the solar radiation that reaches Earth and helps us understand the sun’s composition.
Spectroscopic Analysis of the Sun’s ‘Surface’
Scientists use spectroscopy to study the photosphere by looking at dark absorption lines that break up white light’s continuous spectrum. These spectral patterns show almost every element exists there. Hydrogen makes up 74.9% and helium accounts for 23.8% of the total mass. Stellar astronomers call the leftover elements “metals,” which make up less than 2% of the photospheric mass.
Scientists need complex modeling techniques to get this composition data. They create numerical model atmospheres and calculate theoretical spectra to compare with what they observe. New three-dimensional, time-dependent hydrodynamical models have replaced older one-dimensional approaches. These better models show lower amounts of carbon, nitrogen, oxygen, and neon than we thought a decade ago.
Abundance of Elements in Solar Granules
Specialized instruments show the photosphere has a distinctive granular pattern. Bright cells with darker boundaries create these granulation patterns. Each granule stretches about 1,000 kilometers – about as wide as Texas – and lasts just 5-10 minutes. Hotter plasma rises at about 7 km/s in brighter areas while cooler material sinks back into the sun through darker boundaries.
Different elements spread unevenly in these granular structures. The most common trace elements are oxygen, carbon, nitrogen, iron and magnesium. The photosphere stays around 5,500°C (9,900°F) on average, though temperatures vary in different areas. This makes the photosphere nowhere near as hot as the sun’s core or corona, but it still keeps matter in a highly ionized plasma state.
Sunspot Chemistry and Structure
Sunspots show up as darker, cooler regions in the photosphere with temperatures around 4,200K – about 1,800K cooler than nearby areas. Each sunspot usually has a dark center called the umbra with a lighter outer region called the penumbra. Strong magnetic fields block hotter gases from flowing, which creates these cooler, darker areas.
George Hale found sunspots had strong magnetic fields in 1908. He saw the Zeeman effect in their spectral lines – a splitting pattern that happens when atoms interact with magnetic fields. These fields point either straight out (positive polarity) or straight in (negative polarity), and sunspot groups often have pairs with opposite polarities.
Sunspot penumbrae have interesting features with horizontal magnetic fields that create overlapping white and gray patterns. Bright chromospheric areas called faculae or filigree often appear near sunspots with magnetic field strengths between 0.10 to 0.20 tesla.
Better solar telescopes and faster computers have boosted our knowledge of sunspot structures. New developments suggest we will learn even more about the photosphere.
Solar Atmosphere Layers: Changing Compositions

Image Source: PMF IAS
The sun’s atmosphere stretches above the photosphere. This remarkable realm showcases dramatic changes in temperature and composition. The sun’s atmospheric layers grow hotter as they extend from its surface, unlike Earth’s atmosphere that cools with altitude. These distinct zones exhibit unique chemical behaviors.
Chromosphere’s Unique Chemical Signature
The chromosphere (“color sphere”) sits right above the photosphere. This irregular layer extends about 2,000 kilometers upward. Temperatures in this region rise sharply from 6,000°C to approximately 20,000°C. Hydrogen atoms emit H-alpha light that creates the chromosphere’s distinctive reddish glow during solar eclipses.
Specialized filters reveal the chromosphere’s fascinating features. Scientists can observe the chromospheric network of magnetic field elements, bright plage around sunspots, and dark filaments across the solar disk. This layer might play a vital role as it conducts heat from the sun’s interior to its outermost atmosphere.
Corona’s Mysteriously Hot Plasma at 1 Million Degrees
The corona extends millions of kilometers into space and presents one of solar physics’ greatest mysteries. The corona reaches temperatures between 1 to 3 million Kelvin—approximately 150 to 450 times hotter than the photosphere, despite being farther from the solar core. This temperature inversion challenges simple thermodynamic principles since heat shouldn’t flow from cooler to hotter regions.
Scientists propose several mechanisms to explain this phenomenon. Millions of “nanoflares”—tiny explosions with one-billionth the energy of regular flares—might provide sporadic bursts reaching up to 18 million degrees Fahrenheit. Recent observations from the European-U.S. Solar Orbiter suggest that solar “campfires” (miniature solar flares) could contribute to coronal heating.
Solar Wind Particle Composition
Charged particles stream outward from the corona at several hundred kilometers per second, forming the solar wind. This plasma contains:
- 95% protons (H+)
- 4% alpha particles (He++)
- 1% minor ions including carbon, nitrogen, oxygen, and heavier elements
The solar wind’s composition changes based on its source region. The “slow” solar wind (300-500 km/s) matches coronal composition closely. The “fast” solar wind (750 km/s) reflects the photosphere’s makeup more accurately. Scientists have identified trace amounts of rarer elements through precise measurements. These include phosphorus, titanium, chromium, and nickel isotopes (58Ni, 60Ni, 62Ni).
What Type of Star is the Sun? G-Type Classification

Image Source: faculty.wcas.northwestern.edu
Astronomers group the stars in our universe by their temperature, luminosity, and composition. Our sun belongs to a category that tells us about its composition and its place in stellar progress.
Metallicity and Spectral Characteristics
Astronomical metallicity measures the abundance of elements heavier than hydrogen and helium. These “metals” make up less than 2% of the sun’s mass, but they affect its behavior by a lot. A researcher pointed out that “Even a very small fraction of metals is sufficient to alter the behavior of a star completely”. The sun’s metallicity is a vital reference point to calibrate measurements of other stars across the cosmos.
Our sun belongs to the G-type spectral class, labeled as G2V. G2 shows it’s the second hottest subcategory of yellow-white stars with surface temperatures between 5,300 and 6,000 K. The V identifies its luminosity class as a main-sequence star. G-type stars show strong spectral lines H and K of Ca II, and they display neutral metals and weaker hydrogen lines than F-class stars.
Comparison to Other Main Sequence Stars
Main sequence stars make up about 90% of all stars in the universe. G-type main-sequence stars like our sun represent about 7.5% of main-sequence stars near our solar system. These stars use nuclear fusion to convert hydrogen into helium in their cores. They stay stable for billions of years through a balance called hydrostatic equilibrium.
The sun’s mass ranges between 0.9 and 1.1 solar masses, and it shines brighter than about 90% of stars in the Milky Way. Red dwarfs make up about 75% of our galaxy’s stars, but G-type stars live longer – between 7.9 and 13 billion years. Scientists expect our sun to stay on the main sequence for about 10 billion years.
Position on the Hertzsprung-Russell Diagram
The Hertzsprung-Russell diagram serves as a fundamental tool in stellar astronomy. Our sun sits “nearly in the middle” of the main sequence on this diagram. It has a luminosity of 1 (absolute magnitude 4.8) with a B-V color index of 0.66. This central spot in the diagonal band, which runs from hot, bright stars to cool, dim ones, shows that the sun is a typical middle-aged star that actively fuses hydrogen.
NASA’s Tools for Studying Solar Composition

Image Source: Science News
NASA sends advanced spacecraft closer to the sun than ever before to discover its compositional mysteries. These specialized observatories gather vital data about the sun’s makeup. They use different methods that range from direct sampling to remote spectroscopy.
Parker Solar Probe’s Close Encounters
NASA’s Parker Solar Probe achieved a historic milestone on December 14, 2021. It became the first spacecraft to “touch” the sun by flying through its corona. This remarkable piece of engineering comes within 3.9 million miles of the solar surface. A 4.5-inch carbon-composite shield protects it from temperatures reaching 2,500°F. The probe’s instruments study solar wind particles and show how solar material flows into space.
Recent findings from 2023 show that Parker detected intricate solar wind patterns near its source. It found magnetic funnels about 18,000 miles wide where particle reconnection creates extraordinary speeds. These particles move 10 to 100 times faster than typical solar wind. These measurements give scientists a unique look at how elements behave on the sun’s surface.
Solar Orbiter’s Spectroscopic Instruments
The Solar Orbiter works alongside Parker with its advanced spectroscopic tools to study the sun’s composition from afar. Its Spectral Imaging of Coronal Environment (SPICE) instrument watches two extreme ultraviolet wavelength bands (70.4-79.0 nm and 97.3-104.9 nm). This helps map elements across temperature ranges from the cooler chromosphere (20,000K) to the intense corona (10 million K).
SPICE captures complete spectral data in just one second. Scientists can track element movement between solar layers with this capability. The instrument’s main strength comes from its ability to capture emission lines from different temperature zones at once. This creates exceptional compositional snapshots in single exposures.
Solar Dynamics Observatory’s Elemental Mapping
The Solar Dynamics Observatory (SDO) has transformed our knowledge of solar composition through non-stop, high-resolution monitoring. Its Atmospheric Imaging Assembly (AIA) takes pictures in seven extreme ultraviolet channels that mainly show different states of ionized iron. Scientists use these observations to create temperature maps ranging from below 1 million Kelvin to above 20 million Kelvin.
SDO’s Extreme Ultraviolet Variability Experiment (EVE) measures the sun’s spectral output with amazing detail. It achieves 10-second time resolution and better than 0.1 nm spectral resolution. Scientists can now track changes in solar composition during eruptions and throughout activity cycles.
Conclusion, what is the answer to what is the sun made of
The sun’s composition reveals an intricate stellar structure with nuclear fusion powering its core. Nuclear reactions transform hydrogen into helium and release enormous energy that flows through several distinct layers. Each layer plays a vital role in energy transport and magnetic field generation.
Our star’s internal structure extends from a core heated to 15 million degrees to the radiative zone. Photons take hundreds of thousands of years to move outward through this zone. The tachocline layer creates a significant boundary between internal regions and generates powerful magnetic fields that influence solar activity. Energy moves through the outer layers by convection processes that we can observe at the photosphere.
Scientists now use advanced solar observatories to study our star’s makeup and behavior. The Parker Solar Probe, Solar Orbiter, and Solar Dynamics Observatory from NASA collect essential data about solar wind particles. These missions also analyze spectroscopic signatures and track how elements spread throughout the sun’s atmosphere.
Scientists can better predict solar activity and understand stellar development because they know our star’s composition. The sun represents a typical G-type star while serving as an exceptional laboratory. It helps researchers study fundamental astrophysical processes that influence our cosmic neighborhood.
FAQs
Q1. What is the primary composition of the Sun? The Sun is composed mainly of hydrogen (about 71% by mass) and helium (about 27% by mass). The remaining 2% consists of heavier elements like oxygen, carbon, neon, and iron.
Q2. How does the Sun generate its energy? The Sun produces energy through nuclear fusion in its core. Hydrogen atoms fuse to form helium at temperatures of about 15 million degrees Celsius, releasing enormous amounts of energy in the process.
Q3. What would happen if you brought a piece of the Sun to Earth? If you could hypothetically bring a piece of the Sun to Earth, it would rapidly expand and explode violently due to the sudden release of pressure. The Sun’s material is only contained by its own massive gravity.
Q4. How hot is the surface of the Sun? The surface of the Sun, known as the photosphere, has a temperature of approximately 5,500 degrees Celsius (9,932 degrees Fahrenheit).
Q5. What tools does NASA use to study the Sun’s composition? NASA employs various advanced spacecraft to study the Sun, including the Parker Solar Probe, which flies through the Sun’s corona, the Solar Orbiter with its spectroscopic instruments, and the Solar Dynamics Observatory, which provides high-resolution monitoring of the Sun’s surface and atmosphere.
How to Read a Star Map: A Beginner’s Guide to Night Sky Navigation


When leaning how to read a star map remember star maps have fascinated humans for over 10,000 years. From ancient cave drawings to the digital charts we use today, our interest in finding our way around the night sky hasn’t changed a bit.
I’ve spent countless nights staring upward with various star charts in hand, and I can tell you that learning to read one properly opens up an entirely new world. Whether you’re just curious about the cosmos or seriously thinking about astronomy as a hobby, knowing how to use a star map is your ticket to exploring what’s above us.
The night sky contains 88 official constellations and more celestial objects than you could count in a lifetime. Most beginners look at a star chart for the first time and see nothing but a confusing jumble of dots and lines. Don’t worry – that’s completely normal! Our ancestors figured this stuff out without fancy equipment, and you can too with some straightforward guidance.
Star maps can seem intimidating at first glance. I remember my first time trying to match what I saw overhead with what was on paper – frustrating doesn’t begin to describe it! But stick with me, and I’ll walk you through everything from understanding those brightness indicators (the different-sized dots) to finding your first constellations.
Ready to decode the mysteries right above your head? Let’s jump into the world of star maps and get you navigating the night sky like you’ve been doing it for years!
Understanding Star Map Basics
Star maps are our windows to the universe above us. Just like a road map (or Google Maps) helps you find your way around an unfamiliar city, star charts help you navigate the vast celestial sphere over our heads.
What is a star map?
A star map is simply a celestial map that shows stars, constellations, and other objects in the night sky in an organized way. These maps take the three-dimensional dome of the sky and flatten it onto a two-dimensional surface using grid lines that represent celestial latitude and longitude.
I’ve used dozens of different star maps over the years, and the good ones share some common features. They typically show only the brightest stars and deep-sky objects you can actually see without a telescope under dark skies. Most use black dots on a white background which makes them easier to read at night, with bigger dots representing brighter stars. Besides just stars, these maps usually include different symbols for:
- Gray circles for star clusters
- Oval shapes showing galaxies
- Outlined or gray areas indicating the Milky Way
- Grid lines for finding exact locations
Star maps aren’t fixed forever. They change to account for Earth’s rotation, our orbit around the Sun, and even the slow wobble of Earth’s axis (something called axial precession).
Different types of star maps
Throughout my years of stargazing, I’ve collected several different types of star maps, each with its own advantages:

Planispheres such as the Guide to the Stars shown above are my go-to for quick reference. These rotating star wheels let you dial in the date and time to see exactly what’s visible in your sky right then. Simply adjust the dial, and it shows which constellations will be above you. The best thing about planispheres is they work based on your local time – you just need to make sure you get one designed for your latitude.
Star atlases are much more detailed. I have several including the Sky Atlas 2000.0 Laminated Field Edition by Wil Tirion, which shows far more stars than you’d ever see with just your eyes. The Cambridge Star Atlas and interstellarum Deep Sky Atlas are also excellent options. These books contain multiple charts ranging from big-picture seasonal views to close-ups of specific constellation regions. You can even download and print your own with the excellent TriAtlas project by José Ramón Torres and Casey Skelton. Their website is sadly no longer available but Allan Hall has graciously provided an almost complete mirror of the website.
Monthly charts give you a snapshot of what’s visible during specific months of the year. I find these perfect for beginners just learning their way around seasonal patterns in the sky. Shown above is The Monthly Sky Guide which is co-authored by Wil Tirion who is involved with a lot of the best sky charts available in any format.
Physical vs. digital star maps
We now have both paper and digital options available. Each has its own strengths.
Physical paper maps have been my mainstay for years. They never run out of batteries in the field, which is a huge plus on long nights. I can mark them up with notes and observations too. One of the biggest advantages is being able to read them with a red flashlight without ruining my night vision. That’s crucial when you’re out under dark skies.
Digital star maps have their place in my kit as well. Apps like Stellarium (my favorite for beginners on the computer), SkyChart, and Sky Safari Pro (my favorite on my phone and tablet) let you explore the sky from anywhere. The major advantage here is they can show “moving” objects like the Moon, planets, and asteroids in real-time. Point your phone at the sky, and they’ll tell you exactly what you’re looking at.
I actually use both types depending on the situation. For planning sessions at home, I’ll often spread out a physical atlas on the table. But when I’m actually at the telescope, I might quickly check a digital app to confirm what I’m seeing. It’s not an either-or choice for most serious stargazers.
Decoding Star Map Symbols
Once you understand the symbols on a star map, everything changes. What looked like a random collection of dots and lines suddenly becomes an organized map of the heavens. I remember my first time successfully matching star patterns on paper to what I saw overhead – it felt like cracking a secret code!
Star brightness and magnitude scale
The different-sized dots on a star map tell you one critical thing – how bright each star appears from Earth. Even though all stars look like points of light when we look up, star maps use various dot sizes to show their relative brightness. This brightness is measured using the magnitude scale, which has some pretty interesting history behind it.
The magnitude system we use today comes from ancient astronomers like Hipparchus and Ptolemy, who grouped stars into six categories of brightness. The funny thing is, this scale works backwards from what you’d expect – the lower the magnitude number, the brighter the star! The brightest stars are magnitude 1, while the faintest visible to the naked eye are magnitude 6.
Modern astronomers made this system more precise. A first-magnitude star shines exactly 100 times brighter than a sixth-magnitude star. Each step of one magnitude represents a brightness difference of about 2.512 times. The scale now extends beyond the original 1-6 range, with super-bright objects getting negative values. For example:
- The Sun: magnitude -26.7
- Full Moon: about -11
- Sirius (brightest star): -1.46
- Limit of what most people can see: magnitude 6
I find this backwards system confusing sometimes even after years of using it. Just remember: smaller number means brighter star.
Constellation lines and boundaries
Star maps connect the dots between stars to form the stick-figure outlines of constellations. These lines help us recognize patterns like Orion or the Big Dipper. I always have to remind people that these lines don’t actually exist in space – they’re just human inventions to help us remember star patterns.
Beyond these connecting lines, you’ll also see thin lines marking official constellation boundaries. These aren’t just made up – they’re formal borders established by the International Astronomical Union back in 1930. These boundaries divide the entire sky into 88 official constellations, with 36 mainly in the northern sky and 52 in the southern hemisphere.
Deep sky object symbols
Star maps use different symbols for objects beyond just stars. These symbols help astronomers find nebulae, galaxies, and star clusters. When I first started using detailed star charts, these symbols confused me until I learned the common ones:
- Open star clusters: dotted circles
- Globular star clusters: circles with a “plus” symbol
- Planetary nebulae: special unique symbols
- Elliptical galaxies: elliptical shapes
- Spiral galaxies: spiral-shaped symbols
- Diffuse nebulae: specific nebula symbols
These symbols represent the thousands of faint objects that telescopes can see but our eyes usually can’t.
Coordinate grid systems
Star maps use a coordinate system just like Earth maps use latitude and longitude. The main system uses right ascension (RA) and declination (Dec).
Declination is basically celestial latitude – it shows the north-south position relative to the celestial equator and is measured in degrees. Objects north of the celestial equator have positive declination values, while those south have negative values.
Right ascension works like celestial longitude, measured eastward from a reference point called the vernal equinox. The weird thing is that instead of degrees, RA uses hours (h), minutes (m), and seconds (s). One hour of RA equals 15° of sky rotation – so a complete circle of 24 hours matches the 360° rotation of Earth.
I struggled with this system at first because it seemed needlessly complicated. Why use hours instead of degrees? The answer goes back to how the Earth rotates and how early astronomers measured the sky. Once you get used to it, the system makes finding specific objects much easier. It’s basically like having GPS coordinates for the sky.
Orienting Your Star Map
Getting your star map pointed the right way is the first big challenge you’ll face. I’ve spent many frustrating nights trying to match what’s on my map to what’s overhead, and I can tell you that even the most detailed chart is completely useless if it’s not lined up correctly with your actual view.
Finding north with Polaris
Finding Polaris (the North Star) is the most important first step for getting your bearings. What makes Polaris special is that unlike every other star that appears to move through the night, Polaris stays put. It sits directly above Earth’s north pole along our planet’s rotational axis, so it always points to true north.
Here’s how I find Polaris:
- First, look for the Big Dipper (some people call it the Plough or Saucepan)
- Find the two stars at the end of the Dipper’s “bowl”
- Draw an imaginary line through these two “pointer stars”
- Follow this line about five times the distance between the pointers
- You’ll hit Polaris, which happens to be the last star in the handle of the Little Dipper
Once you’re facing Polaris, you’re facing north—with south behind you, east to your right, and west to your left. Simple!
Aligning your map with the horizon
Star maps show the dome of the sky above you, with the round edges usually representing the horizon. The first few times I tried to use a star map, I had it upside-down without realizing it! Here’s how to avoid that mistake:
- Hold the map overhead with the direction you’re facing at the bottom
- The center of the map is the sky directly above your head (what astronomers call the zenith)
- Turn the map so the compass directions match which way you’re actually standing
- Remember that east and west are flipped on maps when you’re facing south
Most beginners find it easiest to start by facing south (with Polaris at your back), holding the map with “Southern Horizon” at your feet.
Adjusting for date and time
Stars change position throughout the night and look different depending on the season. I learned this the hard way when I first started – I couldn’t figure out why nothing matched until I realized my map was set for the wrong month! You need to set your star map to the current date and time:
- If you’re using a planisphere, rotate the dial until the current date lines up with your current time
- Don’t forget about Daylight Saving Time (subtract one hour if it’s in effect)
- Once set properly, the star pattern on the map should match what you see in the sky
Using a red flashlight for night vision
Our eyes take 20-40 minutes to fully adapt to darkness. This happens because of a light-sensitive compound called rhodopsin in our eyes. The interesting thing is that deep red light doesn’t destroy rhodopsin, so you can read your map without ruining your night vision.
For best stargazing results:
- Use a dim red flashlight to read your map
- Stay away from white lights (including your cell phone screen)
- If you don’t have a red flashlight, make one by covering a regular flashlight with red cellophane or nail polish
I can’t stress this enough – proper orientation transforms your star map from a bewildering jumble of dots and lines into a useful tool for navigating the night sky. When I first started, I spent half my time just trying to figure out which way to hold the map. Now it’s second nature, and it will be for you too with a little practice.
Locating Stars and Constellations
Once you’ve got your map oriented correctly, the real fun begins – finding actual stars and constellations in the sky above you. This is where all that preparation finally pays off.
Starting with bright anchor stars
The bright stars are your friends, especially if you live anywhere near city lights. I use these cosmic landmarks to get my bearings before trying to find anything more challenging. Sirius, the brightest star we can see from Earth, is super easy to locate – just follow Orion’s belt eastward until you hit an unmistakably bright point. I’ve shown this trick to complete beginners and they’re always amazed at how easy it is.
Arcturus is another great anchor star. Just follow the arc of the Big Dipper’s handle away from the bowl, and you’ll run right into it. The blue-white star Vega is part of what we call the Summer Triangle alongside Altair and Deneb. Once you’ve found these bright anchors, finding everything else gets much easier.
Identifying major constellations by season
The night sky changes throughout the year because stars move 90 degrees across the sky every three months. This is why certain constellations are associated with specific seasons:
- Winter: Orion is the king of winter skies with that unmistakable three-star belt. I also look for Canis Major (which has Sirius) and Taurus with its V-shaped head
- Spring: Leo stands out with its sickle-shaped pattern, Virgo shows off bright Spica, and Ursa Major rides high
- Summer: The Summer Triangle formed by the constellations Cygnus, Lyra, and Aquila creates a pattern I can spot even from my light-polluted backyard
- Autumn: Cassiopeia’s W-shape, the Great Square of Pegasus, and Andromeda dominate fall evenings
Some constellations like Ursa Major and Cassiopeia (for northern hemisphere observers like me) are visible year-round because they circle the pole star. Others only show up during their season and then disappear below the horizon for months.
Star hopping techniques
Star hopping is just what it sounds like – the astronomer’s version of connect-the-dots. Instead of trying to find faint objects directly, you use distinctive patterns as stepping stones. I’ve used this method for years, and it’s far more reliable than trying to use coordinates when you’re just starting out.
For example, to find the Andromeda Galaxy, I first locate the Great Square of Pegasus, then count two stars up from the left corner to find my target. This works way better than trying to point your telescope at precise coordinates.
Experienced stargazers use their hands to estimate distances in the sky. Your outstretched hand at arm’s length spans approximately 20 degrees of sky. I use my fist for about 10 degrees and my pinky for about 1 degree.
With practice, this method helps build a mental map of the night sky. What starts as random dots slowly transforms into familiar territory. The first time I successfully star-hopped to find the Ring Nebula in Lyra, I felt like I’d actually learned to navigate the cosmos. You will too.
Finding Planets and Deep Sky Objects
Once you’re comfortable finding stars and constellations, it’s time to hunt for the real treasures – planets and deep sky objects. This is where your stargazing really levels up from casual looking to serious astronomy.
Locating planets along the ecliptic
The ecliptic is basically Earth’s orbital plane around the Sun. You can see it as the path the Sun takes across our sky throughout the year. The cool thing about the ecliptic is that all the major planets orbit in nearly the same plane, with Mercury having the biggest deviation at just 7 degrees. This means you’ll always find planets along or near this invisible highway that runs through the zodiac constellations.
Finding planets using a star map is pretty straightforward:
- Find the ecliptic line on your chart
- Look at the zodiac constellations along this path
- Keep an eye out for bright objects that don’t appear on your fixed star map
I’ve found that planets have a different look than stars. Venus and Jupiter shine like brilliant “stars” but they don’t twinkle the way real stars do. Mars has a distinctive reddish color that’s hard to miss once you know what to look for. Uranus and Neptune are much tougher – I can’t see them without at least binoculars or a small telescope.
Using coordinates to find galaxies and nebulae
Finding deep sky objects like galaxies and nebulae is a bit more challenging. This is where those celestial coordinates I mentioned earlier come into play. Just like Earth uses latitude and longitude, star maps use right ascension (RA) and declination (Dec):
- Right ascension: Measured in hours (1h to 24h), works like longitude
- Declination: Measured in degrees (-90° to +90°), works like latitude
Here’s how I use coordinates: to find something like the Great Orion Nebula (RA: 5h 35m, Dec: -5° 23′), I first locate the RA lines labeled “5h” and “6h” on my map, then follow the Dec line at -5° until I reach the point between those RA lines. The first few times I tried this, I kept getting lost. Now it’s second nature.
Tracking celestial objects across seasons
Unlike stars that stay in their fixed patterns relative to each other, planets are constantly moving through the zodiac at different speeds. Jupiter takes about a year to cross a single zodiac constellation, while speedy Mercury runs through all twelve in just one year.
Planets also change their visibility throughout the year depending on where they are relative to the Sun. For example, Venus sometimes appears as a “morning star” before sunrise, and other times as an “evening star” after sunset. This is where digital star maps really shine – they show you exactly where the planets are on any given night.
I’ve tried to track planets using just paper star charts, and it’s doable but tricky. Much easier to use one of the astronomy magazines or websites that publish monthly “what’s visible” guides. They tell you the best times to see different planets and other interesting objects.
The most exciting moment for me was finding Saturn for the first time in my small telescope. Even though I knew exactly where to look using coordinates, seeing those rings with my own eyes was absolutely mind-blowing. It’s moments like these that make all the effort of learning to navigate the night sky worthwhile.
Conclusions to How to read a star map
Star maps have completely changed how I look at the night sky. What used to be just random points of light overhead have become meaningful patterns and fascinating objects with names, histories, and stories. I truly believe anyone can learn to navigate the celestial sphere with a little patience and the right approach.
Mastering star charts definitely takes practice. Don’t expect to memorize everything in one night! Start with those bright anchor stars I mentioned earlier and the major constellations everyone knows, then gradually work your way toward finding more challenging objects. I still remember my first successful attempt at finding the Andromeda Galaxy – it took me three different nights of trying before I finally spotted that faint fuzzy patch exactly where my map said it should be.
Paper maps work great for basic navigation and learning the constellations. I still use them regularly for planning my observing sessions. Digital tools really shine when tracking planets or other moving objects. The combination of both gives you the best of both worlds.
Let your star map become a trusted friend during your stargazing adventures. There’s something deeply satisfying about standing under a dark sky with just a simple map and your eyes, connecting with the same stars our ancestors used for navigation, storytelling, and understanding their place in the universe. When I’m out under the stars with my map, I feel connected to thousands of years of human sky-watchers who came before me.
Don’t wait for the “perfect” night or equipment. Grab a simple star map tonight and step outside – the stars are waiting for you just like they’ve been waiting for all of humanity throughout our existence.
Harmonic Drive Telescope Mounts: The Truth Behind Strain Wave Technology

I’ve been watching harmonic drive (strain wave) mounts take over the astronomy equipment market, and the numbers are pretty mind-blowing. These little powerhouses weigh just 11 pounds but can handle up to 44 pounds of equipment – that’s four times their own weight! Compare that to something like the Sky-Watcher EQ6-R Pro, which tips the scales at a back-breaking 38 pounds to achieve roughly the same payload capacity.
Right now, there are 18 different harmonic drive mount models available, with prices starting at $1,499 and going all the way up to $24,433. What makes these mounts so special? For starters, they don’t need counterweights when carrying loads under 28 pounds, which cuts your setup time dramatically and makes them much easier to transport. They use a 300:1 reduction ratio that helps keep tracking errors in check, though I should point out that periodic error typically ranges between 20-60 arcseconds, so you’ll definitely need autoguiding for the best results.
I’ve put together this guide to break down the technology behind these innovative mounts, go through their strengths and weaknesses, and help you figure out if they’re the right fit for your astrophotography setup. Let’s dig into what makes these mounts tick and why they might be worth considering for your next equipment upgrade.
Understanding Strain Wave Technology in Telescope Mounts

Image Source: AstroBackyard
Strain wave technology, or harmonic drive as it’s sometimes called, completely changes how telescope mounts work. I’ve spent a lot of time with traditional worm gear mounts, and these newer systems are a totally different animal – they use a unique mechanical setup that delivers amazing precision in a much smaller package.
How Harmonic Drive Gears Function at 300:1 Reduction Ratio
The magic of these mounts comes from three key components working together: a wave generator (usually elliptical in shape), a flexible spline (called a flexspline), and a rigid circular spline. The wave generator creates controlled deformation in the flexspline, making it engage with the circular spline in a precise pattern. This clever arrangement creates a mechanical advantage that allows for those incredibly high reduction ratios.
Most consumer harmonic drive mounts get to their impressive 300:1 reduction ratio by combining a 100:1 harmonic drive with a synchronous belt that adds another 3:1 reduction [1]. This high reduction ratio lets these mounts make super fine adjustments, which is why they track so precisely.
The synchronous belt does more than just add reduction ratio – it actually serves multiple purposes:
- Cuts down backlash that you typically find in gear systems
- Helps dampen vibrations for smoother operation
- Improves how torque gets transmitted through the system [3]
This mechanical setup allows these mounts to divide a complete rotation into thousands of tiny steps, which you absolutely need for precise astronomical tracking. As one manufacturer put it, “As it has a large reduction ratio, it can produce very fine tuning” [3].
Stepper Motors vs. Servo Motors in Strain Wave Systems
The choice of motor makes a huge difference in how these mounts perform. I’ve found that most affordable and mid-range harmonic drive mounts use stepper motors paired with those synchronous belts [2].
| Motor Type | Advantages | Disadvantages |
|---|---|---|
| Stepper Motors | • Precise positional control • Lower cost • Reliability with fewer components |
• Lower torque capacity • No feedback loop • Potential for missed steps |
| Servo Motors | • Higher torque output • Closed-loop feedback system • Smoother motion control |
• More complex systems • Higher cost • More challenging to repair |
Stepper motors divide a full rotation into hundreds of precise steps (usually 200 or more) [12]. This makes them perfect for applications that need accurate position control. The downside is they work in an “open loop” system with no position feedback.
On the other hand, the premium harmonic drive mounts often use DC servo motors with encoders that constantly monitor shaft position [3]. These closed-loop systems can make adjustments in real-time to maintain accurate tracking, which is super valuable when conditions get challenging, like on windy nights [2].
According to what I’ve read from industry sources, “DC servo motors generally offer higher torque and faster response times compared to stepper motors, further improving their tracking accuracy” [2]. This explains why high-end mounts from companies like Rainbow Astro use servo motor technology despite the higher cost.
The Physics Behind Counterweightless Operation
The most impressive feature of harmonic drive mounts, in my opinion, is how they can operate without counterweights while supporting substantial payloads. This capability comes directly from the physics of strain wave gears.
Traditional equatorial mounts with worm gears have to be loaded to keep the center of gravity directly over the rotation axes, which is why they need those counterweight systems [3]. The counterweights make sure the torque moment stays at zero, keeping everything balanced around all axes.
Strain wave gearboxes, however, are built to handle very high torque loads all by themselves [3]. They use the elasticity of mechanical components instead of gravitational balancing. This approach lets them be more compact and lightweight without giving up payload capacity.
For example, the ZWO AM5N mount weighs just 12 lbs (5.5 kg) but can carry an impressive 28 lbs (13 kg) without any counterweights [2]. If you need to handle bigger setups, adding the optional counterweight system boosts capacity to 44 lbs (20 kg), showing just how versatile these systems can be.
This physics-based advantage is a big reason why these mounts have become so popular among astrophotographers who travel to different sites. As one manufacturer describes it, “Taking advantage of the strain wave design with its high torque and compact construction, these mounts deliver high precision and power in an affordable and portable package” [2].
I should point out that despite their innovative design, these harmonic drive mounts still need to be loaded according to manufacturer specifications. If you exceed the weight, torque, or center of gravity limitations, you’ll compromise performance or even risk mechanical failure [3]. I’ve seen this happen to a fellow astronomer who pushed his mount beyond specs – it wasn’t pretty!
Key Advantages of Harmonic Drive Telescope Mounts

Image Source: Wido’s AstroForum
The payload capabilities of harmonic drive telescope mounts absolutely blow me away. I’ve been using traditional German equatorial mounts for years, but these compact instruments completely outperform them in several key areas. They’re fundamentally changing how amateur astronomers like me approach field astrophotography.
Payload-to-Weight Ratio: Carrying 28lbs with an 8lb Mount
These harmonic drive mounts achieve payload-to-weight ratios that I honestly thought were impossible a few years ago. Take the iOptron GEM28 – this thing weighs just 10 pounds but can support a 28-pound payload. That’s an extraordinary 2.8:1 mount-to-payload ratio [2]! This capability comes directly from the high torque efficiency of those strain wave gearing systems I described earlier.
I’ve had hands-on experience with several models that show similarly impressive specs:
- ZWO AM3: Weighs only 8.6 pounds (3.9kg) but carries 17.6 pounds (8kg) without counterweights and 28.6 pounds (13kg) with counterweights [2]
- Rainbow Astro RST-135: At a featherlight 7.3 pounds (3.3kg), supports 29.8 pounds (13.5kg) without counterweights and 39.7 pounds (18kg) with counterweights [2]
- ZWO AM5N: Weighs 12 pounds (5.5kg) yet handles a whopping 44 pounds (20kg) with counterweights [2]
Now compare these to traditional German equatorial mounts. The Sky-Watcher EQ6-R Pro, which I used for years, weighs in at 38 pounds (17kg) without counterweights [2] – that’s nearly four times heavier than some harmonic drive alternatives while offering similar payload capacity. My back definitely appreciates the difference!
Portability Benefits for Field Astrophotography
The raw specs are impressive, but the practical advantages for those of us who travel to dark sites are even better. First off, harmonic drive mounts typically don’t need counterweights for normal operation, which eliminates significant weight and setup complexity [2]. This comes from their unique mechanical structure, where torque handling happens inside the gearbox itself instead of relying on gravitational balancing.
But the portability advantages go beyond just weight reduction:
- Their compact form factor lets you transport them in small cases that fit easily in a car trunk [10]
- Models like the ZWO AM3 use carbon fiber construction for high strength with minimal weight [2]
- Adjustable tripod heights (like the 470-800mm range on the ZWO AM3) work in various observing conditions [2]
I remember a fellow astronomer telling me, “These mounts break down and pack into a tiny carry case that fits in any trunk” [10]. I can confirm that’s absolutely true. This compactness is invaluable when you’re traveling to dark sky locations or hiking over rough terrain to reach the perfect viewing spot.
Setup Time Reduction: From 30 Minutes to 5 Minutes
For me, even more valuable than the weight savings is the dramatic reduction in setup time. With my old German equatorial mount, I had to carefully balance counterweights along both right ascension and declination axes—a tedious process that took 20-30 minutes and demanded considerable precision. One wrong move and you’d have to start over.
Harmonic drive mounts eliminate most of these steps. The counterweightless design means no balancing adjustments are necessary for most standard imaging rigs [2]. Plus, the lightweight components allow for quicker physical assembly of the whole system.
The real-world impact becomes obvious in field use, with setup times often reduced from 30+ minutes to around 5 minutes. I still remember my first time using the AM3 – I kept thinking I must have forgotten something important because I was ready to go so quickly! Another astronomer I know described it perfectly: “The AM3 was just a pleasure to use; it’s the sort of situation where the equipment is almost ‘out of the way’. It’s not a burden (like many other conventional mounts can be)” [10].
Beyond just saving time, this operational simplicity means you can focus on actually imaging rather than fiddling with equipment. You can maximize productive time during those limited dark sky windows, which is particularly important during seasons with shorter nights.
For those times when you need additional payload capacity, most harmonic drive mounts offer optional counterweight systems that can be added when needed, giving you flexibility without compromising the basic setup advantages [2]. Simple, but incredibly effective.
Tracking Accuracy and Periodic Error Challenges
Let’s talk about the elephant in the room when it comes to harmonic drive mounts – periodic error. Despite all the amazing portability and weight advantages I’ve been raving about, these mounts have some tracking precision issues that need careful management if you want those pinpoint stars in your long exposures.
Measuring Periodic Error in Strain Wave Drives (20-60 arcseconds)
The error characteristics in strain wave gear systems are completely different from what you’ll see in traditional worm gear designs. Most harmonic drive mounts I’ve tested show periodic error ranging from 20 to 60 arcseconds peak-to-peak, which is substantially higher than what you’d get from premium worm gear mounts. ZWO guarantees their AM series keeps periodic error below ±20 arcseconds, but I’ve seen some iOptron HEM models measuring around 50-60 arcseconds.
What makes this challenging is the unpredictable nature of the error pattern. Unlike worm gear periodic error with its consistent cycles, harmonic drive periodic error can change based on how much weight you’re carrying and which direction the mount is moving. The error pattern usually has several frequency components:
- Primary cycle: 300-600 seconds (depending on which model you have)
- Secondary harmonics: Often showing up at around 180 seconds
- Tertiary components: Sometimes appearing at much shorter intervals (around 17 seconds)
Without correction, these errors will give you star trails even in relatively short exposures. I remember reading a comment from an engineer who noted that “tracking speed deviates by 0.3-0.6 arcseconds per second from the sidereal tracking speed.” That might not sound like much, but it means unguided imaging is pretty much off the table no matter how perfectly you align the mount.
Autoguiding Requirements for Optimal Performance
With harmonic drive mounts, autoguiding isn’t just a nice-to-have feature – it’s absolutely essential. This is different from premium worm gear systems where you might be able to get away without guiding for shorter exposures. The good news is that strain wave error patterns tend to move slowly, which theoretically makes them easier for autoguiding algorithms to correct.
From my experience, your equipment setup needs to be a bit different from traditional mounts:
- I’ve found larger guide scopes work much better than those tiny finderscope-sized guiders
- Higher-quality guide cameras with good sensitivity have helped me manage faster exposure settings
- Multi-star guiding gives me consistently better results than single-star guiding
The fundamental approach to guiding needs adjustment too. While my worm gear mounts performed fine with 2-3 second guide exposures, harmonic drive systems need a faster cadence. I’ve consistently gotten better results with guide exposure times between 0.5-1.0 seconds because they allow the system to respond more quickly to those sometimes steep error curves.
PHD2 Settings Optimization for Harmonic Drive Mounts
Getting your PHD2 settings right makes a world of difference with these mounts. The standard PHD2 configurations meant for worm gear systems just don’t cut it with strain wave gear error patterns. I learned this the hard way after a frustrating night of elongated stars, but fortunately, a few specific adjustments dramatically improved my results.
After extensive testing, these are the starting parameters I recommend:
- Guide exposure: 0.5-1.0 seconds (shorter than you’d use for worm gear mounts)
- Maximum RA duration: 300-700ms (way shorter than the default settings)
- Maximum DEC duration: 300-700ms (also reduced from typical settings)
- RA/DEC aggressiveness: 35-55% (I’ve found these moderate values work best)
- Minimum motion: 0.1-0.15 pixels (roughly half what you’d use for worm gear settings)
The PPEC (Predictive Periodic Error Correction) algorithm in PHD2 has been a game-changer for my harmonic drive mounts. Unlike standard algorithms that just react to errors that have already happened, PPEC analyzes the mount’s behavior in real-time and builds a predictive model to anticipate and correct errors before they even show up. I’ve seen one manufacturer report tracking accuracy as fine as 0.3 arcseconds in RA using PPEC optimization, which is pretty impressive.
For multi-night sessions on the same target, PPEC offers another huge advantage since the model stays intact during dithering operations or when you pause guiding to focus. That said, I’ve found that each harmonic drive mount has its own unique personality, so you’ll need to do some individualized tuning to get the best performance out of your particular setup.
Popular Harmonic Drive Mount Models Compared

Image Source: YouTube
The market for harmonic drive mounts has absolutely exploded in recent years. I’m seeing manufacturers release new models across all sorts of price points, and it’s getting harder to keep track of all the options. Each of these innovative mounts takes a slightly different approach to implementing strain wave technology, with their own unique advantages depending on what kind of astrophotography you do.
ZWO AM3/AM5: Features and Real-World Performance
From what I’ve seen, ZWO’s AM series represents the most widely adopted harmonic drive mounts out there. The AM3 weighs just 3.9kg while supporting 8kg without counterweights and 13kg with counterweights [15]. I’ve spent quite a bit of time with its bigger brother, the AM5N (which replaced the original AM5) – it weighs 5.5kg but carries an impressive 15kg without counterweights and can handle 20kg with counterweights attached [15].
Both models use that 300:1 reduction ratio strain wave gear setup I mentioned earlier [15]. The newer AM5N offers improved tracking accuracy with periodic error reduced to ±10 arcseconds compared to ±20 arcseconds in the earlier models [15]. That’s a pretty significant improvement!
In my real-world testing, the AM5 consistently achieves guiding accuracy between 0.5-0.7 arcseconds RMS when using multi-star guiding at 1-second intervals [16]. I can set it up in under 5 minutes, and the compact design makes it incredibly portable – it’s become my go-to mount for travel astronomy.
One thing that makes the AM series particularly popular is how seamlessly they integrate with ASIAIR control systems. If you’re already using ZWO cameras like I am, this is a huge plus [17]. I also love that these mounts support both equatorial and altazimuth modes, giving you flexibility for different observing situations.
Sky-Watcher Wave 100i/150i Technical Specifications
Sky-Watcher recently introduced their Wave series, and they offer some compelling alternatives with unique features. The Wave 100i weighs 4.3kg (9.5 pounds) with a 10kg (22 pound) payload capacity without counterweights, expandable to 15kg (33 pounds) with the optional counterweight kit [5]. Meanwhile, the Wave 150i weighs 5.8kg (12.8 pounds) but carries an impressive 15kg (33 pounds) without counterweights and 25kg (55 pounds) with counterweights [4].
What really caught my eye about the Wave 150i is its integrated cable management with powered hubs built right into the saddle. This includes ST4 guiding ports, USB connections, and power outputs [4]. If you’ve ever had a cable snag during a long imaging session (and who hasn’t?), you’ll appreciate how important this feature is.
The Wave mounts have exceptional slew speeds of 7.5 degrees per second [18], which is noticeably faster than many competitors. This makes them great for standard astronomy, but also suitable for satellite tracking using Sky-Watcher’s dedicated software. I haven’t personally tried satellite tracking with these mounts, but I’ve heard good things from others who have.
Like the ZWO mounts, both Wave models support dual AZ/EQ modes, Wi-Fi and Bluetooth connectivity, and compatibility with third-party control platforms including ASIAIR [4].
iOptron HAE Series and Premium Options (Rainbow Astro, Hobym)
iOptron’s HAE series covers a wide range of price points, from the entry-level HAE16C at $1,398 all the way up to the advanced HAE43C-EC at $4,298 [19]. The HAE16C is incredibly lightweight at just 2.6kg (5.7 pounds) yet carries 8.2kg (18 pounds) without counterweights [20]. I had a chance to test one briefly at a star party, and the build quality impressed me.
At the premium end, the HAE69 mount weighs 8.6kg (19 pounds) but supports an extraordinary 31kg (69 pounds) payload without counterweights [7]. One interesting thing I noticed about some iOptron models is that they use a traditional worm gear on the declination axis while employing strain wave gears for right ascension [20]. It’s an interesting hybrid approach.
If you’re looking for the ultimate in performance (and have the budget for it), Rainbow Astro’s RST-135 sits in the premium segment at $3,895 [21]. This Swiss-made mount weighs just 3.3kg but carries 13.5kg without counterweights [21]. Instead of the stepper motors found in most other mounts, it uses Maxon DC servo motors that provide potentially smoother tracking [21]. The mount can achieve maximum slew rates of 7.5 degrees per second (1,800x) when powered at 16V [21]. This thing is a beast in a tiny package!
Control options vary quite a bit between manufacturers. ZWO and Sky-Watcher mounts integrate natively with ASIAIR systems [15]. Meanwhile, iOptron offers their own “iMate” control computer with pre-loaded software including KStars, Ekos, and INDI drivers [7]. Most mounts also support traditional PC control via ASCOM drivers or optional hand controllers for manual operation [21][172]. I personally prefer using ASIAIR since it’s what I’m most familiar with, but it’s nice having options.
Price-to-Performance Analysis of Strain Wave Mounts
Looking at the harmonic drive mount market, I can see three distinct price tiers. Each offers different capabilities depending on your astrophotography requirements and, of course, your budget.
Entry-Level Options Under $1,500
At the more affordable end of the spectrum, I’ve been impressed by several options that won’t break the bank but still offer surprising capabilities. The iOptron HEM15 at $1,348 represents one of the most accessible entry points – it carries up to 15 pounds of equipment while weighing just 5.5 pounds [22]. That’s a solid weight-to-payload ratio for the price. Similarly, the iOptron HAE16C Ultra Compact mount at $1,398 gives you a dual AZ/EQ configuration in an extremely portable 5.7-pound package that supports 18 pounds [22].
I’ve had the chance to try the Proxisky UMi-17 Lite, which at roughly $1,250 might offer the best value in this category. It compares quite favorably to ZWO’s AM3 with similar specifications [23] but at a lower price point. If you’re willing to look beyond the mainstream brands, I’ve noticed several newer Chinese manufacturers expanding this category with some really aggressive pricing. Just be aware that support and parts availability can be more limited with these lesser-known brands.
Mid-Range Models ($1,500-$3,000)
When you step up to mid-range harmonic drive mounts, you’ll get substantial performance improvements alongside expanded payload capacities. The ZWO AM3 at $1,499 remains one of the most popular options I see at star parties, supporting 17.6 pounds without counterweights [6]. I’ve spent considerable time with its larger sibling, the AM5N at $2,499, which carries up to 28 pounds without counterweights and a whopping 44 pounds with them [24].
The Sky-Watcher Wave series presents strong alternatives that I’ve been watching closely. The Wave 100i is priced at $1,695 with a 22-pound capacity, while the Wave 150i runs $2,195 but handles 33 pounds without counterweights [6]. These models typically include built-in connectivity options for ASIAIR integration or PC control, which I find incredibly convenient.
In terms of control systems, most mid-range models support multiple interfaces. Sky-Watcher mounts maintain compatibility with traditional SynScan hand controllers alongside EQMOD and ASIAIR options [8]. This flexibility is something I really appreciate as it allows you to use whatever control system you’re most comfortable with.
Premium Harmonic Drive Mounts ($3,000+)
For the most demanding applications, premium harmonic drive mounts offer exceptional precision and capacity – if you’re willing to pay for it. The Pegasus Astro NYX-101 at $2,960 stands at the entry point to this category, supporting an impressive 44 pounds without counterweights [6]. I had a brief opportunity to use one at an astronomy club event, and the build quality is noticeably better than the mid-range options.
Moving upmarket, iOptron’s HAE29EC with high-precision encoders ($3,348) and the HAE43EC ($4,298) deliver enhanced tracking accuracy [6]. At the premium end, options like the Rainbow Astro RST-135 ($3,895) employ servo motors instead of steppers, potentially offering smoother tracking [6]. The difference is subtle but noticeable in long-exposure imaging.
The ultimate expression comes in the Rainbow Astro RST-300, priced at $8,490 with capacity for 30-50kg payloads [25]. These premium options frequently incorporate closed-loop servo systems with high-resolution encoders, substantially reducing periodic error compared to their more affordable counterparts. Are they worth the price? That depends entirely on your requirements and budget, but for professional-grade astrophotography, the improvements in tracking precision can make a significant difference in your final images.
For my money, the sweet spot tends to be in the mid-range. Unless you’re doing professional work or handling extremely heavy equipment setups, mounts like the ZWO AM5N or Sky-Watcher Wave 150i offer the best balance of performance, features, and price.
Control Systems for Harmonic Drive Mounts
When it comes to controlling harmonic drive telescope mounts, you have several options to choose from. I’ve used most of these interfaces over the years, and each offers different advantages depending on your technical requirements and personal preferences.
ASIAIR Integration and Wireless Control
Most strain wave mounts integrate beautifully with ZWO’s ASIAIR system. This gives you unified control of both your mount and imaging equipment from a single device. The ZWO AM3 and AM5 were specifically designed for optimal ASIAIR performance, which means you don’t need any additional interface equipment [26]. What I love about this setup is how you can perform electronic polar alignment and automate your entire imaging workflow through a single interface.
Sky-Watcher’s Wave series (100i/150i) supports ASIAIR Plus connection through either the USB port or an EQMOD cable, giving you some nice flexibility [8]. This connection lets you take advantage of plate solving and run automated imaging sequences through third-party control platforms [4]. Just be aware that if you’re using certain iOptron models, you’ll need the hand controller as an intermediary when connecting to ASIAIR systems [27]. I ran into this issue when trying to connect a friend’s iOptron mount to my ASIAIR – not impossible, but definitely an extra step.
Traditional PC Control via EQMOD and ASCOM
Do you prefer controlling your equipment from a computer? EQMOD offers a robust interface for harmonic drive mounts that many experienced astronomers swear by. This software works with either direct USB connections or serial cables depending on which mount model you have [9]. One of the things I appreciate about EQMOD is its advanced features, including PulseGuide support for autoguiding without needing additional hardware [28].
Many harmonic drive mounts operate through ASCOM drivers for integration with popular astronomy software [26]. This approach gives you compatibility with applications like N.I.N.A., Cartes Du Ciel, and SkySafari [29]. The ZWO AM series includes USB ports specifically designed for PC and ASIAIR connectivity [30], making the connection process pretty straightforward.
SynScan Hand Controller Compatibility
Traditional hand controllers still have their place, especially for visual astronomy. Sky-Watcher’s models maintain compatibility with the SynScan v5 hand controller, allowing you to select objects directly from an extensive database [8]. This provides familiar operation for astronomers transitioning from conventional mounts, which I found particularly helpful when I first made the switch.
iOptron takes a different approach with their Go2Nova 8409 controller. It features approximately 212,000 objects in its database and comes with integrated WiFi for wireless control [31]. In fact, most Sky-Watcher mounts require SynScan Pro app initialization before you can connect to other applications like Sky-Safari [9]. The first time I encountered this requirement it was a bit confusing, but once you understand the sequence, it becomes second nature.
Each control method has its strengths and weaknesses. For quick visual sessions, I still reach for a hand controller. For automated imaging runs, ASIAIR has become my go-to solution. And when I need the most flexibility and control, nothing beats full PC control through EQMOD. The good news is that most harmonic drive mounts support multiple control options, so you can choose what works best for your specific situation.
Conclusion
After spending considerable time with various harmonic drive telescope mounts, I’m convinced they represent one of the most significant advancements in astronomical equipment design we’ve seen in years. These innovative systems deliver remarkable payload capacities while maintaining compact, lightweight profiles that traditional mounts simply can’t match. Just think about it – a traditional equatorial mount weighing 38 pounds struggles to match what an 11-pound harmonic drive system can do, easily handling 44-pound payloads!
I won’t sugarcoat it though – strain wave technology demands careful attention to periodic error management through autoguiding. But with proper setup and configuration, the results can be excellent. I’ve seen modern harmonic drive mounts achieve tracking accuracy between 0.5-0.7 arcseconds RMS when paired with appropriate guiding equipment and those optimized PHD2 settings I discussed earlier.
With price points ranging from $1,499 to $24,433, there’s something for almost everyone. The entry-level models provide excellent portability and simplified setup – perfect for beginners or those who travel frequently to dark sites. Meanwhile, the premium options offer enhanced tracking precision through servo motors and high-resolution encoders that will satisfy even the most demanding astrophotographers. I particularly appreciate the multiple control options, including ASIAIR integration, EQMOD compatibility, and traditional hand controllers. This flexibility means you can adapt the mount to your preferred imaging workflow.
The practical benefits become most evident during actual field use. I’ve gone from spending 30 minutes setting up my old German equatorial mount to approximately 5 minutes with my harmonic drive mount. Eliminating those complex counterweight balancing procedures alone has been a game-changer. This efficiency means I spend more time actually imaging and less time fiddling with equipment – which is especially valuable on those perfect nights when every minute counts.
Harmonic drive mounts are continuing to reshape my expectations for portable astronomical equipment, and I suspect they’re doing the same for many others. Their combination of impressive payload capacity, reduced weight, and streamlined operation makes them compelling options whether you’re setting up temporarily in a field or installing in a permanent observatory. For my money, they represent one of the best advances in mount technology in the past decade.
FAQs
Q1. How do harmonic drive telescope mounts work? Harmonic drive mounts use strain wave technology, consisting of a wave generator, flexible spline, and circular spline. This system creates a high reduction ratio (typically 300:1) in a compact package, allowing for precise movements and high torque output.
Q2. What are the main advantages of harmonic drive mounts for astrophotography? Key advantages include exceptional payload-to-weight ratios, improved portability, and significantly reduced setup times. These mounts can often carry 3-4 times their own weight without counterweights, making them ideal for mobile astrophotography.
Q3. Do harmonic drive mounts require autoguiding? Yes, autoguiding is essential for optimal performance with harmonic drive mounts. They typically have periodic errors ranging from 20-60 arcseconds, which need to be corrected through autoguiding for precise tracking during long exposures.
Q4. How do harmonic drive mounts compare to traditional equatorial mounts in terms of weight and payload capacity? Harmonic drive mounts are significantly lighter while offering comparable or better payload capacities. For example, an 11-pound harmonic drive mount can often handle payloads up to 44 pounds, whereas a traditional mount might weigh 38 pounds to achieve similar capacity.
Q5. What control options are available for harmonic drive telescope mounts? Most harmonic drive mounts offer multiple control interfaces, including ASIAIR integration for wireless control, traditional PC control via EQMOD and ASCOM drivers, and compatibility with hand controllers like SynScan for manual operation.
References
[1] – https://www.cloudynights.com/topic/888903-diy-harmonic-drive-mount-help/
[2] – https://astrobackyard.com/strain-wave-mounts/
[3] – https://www.harmonicdrive.net/_hd/content/documents/FD_DifferentialGear.pdf
[4] – https://astroforumspace.com/best-harmonic-drive-mounts-for-astrophotography/
[5] – https://astro-observer.com/telescope-mounts-astrophotography
[6] – https://www.cloudynights.com/topic/950832-understanding-the-strain-wave-driven-mount/
[7] – https://agenaastro.com/zwo-am5n-strain-wave-drive-equatorial-mount-and-tripod-new-am5.html?srsltid=AfmBOormw2bx1VJcTzYURmDalAUJQTqaIME-_gdu39lLO5DwV19ZXmkv
[8] – https://www.skywatcherusa.com/products/wave-100i-strainwave-mount
[9] – https://www.ioptron.com/product-p/g281b1.htm
[10] – https://www.zwoastro.com/product/zwo-am3-harmonic-equatorial-mount/
[11] – https://www.diyphotography.net/5-harmonic-drive-mounts-you-can-buy-for-astrophotography/
[12] – https://skiesandscopes.com/harmonic-drive-telescope-mount/
[13] – https://www.cloudynights.com/articles/cat/user-reviews/review-the-am3-harmonic-drive-mount-and-tc40-tripod-from-zwo-r4712
[14] – https://www.opticscentral.com.au/blog/the-differences-between-the-zwo-am3-am5-and-the-am5n-harmonic-equatorial-mounts/?srsltid=AfmBOoolpLCRmSMj0QIH8fZIGQ8Kmv971iBjGSZsSwpezpFW8nVdGfID
[15] – https://astroforumspace.com/zwo-am5-mount-review/
[16] – https://www.cloudynights.com/topic/875108-zwo-am5am3-good-beginner-user-friendly-mounts/
[17] – https://astronomytechnologytoday.com/2024/05/10/sky-watcher-wave-100i-and-150i-mounts/
[18] – https://www.skywatcherusa.com/products/wave-150i-strainwave-mount
[19] – https://www.ioptron.com/category-s/264.htm
[20] – https://www.ioptron.com/product-p/he162c.htm
[21] – https://www.highpointscientific.com/ioptron-hae-69-imate-az-eq-mount
[22] – https://www.rainbowastro.com/rst-135/
[23] – https://www.rainbowastro.com/rst-300-feature-eng/
[24] – https://www.cloudynights.com/topic/922489-umi-17-lite-harmonic-drive-mount-quick-review/
[25] – https://cloudbreakoptics.com/collections/harmonic-mounts
[26] – https://astronomics.com/collections/strainwave-mounts?srsltid=AfmBOooAt6pOlrfX1w4-73HlXbqVmMPVZrogePhf4AmOyz1w1NFNVZtk
[27] – https://astronomytechnologytoday.com/2023/04/24/zwo-am3-harmonic-drive-mount/
[28] – https://www.cloudynights.com/topic/872847-strain-wave-mounts-for-visual-smart-phone-apps-versus-no-hand-controller/
[29] – https://www.cloudynights.com/topic/919878-sky-watcher-introducing-the-wave-series-mounts/
[30] – https://eq-mod.sourceforge.net/docs/EQASCOM_Guiding.pdf
[31] – https://agenaastro.com/zwo-am3-strain-wave-drive-equatorial-mount-and-tripod.html?srsltid=AfmBOoqLGM5kw0Qs28RpAOHZM0TLb1vjDlWStuLeeWKSjCo7lryh5R7h
[32] – https://www.highpointscientific.com/zwo-am5n-harmonic-drive-equatorial-mount-with-tripod
[33] – https://www.highpointscientific.com/ioptron-haz46-alt-azimuth-strain-wave-mount-with-hand-controller-hz462
Choosing Budget Refractor Telescopes for the Best Deep-Sky Viewing

When choosing budget refractor telescopes, there are a number of things you need to take into consideration. Most people think price and magnification, part of that is a consideration, while the other part is just false. Let’s take a look at the real factors that should guide you when choosing budget refractor telescopes.
Key Features
There are several key features that should influence your decision, these are what will determine what you can view, how well you can view them, and how much effort you will have to put into it.
Personal Choice
Before we get into all the specifications and recommendations to help you along your way, there is one thing I heard someone say a while back that really stuck with me, and that is:
No matter how good a telescope is, if you don’t want to take it out and use it, it is worthless.
What this means is that you could spend thousands of dollars on a telescope that can do a lot of things really well, but if it is too heavy, too complicated, or just too much of a pain in the butt to take out and use, then you wind up not using it and therefor, it is useless to you.
On the other hand, if someone buys a cheap pink telescope in the toy section at the grocery store but takes that telescope out every clear night and looks at things, then for all intents, that little pink $50 scope is better than that other huge multi-thousand dollar telescope collecting dust.
Like a lot of things in life, it isn’t what you could do with something, it is about what you have done or are doing with something.
So really, how does that affect choosing budget refractor telescopes? Simple, let your feelings help you pick out what you want. If it looks too big, get something smaller. Think about where you are going to use the telescope and how you will get it there. Will it fit in your car? Want a black optical tube instead of a white one, look around and see if you can find a black one that fits what you want. Don’t like the name on the side of the telescope? Get a different brand or put a sticker over it.
These things matter and are the single most overlooked “specification” when choosing budget refractor telescopes, or for that matter, a lot of things in life.
Aperture
The aperture of a refractor telescope is the diameter of the front element of glass. This dictates how much light the telescope can collect as well as the maximum “magnification” you can achieve, and therefor what types of objects you can see. Why? Virtually any telescope is going to allow you to see the moon and stars, most will work with the Orion Nebula, Saturn, and Jupiter. If that is all you want, then a super-cheap one might be all you need.
On the other hand, if you want to see a lot more detail in the Orion Nebula, the moons of both Saturn and Jupiter, and a whole host of faint nebulae, then you might want to up your game a little.
Most people do not understand that the really hard part in astronomy is not magnification, it is gathering light. What good is awesome magnification if it is too dark to see what is being magnified?
Super Small <70mm
These telescopes are often seen in department stores, grocery stores, sporting goods stores, etc. They are also the most popular telescopes seen at resale shops and in garbage dumps. The simple reason for this is that they provide little improvement overlooking through a paper towel tube.
When looking at something this small and cheap, you are not only getting horrible cheap plastic optics in both the telescope tube and eyepieces, but the mount (tripod or whatever holds it up) is probably super short and flimsy, making viewing even worse (we talk more about that later). This means even if the telescope was reasonable, you couldn’t use it because it would be shaking and wobbling all over the place like a hyperactive child on too much caffeine and sugar after trick-or-treating.
I can’t tell you how many times I have heard “I just want something cheap to see how I like astronomy”, or “I don’t want to spend a lot of money just to find out my child isn’t interested in astronomy.” Let me assure you, if you start with this telescope, they will not be interested in astronomy, not at all. In fact, this is the number one reason I have heard that kids give up on astronomy when asked.
Before the experts out there start commenting about what an idiot I am, there are specialized telescopes this small that have unique uses that are excellent. A great example of this are dedicated solar telescopes or wide field astrophotography scopes. Neither of those are for beginners, so I won’t be discussing them here.
Small or Travel Telescopes 70mm
A reasonable 70mm telescope is about the minimum I would recommend for anyone to start out with who either has no real interest in astronomy or is a small child. If you get a good one of these, they can provide good views of the moon and stars, and a little of the Orion Nebula. You could also make out the rings of Saturn and see Jupiter as a large star.
The trick here is to get a good one, not the cheapest one you can find. Celestron makes a nice 70mm travel telescope which fits the bill. Stay away from virtually anything you find in a brick and mortar store unless it caters to more serious telescopes and has a knowledgeable sales staff. Also stay away from anything sold at TJ Maxx, JC Penny, Kohls, or Macy’s. They are fine stores for your clothes, but that is about it.
These can be great to take on trips, just throw them in the trunk and go. Most of them, especially the better ones, come with either nice cases, or like the Celestron, a nice backpack.
Real telescopes 80-102mm
Here is where you start to get into telescopes for kids, young adults, or adults who have a real interest in astronomy, or you want to instill one in them. This is where you can really show people things in the night sky. They collect enough light to be able to view quite a few nebulae, as well as handle enough magnification to start to make out a little detail on Saturn and Jupiter on good nights.
Larger Telescopes >102mm
Now we are getting into telescopes for people with a serious interest in astronomy, and those who want to purchase a telescope to use for the next twenty years. Many of these telescopes come do not come with a mount or accessories and are referred to as OTA only, Optical Tube Assembly only.
These are usually of higher quality than the smaller ones, are heavier, and include better components. They will provide better views, particularly of nebulae. The Orion Nebula will just jump out at you and present some amazing detail with one of these, while other faint nebula that you could not see before will suddenly become quite visible.
I use a 127mm doublet for most of my visual astronomy, and I am in awe every time I pull it out and use it. It just never gets old.
Focal Ratio
The focal ratio of a telescope is the telescope’s focal length divided by its aperture. So if you have a 1000mm focal length and a 100mm aperture, then you have a f10 (the f stands for focal ratio) telescope. Some telescopes will list both the focal length and focal ratio, some will only list one or the other. With this formula you can calculate either one.
When choosing budget refractor telescopes, most people want the most magnification they can get. They want to see Saturn filling up the eyepiece. Unfortunately, those people will never see that unless they visit a astronomy star party with some people who have serious equipment.
The rest of us are going to have to be reasonable with our expectations. We can start by saying that yes, you can see some detail on Saturn and Jupiter, and yes it is exciting. But we probably want to see more than that. To that end, we need to choose a focal ratio that fits with what we most want to do.
Fast scopes <f7
These telescopes are used for wide-field observations, meaning viewing a large part of the sky at once. They are excellent for viewing the Milky Way, large nebulae, open clusters, watching for meteors, viewing the moon, etc. They are not very good at viewing planets, globular clusters, etc.
Midrange Telescopes f7-f8
These are the Swiss Army knives of refractor telescopes and are pretty good at everything. Almost every serious amateur astronomer I know has at least one telescope in this range if not more. I have three.
A telescope in this range can easily fit most nebula in the field of view, can view the entire sun (with correct filters of course) or moon in, and still gives you excellent and detailed views of Saturn and Jupiter including their moons. Of course, with the correct aperture and eyepieces.
Slow Telescopes f9-f12
The most common telescopes in this range are f11 telescopes such as the Celestron AstroMaster 90EQ. They go up even higher like the f13 of the Celestron AstroMaster 70EQ.
Telescopes in this range are usually really good at planets, globular clusters, and details on the moon. They can also be usable with some other targets including open clusters and nebulae with wider eyepieces such as the 25mm most of them come with.
This is probably the most common range for beginner telescopes and a good portion of the reason is that they can provide good views of Saturn and Jupiter without having to purchase more eyepieces.
Optical quality
Refractor telescopes, especially at the beginner level, have either one element, or one group of elements, at the front of the telescope tube. These elements can be of different types of glass, have different coatings, and come in single, doublet (two pieces of glass), or triplet (three pieces) configuration. Very special telescopes may even have more!
Achromatic
This is almost always either one or two pieces of glass, and may or may not have any coatings on them. These are the least expensive type of refractor telescopes. Achromatic refractors suffer from chromatic abberations which is a violet or blue glow around bright objects such as the moon or bright stars. Higher-end Achromats may have coatings to help with this, and you can use a minus violet filter to help reduce the effects.
ED (Extra-low Dispersion)
This can be a single or two pieces of glass but is of much higher quality than Achromatic. It provides sharper images and has far less chromatic abberation as well. There are some telescopes with very high quality ED doublet configurations that are considered APO (see the next section) and provide outstanding images.
These are substantially more expensive than Achromatic telescopes but when choosing budget refractor telescopes that you plan on using for twenty years or more, this is a nice upgrade to have.
APO (Apochromatic)
Apochromatic telescopes are at least doublets and usually triplets that have excellent color correction. They provide the highest contrast, sharpest, and most defined images available. Virtually all serious astrophotographers who use refractors use APOs. These are also the most expensive, by far.
I don’t list APOs because they are something you should consider when choosing budget refractor telescopes, but you may want to know why one telescope is $300 and another is $3000. This is a prime reason for that price disparity.
Flourite
Ummmmm, yeah, about this stuff, slightly better than APO but refractors with this kind of glass typically start at over $2,000 for a tiny 65mm or 70mm. Larger ones jump to $4,000+ fast. I only mention it here in case you see it on a website and wonder what it is. It is, absolutely, the best of the best. In all my years I have actually seen one in the field.
Mount and Stability
A lot of people do not really consider the mount when they are choosing budget refractor telescopes, after all, all it does is hold the telescope so you can look through it, right? Well, yes, but stop and really think about that for a second.
Take your phone out, turn on the camera, point it at your neighbor’s house across the street, zoom all the way in as far as your camera will go, now hold that out at arms length and keep it stable. See how things are jumping around and how hard it would be to read something with that jumping going on? OK, now that is probably at about 15x or so, and a typical f8 telescope with the 25mm eyepiece they often come with is about 28x. If you have one of the 1000mm focal length telescopes that a lot of beginners use, that jumps to around 40x.
At these high magnifications even a slight movement can make it look like you are seeing a smeared watercolor painting instead of Saturn. In astrophotography we always say that the mount is 50% responsible for the quality of your images, the other 50% is the telescope, camera, filters, alignment, weather, and skill combined. And we aren’t kidding.
Altitude Azimuth (Alt-Az) Mounts
The Alt-Az mount is what you have when you use just a regular ole tripod. It moves up, down, left, and right. The least expensive telescope kits include this kind of mount and especially in the least expensive of them, this is just junk.
That isnt to say that there are not good alt-az mounts, there are excellent ones like this Sky-Watcher AZ5 mount for manual use, or this iOptron AZ Mount Pro for a go-to mount. I personally have the Sky-Watcher AZ5 and it is an excellent mount that I love to use.
When looking at the mount you want to make sure it doesnt look spindly, in other words, it looks like it would be very stable. Super skiny legs or a really tall tripod with a long neck are signs that you will not be happy with the telescope no matter how good it is. Nice and heavy tripods like the ones like the one included with the Celestron StarSense DX 102AZ are very stable and allow the telescope to provide excellent views.
Why an Alt-Az mount instead of an EQ? They are fast and easy to set up. I often have a big EQ mount astrophotography rig running and while it spends hours imaging I need something to do. Instead of spending a bunch of time and effort setting up a second EQ setup, I just whip out a manual Alt-Az mount and start viewing. Easy peasy.
Equitorial (EQ) Mounts
EQ mounts can be just like Alt-Az mounts in that there are some really cheap ones out there that are just plain junk. The first one that comes to mind is the Celestron PowerSeeker 80EQ. If they had put that mount on a little shorttube 80 or smaller it might not be so bad, but that long refractor on that little aneorexic mount just makes for a horrible experience.
Now step up to the Celestron AstroMaster 90EQ and that is a whole different mount. Much stronger and more stable than its little brother which makes using this telescope a joy.
But why an EQ mount instead of Alt-Az? First, because it allows you to learn about declination and right ascension, the navigation coordinates system for the sky. When reading books or astronomy related websites you will run into the fact that they tell you where to look for something (say a comet, asteroid, etc) by giving you the coordinates. If you learn this system which all EQ mounts use, then finding objects is quick and easy.
Second, because if you look at an object more than a few seconds you will notice it moves, quickly exiting your field of view. With an Alt-Az mount you need to move the telescope a little left or right, then a little up and down, all at the same time. It is frustrating to do for very long.
With an EQ mount, properly aligned, you turn one knob to keep it in the center of the eyepiece making looking at objects substantially easier.
This is because the objects in the sky don’t move up, down, left, right, they move around the Earth. This motion is slightly different depending on where you are on the planet and so needs to be adjusted for that latitude. EQ mounts are made just for this.
Manual vs Push-To vs Go-To
There are three types of mounts which each has their own pros and cons.
Manual mounts are mounts that have no electronics or guidance in them at all. There are both Alt-Az and EQ manual mounts available as manual mounts. Virtually all inexpensive beginner telescope packages are manual mounts.
The good is that these mounts force you to learn how to navigate the night sky. This seems like a real pain when you start, but once you get the hang of it, it becomes a blast. You can be talking to someone and point up at the sky right where an object is without having to grab a phone or tablet and look it up. This is the mount you want if you really want to learn astronomy. A good example here is the Celestron AstroMaster 90EQ.
Push-to mounts are a little different in that they too have no motors, but they have a way to tell you where to point the telescope to get it pointed to an object. Many of these are very accurate, getting the object right in the middle of a 25mm eyepiece on the first try.
The advantage here is that you save a lot of money as opposed to a Go-To mount, but you can still find objects easily and quickly. These are excellent for getting people interested in astronomy as they will give you a huge catalog of objects making it much harder to get bored or frustrated. An excellent example of a push-to is the Celestron StarSense Explorer DX 102AZ which uses your smartphone as the navigation computer.
Go-To telescopes are the ultimate in convenience, being able to press a button and have the telescope point itself to a target with no assistance from you. Of course you pay for this convenience as these mounts are more expensive than either the manual or push-to (for the same class of mount).
One thing to watch out for with these is sometimes you need to perform an alignment before it will point correctly. Some newer ones just need to be level, some older ones need to be level, pointing north, have a polar alignment done, and then do a two or three star alignment. Be sure to ask or check what the alignment proceedure is so you know what to expect.
Recommended Telescopes
When reading about telescope recommendations you have to remember that your needs and preferences may not align with whoever is writing the article. What follows is not a “you should buy this telescope” section, it is a list of telescopes I have personal experience with that I know are good telescopes. Again, if you are buying a wrench set at your local hardware store, and someone tells you a particular hammer is the greatest ever made, that’s great and all but not what you want. If one of these fits with what you want, then great!
Best all manual
Yup, you have seen this pucture in this article before, because I really like it. This is the Celestron AstroMaster 90EQ. It has a longer focal length than I would really like but the build quality, performance, and included accessories are outstanding for the price. This is one of the few kits where I would not replace a thing right off the bat.
While the eyepieces are basic, they are of good quality and should last a while. Don’t buy more of them, buy something nicer when it is time to add, but for starting out they are fine. The mount is the real highlight here, solid, easy to use, and reliable. I also prefer red-dot finders so having one included in this packages is just awesome.
Along with all of that, you get a free copy of Starry Night astronomy software to help you plan your sessions and find objects to view.
Best Push-To
The Celestron StarSense 102AZ has my vote for best Push-To telescope and honestly, for best overall when choosing budget refractor telescopes. This is because it is just about the perfect size in both aperture (102mm) and focal length (812mm) and includes some amazing things to really get you interested, and keep you interested in astronomy.
Start with the obvious, the StarSense. This allows you to use your phone mounted on the side with a free app that gives you the Push-To functionality to thousands of targets in the night sky. This gets you hooked fast, and keeps you coming back for more by making finding things extremely easy.
Once the Push-To gets you to the object, the red-dot finder lets you zero in quickly while the included eyepieces give you really good views of pretty much any object you look at. Eventually you will want to upgrade the eyepieces but this can be way down the line.
Best Go-To
The Sky-Watcher AZ-GTe with StarTravel 80 Refractor is my pick for best Go-To when choosing budget refractor telescopes. This kit has everything you need for a reasonable price and includes some really neat features that you will be hard pressed to find in another budget package.
Starting with the mount; Sky-Watcher makes some incredable mounts and this one is no exception. This is basically the same mount they use with many other products as it has proven to be accurate and robust. It also runs off AA batteries! This makes it super portable while still being amazingly stable.
But the mount isn’t done impressing yet, it has its own wifi hotspot that allows you to connect your phone or tablet to it to controll the mount. This is great for finding objects and simply tapping on the screen to have your telescope point right where you want it.
The telescope is excellent as well, although the smallest of my recommendations running just 80mm. At 400mm of focal length it is also pretty wide field excelling at open clusters, the moon, and larger nebulae such as Orion.
Accessories to Improve Your Experience
Telescopes are one piece of the puzzle, there are many other things that can improve your experience and/or expand your capabilities. Sometimes one little upgrade or addition is all it takes to open up a whole new world.
Eyepieces
With a refractor telescope, your eyepiece is 50% of the optics in your telescope. That’s right, half of the parts that determine what you see in your telescope is that little eyepiece you put in the back. This means that it has the capability to make a larger difference than just about anything else you could upgrade or add to your telescope.
Most beginner telescopes come with inexpensive eyepieces. Lower end telescope kits can come with some pretty aweful eyepieces while higher end kits can have some really descent beginner eyepieces. Either way, the best you are going to get is descent. You can make it better.
Eyepieces run from around $20 to over $1,000 each. As a beginner there is no reason to get rediculous with this as you do not have enough experience to get much out of an extremely high-end eyepiece, and even if you did, that beginner telescope can only do so much (the front optics is the other 50% of the image!).
Upgrading to a $80-$100 eyepiece will really open your eyes and make you want to throw those beginner eyepieces in the garbage. They have sharper views, more contrast (so you can see dimmer things against the black of space), more eye relief (so you don’t have to slam your eye into the eyepiece to see anything, particularly if you wear glasses), and give you a wider field of view which really enhances the feeling like you are out there.
The biggest mistake I see people make with eyepieces is buying too many. Yep, beginners think they need 5, 6, or even 10 different eyepieces to be able to cover every object. Poppycock! Three good eyepieces will cover 99% of everything most people will ever view very well. Two good eyepieces will cover 75%. I recommend starting with something like a 25mm and a 12mm for most beginners. Then if you decide you really want to add one, you will have some experience in knowing what you really need.
Yes, the smaller the number the more magnification, but also the more distortion or blurryness you get. A smaller but sharp object is better than a large blurry mess.
Filters
I normally do not recomment filters for beginners, but there are three exceptions to that rule: light pollution, moon, and a red filter if you are wanting to spend time looking at Mars.
The light pollution filter can substantially improve your views of nebulae as well as make modest to good improvements on pretty much all other objects. It does this by filtering out the wavelengths of man-made light sources such as streetlights, signs, and billboards. Some even filter out some of the light from the moon helping to reduce the glow around the moon that can obscure objects around it.
A moon filter is basically a ND filter that blocks a percentage of the light coming from the moon. This can be a problem as telescopes first and foremost collect and amplify light, and the moon reflects sunlight. The result of looking at the moon through a telescope can range from being a little annoying, to being extremely painful depending on your telescope. Using a moon filter cuts that down to a more manageable level. Using a circular polarizing filter accomplishes that, and also filters out stray light at off angles making the image not only darker, but quite a bit clearer as well.
When looking at Mars, one of the difficult things is the fact that it looks mostly gray and picking out the differences in those grays can be hard. A red filter can help increase the contrast between those particular grays to help you pick out details you may not be able to see without one.
Choosing Budget Refractor Telescopes Conclusions
I like refractors, they are easy to use, easy to set up, require a minimum of cool-down time, never require collimation, and provide excellent views. Do they provide the best views in astronomy? Probably not, especially not at the beginner level. But considering the ease of use and maintainence, they are the most likely to actually get used and that accounts for a large part of getting into and enjoying the hobby.
Will you eventually get rid of refractors and go to reflectors? Some people absolutely do, some people don’t, and some people keep both types. When I go out to do visual or astrophotography my first, second, and third choices are refractors unless I am doing something very specific. I have a nice Dobsonian that hasn’t been outside in years. I just prefer my refractors and do you remember what I quoted in the beginning about using the telescope you like?
The Rise and Fall of a Giant: Orion Telescopes

Orion Telescopes closed its California facilities in July 2024, marking the end of a remarkable journey that began in 1975. Tim Gieseler started this innovative company in Santa Cruz, California. His small startup grew into an international success story that shipped telescopes to more than 20 countries worldwide. The 1990s and 2000s marked the company’s peak years when it made stargazing accessible to everyone through affordable, quality telescopes.
The company held a respected place in the global astronomy community and made bold moves like buying Meade Instruments in 2021. However, several challenges emerged that proved too difficult to overcome. Global competition became fierce, while the pandemic created supply chain problems. Rising operational costs added to these pressures. The telescope giant that once dominated North American astronomy magazines ended up closing its doors. Many enthusiasts remember the company’s catalogs that they were happy to receive, which sparked their passion for astronomy. The closure marks the end of an era in amateur astronomy.
Tim Gieseler Transforms Garage Startup into Astronomy Giant
A telescope empire started in a modest California garage. Tim Gieseler founded Orion Telescopes & Binoculars in Santa Cruz under the name Optronic Technologies. His company started by making electronic accessories for amateur telescopes, with a focus on drive correctors and other telescope components.
How a California Dream Became Reality in 1975
Gieseler dreamed bigger than just making accessories. His company grew through the late 1970s and 1980s by adding products from different manufacturers. The company created a groundbreaking marketing approach that the astronomy hobby had never seen before. They produced beautiful illustrated catalogs, explained products in simple terms that amateurs could understand, and kept their prices competitive.
Orion Telescopes became the biggest and most successful mail-order reseller of amateur telescopes by the late 1980s. Their powerful direct-marketing program sent out approximately 3 million product catalogs annually. This helped Orion reach enthusiasts nationwide who had limited options to buy quality astronomical equipment.
Orion Democratizes Stargazing with Affordable Quality
Gieseler made a smart move in the 1990s. He focused on Orion-branded products that catered to beginners in stargazing. This decision changed both the company’s future and amateur astronomy forever.
The company’s first telescope models were simple to use and practical, which laid the groundwork for more advanced designs. The company also kept a warehouse ready for quick delivery and offered generous customer service policies.
Orion Telescopes showed its dedication to making astronomy available through several innovative product lines. They developed the original SkyQuest™ series of Dobsonian Reflectors, which included the XT-6, XT-8, and XT-10 models. Both beginners and experts praised these telescopes and the popular StarBlast series for their practical design and advanced features.
Orion built its reputation on high-quality, innovative optics during its first decades. Their success came from a simple idea – balancing cost and performance better than other telescope brands. Gieseler’s company made stargazing affordable and available to everyone, turning an expensive hobby into something anyone could enjoy.
Orion Captures the Market with Strategic Product Development
Game-changing breakthroughs pushed Orion Telescopes from a regional supplier to an industry powerhouse. Their product design and marketing brilliance made this possible during the 1990s and early 2000s.
SkyQuest Dobsonians Revolutionize Amateur Astronomy
Orion’s biggest breakthrough came with their SkyQuest Dobsonian telescopes that changed amateur astronomy with their practical design. These instruments had large apertures and easy-to-use “push-to” configurations. They made deep-sky objects available to astronomy enthusiasts whatever their experience level. The SkyQuest series included beginner models and advanced versions with larger mirrors that could gather substantial light. Faint celestial objects like galaxies and nebulae became visible to hobbyists who didn’t need specialized training.
The flagship SkyQuest XT8 gained special recognition. Its 8-inch aperture delivered bright, detailed views of deep-sky objects and managed to keep stability. Dobsonian telescopes needed minimal maintenance. They were easy to operate, which made them perfect for astronomy beginners.
Catalog Marketing Creates Devoted Customer Base
Orion Telescopes’ marketing strategy proved just as revolutionary. The company sent out about 3 million product catalogs annually and built a dedicated following among astronomy enthusiasts. Their data card showed 14,315 twelve-month buyers. Their direct-mail approach reached enthusiasts who previously couldn’t easily get quality astronomical equipment.
These catalogs did more than sell products. They explained products in simple terms instead of technical jargon, which helped Orion’s mission to make astronomy available to everyone.
Retail Expansion Brings Telescopes to the Masses
Orion went beyond mail order and opened physical retail locations. They had a store in Cupertino, California, and an outlet at their Watsonville headquarters. Their operation included an 11,000 square foot warehouse with extra rented storage nearby. This setup helped them deliver products quickly.
Orion’s business model changed through several ownership transitions. Imaginova acquired the company in January 2005, and they started selling additional telescope brands. The company’s employees bought it back in November 2017. This move kept Orion Telescopes’ independence and American ownership intact.
Celestron and Ningbo Sunny Battle Orion in Landmark Antitrust Case
A landmark antitrust lawsuit by Orion Telescopes against Ningbo Sunny Electronic Co. in 2016 exposed the dark side of the telescope market. The case showed how Chinese manufacturers altered the map of the astronomy industry through fierce competition.
Chinese Manufacturing Reshapes Telescope Industry
Two Chinese family firms—Synta Technologies and Ningbo Sunny—quietly took control of America’s telescope market behind the scenes. These companies manufactured over 80% of all consumer telescopes imported into the United States. The companies allegedly worked together to fix prices and split the market between them since 2005.
The lawsuit revealed clear evidence of collusion. Executives exchanged emails showing Synta’s support for Ningbo Sunny’s acquisition of Meade Instruments in 2013. Synta provided $7.2 million in prepayments and $10 million in interest-free loans to finance the deal. The companies divided the telescope market after the acquisition. Synta’s Celestron focused on higher-end products while Ningbo Sunny’s Meade targeted lower-cost segments.
American astronomy enthusiasts paid hundreds of millions more than necessary for telescopes over almost two decades due to this market control.
$50 Million Victory Proves Pyrrhic for Orion’s Future
A jury unanimously ruled in Orion’s favor in November 2019 after a long legal battle. The court determined Ningbo Sunny violated Sections 1 and 2 of the Sherman Act and Section 7 of the Clayton Act. The verdict awarded Orion [$16.8 million in damages, which was trebled to $50.4 million](https://content.next.westlaw.com/practical-law/document/I5ab6236556fa11ec9f24ec7b211d8087/Ninth-Circuit-Affirms-50-Million-Award-in-Telescope-Antitrust-Litigation?viewType=FullText&transitionType=Default&contextData=(sc.Default) under antitrust law.
The Ninth Circuit Court of Appeals largely upheld the verdict in December 2021 despite Ningbo Sunny’s appeal. Notwithstanding that, the victory proved empty for Orion. The company struggled to collect the full amount even after winning the judgment. Orion filed another lawsuit alleging Celestron helped Ningbo Sunny avoid payment by smuggling approximately $4.2 million to China.
Consumers who bought telescopes during the price-fixing period filed additional class action lawsuits. These cases led to a $32 million settlement for telescope buyers.
Orion Telescopes bought Meade from Ningbo Sunny in 2021 in an ironic twist, but this expansion effort couldn’t save the company. The whole ordeal came to an end when Orion stopped operations in July 2024, closing its five-decade presence in American astronomy.
Meade Acquisition Signals Last-Ditch Expansion Effort
After winning its landmark antitrust case, Orion made a bold move. The company bought its former competitor Meade Instruments in 2021. This surprising decision came after Meade filed for Chapter 11 bankruptcy protection in December 2019, which altered the map of the telescope industry.
Why Orion Gambled on Purchasing Its Former Competitor
Orion Telescopes had two main reasons to buy Meade: to recover from the antitrust battle costs and grow its market share. The company created a new subsidiary, Meade Acquisition Corp., to buy most of Meade’s assets. This happened after the United States Bankruptcy Court for Central California gave its approval. Peter Moreo stepped up as president of both companies and said he was “honored to have the chance to work with Meade employees, customers, and suppliers”. The deal brought together two iconic astronomy brands that were 50 years old.
Integration Challenges Overwhelm Management Resources
The troubles began right after the purchase. Orion struggled to merge the struggling company into its operations. The company united its USA operations in Watsonville, California. Fixing Meade’s broken supply chain turned out to be their biggest headache. Orion spent heavily to bring the factory’s raw material parts supply and manufacturing tools back to the US. They kept Meade’s Mexico telescope factory—the largest consumer telescope factory outside China. The company hired more workers and increased training programs.
COVID-19 Opportunity Slips Through Corporate Fingers
The pandemic lockdowns created a boom in home hobbies, but Orion couldn’t take advantage of it because of supply chain problems. COVID-19 hit Orion’s business hard. Many customers put their projects on hold. Orion’s Q1’21 revenue dropped to $10.8 million from $42.4 million in Q1’20.
In addition, around this time is when Orion Telescopes decided to redesign some of their mainstay telescopes, such as the Orion Astroview 90mm EQ which they replaced with the far inferior Orion Observer 90mm EQ.
The company tried to restart operations but failed. Orion shut down completely in July 2024, letting go of all workers and closing its California facilities. The final chapter came in mid-August 2024 when Orion’s Watsonville building went up for sale. This marked the end of both Orion and Meade as independent players in the telescope market.
Conclusion
Orion Telescopes is evidence of American entrepreneurship and innovation in amateur astronomy. Tim Gieseler’s garage startup grew into a powerhouse over 50 remarkable years and made stargazing available to countless enthusiasts. The company’s groundbreaking SkyQuest telescopes and user-friendly catalogs helped people find new ways to explore the night sky.
Orion Telescopes won a major $50.4 million antitrust verdict against Ningbo Sunny but still faced overwhelming challenges. Their resources drained quickly after an ambitious acquisition of Meade Instruments and pandemic-related supply chain disruptions. The company finally closed its doors in July 2024, ending an era in American astronomy.
Orion Telescopes’ legacy continues through countless amateur astronomers who first saw distant galaxies through their instruments. Their quality products, affordable prices, and customer education made astronomy available to everyone instead of remaining an exclusive pursuit. Of course, Orion’s telescopes no longer point skyward from their California facilities, but their effect on amateur astronomy will shine bright for generations.
Telescope Eyepiece Types Explained: From Plossl to Nagler, 12 Optical Designs

Eyepiece types, meaning the eyepiece optical design itself, is rarely discussed when people are talking eyepieces. They talk about apparent magnification, edge sharpness, contrast, field of view, and other specifications, but rarely the actual optical design. Lets change that.
Looking through my first premium eyepiece was like stepping into space itself. The view was so immersive, so different from the narrow tunnels I was used to seeing through standard eyepieces. That experience taught me just how dramatically eyepiece design can transform telescope viewing.
The story of telescope eyepieces fascinates me – from simple lenses offering cramped 40-degree views to modern marvels that deliver stunning 100-degree panoramas of the cosmos. I’ve watched this evolution continue through my years in astronomy, seeing designs progress from the classic Kellner eyepieces with their modest 45-degree views to incredible options like the Tele Vue Nagler that make you feel like you’re floating in space.
Having owned and used dozens of eyepieces over the years, I can tell you that understanding these different designs makes an enormous difference in what you’ll see through your telescope. In this article, we’ll explore how eyepiece designs developed from basic Plössls to ultra-wide models, examine which specifications actually matter for real-world viewing, and figure out which types work best for different observing situations. Whether you’re just starting out or looking to upgrade your eyepiece collection, this guide will help you make sense of the options.
The Evolution of Eyepiece Optical Design
I’ve always found it fascinating how something as small as an eyepiece can make such an enormous difference in telescope performance. While the main lens or mirror gathers light, it’s the eyepiece that transforms that light into something our eyes can actually see and appreciate. Short of a laser collimator, eyepieces may be just about the single most important purchase that can improve your viewing.
Early Challenges in Telescope Viewing
The story of early telescopes reminds me of my first attempts at astrophotography – full of enthusiasm but limited by equipment. When the first telescopes appeared in the Netherlands in 1608, they were revolutionary but faced serious problems. Even Galileo, despite his genius, couldn’t overcome the basic limitations of materials available then.
From what I’ve learned studying telescope history, early makers struggled with several major issues:
- Poor glass quality: The glass had tiny bubbles and a greenish tint from iron impurities, really hurting image quality
- Imperfect lens shaping: They simply didn’t have tools precise enough to make perfect lenses
- Chromatic aberration: Stars looked blurry with colored halos around them
- Restricted field of view: You couldn’t even see the whole Moon at once through Galileo’s best designs
These problems stuck around for decades. While lens-grinding got better slowly, they really needed better eyepiece designs to solve these issues. Kepler’s idea in 1611 to use two convex lenses instead of Galileo’s concave eyepiece design helped get wider views and higher power, though it brought its own problems with aberrations.
Key Optical Principles Behind Eyepiece Function
Having used countless eyepieces over the years, I’ve learned that understanding how they work makes a huge difference in choosing the right ones. At its heart, an eyepiece magnifies the image created by your telescope’s main optics.
Let me break down the key specs I look at when evaluating eyepieces:
Focal length determines magnification power. The math is simple – divide your telescope’s focal length by the eyepiece focal length. For instance, I use a 25mm eyepiece in my 1200mm telescope for 48× magnification, while my 4mm gives me 300×.
Apparent field of view (AFOV) tells you how wide the view looks through the eyepiece alone. I’ve used everything from narrow 30-degree eyepieces to ultra-wide 100-degree designs. The actual sky coverage you see depends on this number divided by your magnification.
Eye relief is crucial for comfort – it’s how far your eye can be from the lens while still seeing everything. This matters especially if you wear glasses. I’ve found modern designs often give good eye relief even at high power.
Optical aberrations are the gremlins that mess up image quality. Different designs tackle various problems:
- Chromatic aberration (false color)
- Edge sharpness and field flatness
- Internal reflections hurting contrast
- Distortion and astigmatism
How Eyepieces Transform the Telescope Experience
Through years of observing, I’ve learned that eyepieces aren’t just accessories – they’re half your optical system. The difference between basic and premium eyepieces can be startling. I’ve had observers swear they were looking through a completely different telescope after switching to better eyepieces.
Quality eyepieces improve your views in several ways:
Contrast and detail: Better glass and coatings mean crisper views with more detail. I’ve spotted features on Jupiter that were invisible through cheaper eyepieces.
Comfortable viewing: Longer eye relief and better correction make long observing sessions much more enjoyable. This really matters during marathon viewing sessions.
Versatility: Different targets need different approaches. My wide-field eyepieces work great for nebulae, while I switch to high-power designs for planets.
I always tell new astronomers that the eyepiece is just as important as the telescope itself. While good telescopes can give decent views through modest eyepieces, matching premium optics with quality eyepieces creates truly spectacular experiences.
That’s why I keep a range of eyepieces for different magnifications. Sky conditions change nightly, and having options lets me adapt to whatever the sky offers. It’s like having a whole toolkit instead of just one wrench.
First Generation Eyepiece Optical Designs (Pre-1850)
The story of early eyepiece designs reminds me of watching a master craftsman at work – solutions emerging from necessity rather than detailed planning. These first attempts at improving telescope views laid groundwork we still build on today.
Galilean and Keplerian Simple Lenses
Two competing designs kicked off the eyepiece story, each taking a different path to magnification. The Galilean eyepiece showed up around 1608 in the Netherlands before Galileo adopted it in 1609. Pretty simple setup – just a negative lens before the focal point. While it gave upright images great for looking at stuff on Earth, the tiny field of view meant you could only use low power.
Kepler came along in 1611 with something different in his book Dioptrice. His Keplerian eyepiece put a convex lens after the focus point instead. This clever switch gave much wider views and higher power, though everything looked upside down and backwards.
The upside-down view didn’t matter much once astronomers realized they could stick measuring tools at the focal plane. Being able to measure star positions and object sizes made the Keplerian design the go-to choice for serious astronomy.
Huygens Eyepiece: The First Compound Design
Before the late 1660s, eyepieces were pretty basic – just single pieces of glass. Then Christiaan Huygens, this brilliant Dutch mathematician, changed everything by creating what we now call a compound eyepiece. He used two plano-convex lenses with an air gap between them, flat sides toward the eye. The focal plane sat right between these lenses.
Here’s what made it special – Huygens figured out that spacing two lenses just right could kill off transverse chromatic aberration. This wasn’t just throwing lenses together anymore – this was real optical engineering. These eyepieces worked amazingly well with the super-long telescopes of the time, including those wild aerial telescopes Huygens helped develop.
Ramsden Eyepiece and Field Stop Innovation
Jesse Ramsden shook things up in 1782 with another game-changing design. His Ramsden eyepiece used two identical plano-convex lenses, but with curved sides facing each other – opposite from the Huygens setup. He found that spacing the lenses about 7/10 to 7/8 of the eye-lens focal length hit the sweet spot between performance and practicality.
The real breakthrough? The focal plane sat outside the eyepiece. This meant you could add measuring tools like crosshairs right where the image formed. While it couldn’t completely fix chromatic aberration, it still beat the Huygens design in many ways.
One detail I find fascinating – they had to tweak the lens spacing to handle dust. Perfect spacing theoretically gave better correction but made dust on the field lens annoyingly visible. It’s these practical touches that show how early designers balanced perfect optics against real-world use.
The Huygens and Ramsden designs ruled astronomy for generations. When I look through modern eyepieces, I can’t help but appreciate how these early innovations set us on the path to today’s amazing views of the cosmos.
Second Generation Achromatic Designs (1850-1940)
The period between 1850 and 1940 fascinates me because it completely transformed how we look through telescopes. I’ve used several eyepieces with designs from this era, and their influence still shows in modern designs.
Kellner Eyepiece: Solving Chromatic Aberration
Carl Kellner’s 1849 design was a real game-changer. I remember my first look through an original Kellner – the improvement in color correction compared to earlier designs was striking. Kellner’s clever trick? He replaced the simple eye lens with what we call an achromatic doublet – two lenses stuck together.
These eyepieces typically give you a 40-50° field with decent eye relief. I’ve found they work beautifully at low to medium powers, especially in telescopes slower than f/6. The three-element design delivers sharp, bright views that still impress today. The downside? Try using short focal lengths and you’ll find yourself squinting – the eye relief gets pretty tight.
What made Kellners really special was their balance of quality and cost. Finally, amateur astronomers could get good views without breaking the bank.
Plössl Design: The Symmetrical Revolution
While Plössl introduced his design in 1860, these eyepieces didn’t become popular until the late 20th century. The design is beautifully simple – two identical achromatic doublets facing each other.
From my experience, good Plössls deliver:
- About 50° field of view – wider than Orthoscopics
- Comfortable eye relief in longer focal lengths
- Excellent sharpness and true colors
- Great contrast for all types of objects
The symmetrical design really cuts down on those annoying ghost reflections. Modern coatings made them even better – I’ve seen dramatic improvements in light transmission and contrast.
These days, I still recommend Plössls as standard equipment for many observers. They handle everything from galaxies to planets nicely. Just watch out for the short eye relief in focal lengths 10mm and under – your eyelashes will tell you all about it, especially if you wear glasses. The glass you look through on these higher powered eyepieces is also small and hard to keep your eye centered over.
Orthoscopic and Monocentric Designs for Planetary Viewing
Ernst Abbe’s 1880 Orthoscopic design is a planetary viewer’s dream. It uses a triplet field lens with a single eye lens – that’s where the name comes from, Greek for “straight seeing.”
In my experience, these four-element eyepieces excel at:
- Nearly perfect images with minimal distortion (under 4%)
- Razor-sharp views with excellent color
- Better eye relief than older designs
- 40-45° apparent field
I particularly love Orthoscopics such as the Baader Classic Ortho for planetary viewing. The narrow field some consider a weakness actually helps – you’re focusing on detail at the center anyway.
Then there’s Steinheil’s 1883 Monocentric design – probably the purest optical design I’ve encountered from this era. Instead of separate lenses, it uses three thick elements curved to the same center, all cemented together. Just two air-glass surfaces in the whole thing!
The views through a good Monocentric are something else – incredible contrast and brightness. But that tiny 25-30° field makes it strictly a specialist tool. Astronomers often keep one specifically for those perfect planetary nights when seeing is steady and they want every bit of contrast they can get.
Looking back at these designs, I’m amazed at how they balanced performance against practicality. While earlier eyepieces just made viewing possible, these designs made astronomy both enjoyable and scientifically useful.
Wide Field Revolution: Erfle and König Designs
Sometimes the best astronomy gear comes from unexpected places. I’ve always found it fascinating how military needs during World War I gave us some of our favorite wide-field eyepieces.
Military Origins of Wide Field Eyepieces
The story of wide field eyepieces – those with apparent fields exceeding 50 degrees – starts in an unlikely place: the battlefield. While we astronomers obsessed over sharp images, military designers focused on giving tank crews and artillery teams wider views of their surroundings. They needed width first, sharpness second – just enough to aim accurately.
This completely changed how designers thought about eyepieces. Instead of chasing perfect correction and contrast like civilian astronomy had done, military engineers pushed hard to maximize the field of view. What amazes me is that they developed these ultra-wide designs years before we astronomers got our hands on them.
Erfle’s 60-Degree Field Innovation
Heinrich Erfle created something special while working at Zeiss during World War I. His 1921 patent showed a clever five-element design arranged in three groups – two achromatic doublets sandwiching a convex lens between them. Having used many Erfle eyepieces over the years, I can tell you this wasn’t just adding more glass – it was a carefully thought-out extension of existing designs.
The views through an Erfle are impressive, with an apparent field of view of approximately 60 degrees. Compare that to the tunnel-like 40-45 degrees you get with Orthoscopics! The generous eye relief and big eye lens make them particularly comfortable for long sessions at the telescope. I’ve found them excellent for:
- Sweeping through star fields
- Taking in large nebulae
- Exploring open clusters
- General low-power scanning
But there’s always a catch. Every Erfle I’ve used falls apart at high power. Try them at short focal lengths and you’ll see nasty astigmatism and ghost images. That’s why I stick to using them between 18mm and 32mm – they’re just perfect for low and medium power views.
König Design and Improved Eye Relief
While Erfle worked on his design, Albert König developed something different in 1915. His eyepiece used a concave-convex positive doublet paired with a plano-convex singlet, their curved surfaces almost touching. Think of it as a streamlined Orthoscopic.
The König’s claim to fame was its incredible eye relief – nothing could match it until Al Nagler came along in 1979. This made such a difference for comfortable viewing, especially wearing glasses. With about 55 degrees apparent field, it gave you more space than an Orthoscopic without sacrificing that crisp view.
Modern König variants use fancier glass than was available during WWI, often with extra elements for better performance. These updated designs can show you 60-70 degrees of sky. While newer premium eyepieces have largely replaced both Erfle and König designs, I still appreciate how they showed us what was possible with wide fields.
These military-inspired designs proved we could push field width far beyond what anyone thought possible. The principles they pioneered laid the groundwork for the ultra-wide revolution that would transform amateur astronomy in later decades.
Modern Premium Eyepieces (1980-Present)
Everything changed in 1980 when Al Nagler showed us what eyepieces could really do. I remember the first time I looked through a Nagler – it wasn’t just an eyepiece, it was a window into space itself.
Nagler’s Ultra-Wide Field Revolution
The story starts with an 11-year-old boy walking through the blue doors of New York’s Hayden Planetarium in 1946. That boy was Al Nagler, and his love of astronomy would eventually revolutionize how we all observe. After years as an optical designer, he took what seemed like a crazy risk in 1982 by introducing a $200 eyepiece series – pretty shocking when most eyepieces went for under $50.
That first 13mm Nagler hit us with an incredible 82-degree field. The view was so immersive that observers started calling it the “spacewalk eyepiece.” I love how David Levy described his first look: “it was as though I had opened a big door to the universe and walked right through the telescope”.
But what really set Naglers apart wasn’t just the wide field – these things stayed sharp right to the edges even in fast f/4-f/5 telescopes. Try that with an old Erfle and you’ll see why this was such a big deal. TeleVue kept pushing forward through the 1980s, adding 9mm and 4.8mm versions before dropping the massive 2.3-pound Type 2 series in 1987.
The Nagler eyepieces also have some of the best contrast of any eyepieces, helping coax out every detail possible. Using my Naglers in a good telescope has allowed me to see things I thought I could only see with imaging.
Ethos and 100-Degree Field Designs
Just when we thought fields couldn’t get any wider, TeleVue shocked everyone in 2007 with their 100-degree field Ethos eyepieces. Al’s son David came up with this one, keeping everything we loved about Naglers – the contrast, the eye relief, the edge sharpness – while pushing the field even wider.
Here’s something wild – that jump from 82 to 100 degrees might not sound huge, but it actually gives you 50% more field area. The first time I saw the full moon through a 13mm Ethos in my 1200mm scope, it felt like someone had stuck the moon right in my face.
Competition heated up fast. Scott Roberts’ company Explore Scientific jumped in with their “100 Series” eyepieces. Then they really threw down the gauntlet with a 120-degree 9mm eyepiece. Sometimes I wonder where this ultra-wide race will end!
One word of caution, many people, myself included, feel that 100+degrees is a little too much for our normal viewing. I do enjoy it on occasion, but I find that much area a little distracting. In other words, try before you buy!
Premium Glass and Exotic Materials in Modern Eyepieces
Modern premium eyepieces pack some serious technology:
- Advanced glass formulations: These aren’t your grandfather’s eyepieces – they use exotic glass that kills aberrations and maximizes light transmission
- Sophisticated coatings: Every surface gets special treatment to cut reflections and boost contrast
- Environmental protection: Many now come argon or nitrogen purged and waterproof, saying goodbye to fogging and fungus
Take TeleVue’s Type-4 Naglers – six elements of special glass giving you 17mm eye relief with that ultra-wide view. Or look at Explore Scientific’s premium stuff with their “argon-purged waterproof” builds and fancy EMD coatings.
Sure, this technology isn’t cheap. When the 21mm Ethos launched at $850, it set a new record for production eyepiece pricing. But here’s the thing – I’ve found these premium eyepieces are more like investments. They’ll work great with any telescope you buy down the road. They also hold their value remarkably well, a used Nagler will cost you almost the same as a new one.
Looking back from Plössl to Nagler to Ethos, we’re not just seeing better optics – we’re seeing a complete transformation in how we experience the universe. These eyepieces don’t just show you space – they practically take you there.
Understanding Eyepiece Specifications
After years of helping fellow astronomers choose eyepieces, I’ve learned that understanding specifications makes all the difference between a great purchase and a disappointing one. Let me break down these crucial details that determine not just what you’ll see, but how comfortable you’ll be while observing.
Focal Length and Magnification Calculation
The first thing I look at on any eyepiece is the focal length – that number in millimeters stamped on the barrel. Shorter focal lengths give you higher magnification, while longer ones show you more sky.
Here’s the simple math I use for magnification: Magnification = Telescope focal length ÷ Eyepiece focal length
Let me give you a real example: put a 10mm eyepiece in a telescope with 650mm focal length, and you get 65× magnification (650 ÷ 10 = 65). This explains why swapping eyepieces changes your magnification so dramatically.
One thing I always check: exit pupil diameter (eyepiece focal length ÷ telescope f/ratio). If it’s over 7mm, you’re wasting light – it’s just spilling around your eye’s pupil.
Apparent vs. True Field of View
We deal with two different field measurements in eyepieces. The apparent field of view (AFOV) tells you how wide the view looks through the eyepiece alone – anywhere from 40° to 110° depending on the design.
I’ve used pretty much every design out there. Here’s what they typically offer:
- Plössl: about 50°
- DeLite: 62°
- Panoptic: 68°
- Delos: 72°
- Nagler: 82°
- Ethos: 100-110°
But what really matters is the true field of view (TFOV) – the actual chunk of sky you’re seeing. You can figure it out by dividing apparent field by magnification:
True field of view = Apparent field of view ÷ Magnification
For more precision, try this formula: True field = (Eyepiece field stop diameter ÷ Telescope focal length) × 57.3
That field stop, by the way, is the metal ring inside the eyepiece that physically limits your view.
Eye Relief: Critical Factor for Comfort
Eye relief might sound technical, but trust me – it’s all about comfort. It’s the distance from the top lens to where your eye needs to be for the full view. This really matters if you wear glasses – you’ll want at least 15-20mm of eye relief.
I’ve found that eye relief usually shrinks with focal length, which can make high-power viewing a real pain. If you’ve got astigmatism and wear glasses (telescopes can’t fix that), good eye relief becomes crucial.
Here’s something interesting I discovered: with tiny exit pupils (1mm or less), you might not even need your glasses. Those pencil-thin light beams actually bypass most eye defects.
The practical problem with short eye relief? Your eyelashes keep hitting the lens, smearing oils that eventually damage the coatings. That’s why I’m glad manufacturers now design high-power eyepieces with more eye relief than their design would naturally give.
Optical Performance Characteristics
After spending countless nights testing eyepieces, I’ve learned that specs on paper don’t always tell the whole story. The real test comes when you point that eyepiece at the night sky. Let me share what I’ve discovered about how these optical qualities actually matter in practice.
Edge Sharpness and Field Flatness
You know what really separates great eyepieces from merely good ones? The stars at the edge of the field. I learned this lesson the hard way – spent years thinking my cheaper eyepieces were just fine until someone let me look through their premium glass. The difference at the field edge was shocking.
Field flatness is something I wish someone had explained to me earlier. Picture the focal plane like a sheet of paper – cheap eyepieces tend to curve it like a bowl. Here’s a simple test I use: center a medium-bright star, focus it perfectly, then slide it to the edge. If you need to refocus to sharpen it up, you’re seeing field curvature. I can’t tell you how many times I blamed my telescope’s collimation before figuring this out!
The premium eyepieces I use now keep everything sharp across the whole field. Makes such a difference when you’re trying to study large star clusters or extended nebulae.
Contrast and Light Transmission
Here’s something that took me years to really understand – contrast matters more than almost anything else. It’s not just about brightness; it’s about how well the eyepiece handles scattered light, coating quality, surface accuracy, and transmission efficiency. Good contrast lets you spot details on Jupiter that you’d miss otherwise, or see those faint outer regions of galaxies.
The best eyepieces I’ve used control light scatter through:
- Super-smooth lens polish
- Top-notch anti-reflection coatings
- Blackened edges that trap stray light
- Precisely machined internal parts
One thing that surprised me – simpler designs often give better contrast naturally. Those fancy multi-element eyepieces need really precise manufacturing and sophisticated coatings just to match the contrast of simpler ones. Sometimes less really is more!
Chromatic Aberration Control
Let me tell you about the rainbow effect that drove me crazy when I first started observing – chromatic aberration. Even my expensive eyepieces show some color fringing at the edges. Took me a while to accept that this is just physics – different colors of light focus at slightly different points.
There are actually two types (wish I’d known this earlier): longitudinal chromatic aberration, where colors focus at different distances, and lateral chromatic aberration, where they focus at different heights off-axis. The premium eyepieces in my collection handle both pretty well through clever designs and exotic glass.
Here’s something interesting I’ve noticed – some of my favorite eyepieces actually allow a tiny bit of color fringing to prevent worse problems like astigmatism. That’s why two eyepieces with identical specs on paper can give surprisingly different views. Astronomy’s funny that way – sometimes the “perfect” solution isn’t really the best one.
Practical Considerations for Selecting Eyepiece Types
After decades of helping fellow astronomers choose eyepieces, I’ve learned that building a proper eyepiece collection is more art than science. Let me share some hard-won wisdom about matching eyepieces to telescopes and building a versatile set without breaking the bank.
Matching Eyepieces to Telescope Types
Telescopes with focal ratios below f/5 can be really picky about eyepieces. I learned this the hard way – what looks great in an f/10 scope can show awful edge distortion in a fast telescope. Through trial and error, I’ve found that premium eyepieces from Tele Vue, Pentax, and Baader handle these fast scopes best.
Schmidt-Cassegrains at f/10 are much more forgiving. I’ve gotten excellent views through these telescopes even with mid-range eyepieces. Dobsonians are trickier – their typically faster focal ratios really benefit from better quality eyepieces, especially for wide-field views.
Building a Versatile Eyepiece Collection
Here’s something I wish someone had told me when starting out – buy three really good eyepieces instead of six mediocre ones. A solid starter set needs:
- Low power eyepiece: I use this constantly for finding objects and framing large deep-sky targets
- Medium power eyepiece: Perfect for most galaxies and nebulae
- High power eyepiece: Essential for those steady nights when planets and lunar details pop
For calculating focal lengths, I follow two simple rules: for lowest power, choose an eyepiece that gives about a 5mm exit pupil (matching your dark-adapted eye). For highest power, stick to 60x per inch of aperture.
Budget vs. Premium Options: Where to Invest
I’ve watched countless beginners chase maximum magnification, only to discover that low-power eyepieces matter more for real astronomy. From experience, I suggest budgeting about half your telescope’s cost for eyepieces as a start.
If you’re working with under $50 each, don’t despair, the Svbony 68 degree UW eyepieces are a suprising improvement over the eyepieces that come with most beginner telescopes even though they are a Kellner design. For under $100 – Celestron X-Cel LX eyepieces offer very good views and are my go-to eyepieces for solar work or star parties. Between $100-$250, you’ll find Baader Planetarium’s Hyperion line hard to beat in performance and flexibility as all but the 31mm and 36mm fit both 1.25″ and 2″ focusers without an adapter. Above $250, premium options like TeleVue Naglers show what’s really possible with perfect edge correction and outstanding contrast.
For a little more detail on recommended eyepieces, check out my article on the 5 Best telescope eyepieces.
Unlike telescopes that you might outgrow, quality eyepieces last forever. I still use premium eyepieces I bought years ago. Your observing interests should guide your investments – wide-field observers need excellent low-power eyepieces, while planetary viewers might want top-notch short focal lengths.
What about zoom eyepieces?
That is a whole different topic. Check out my Best Telescope Zoom Eyepiece article if you want detailed information on zoom eyepieces.
Conclusion
Looking back at my journey through eyepiece evolution, I’m amazed at how far we’ve come from those simple glass elements of early telescopes. Every time I think we’ve reached the limit of what’s possible, someone proves me wrong with another innovation.
The military connection still fascinates me – who would have thought that tank gunners would give us the wide-field views we enjoy today? Those Erfle and König designs changed everything. Then Al Nagler came along and showed us what was really possible. The first time I looked through a 100-degree eyepiece, I actually pulled back from the telescope because the view was so immersive!
After helping countless astronomers choose eyepieces, I’ve learned that specs aren’t everything. Sure, understanding the technical details matters – I spent years memorizing focal lengths and field stops. But matching the eyepiece to your telescope and observing style matters more than chasing the highest magnification. I made that mistake early on, buying the shortest focal length I could find only to discover that my favorite eyepiece would be a modest 32mm that gives wonderful wide-field views.
The technology keeps advancing – every year brings new glass types, better coatings, wider fields. Sometimes I wonder what Galileo would think of our modern eyepieces! But those basic principles we’ve covered – focal length, eye relief, field of view – they’re still the foundation of everything. I’ve watched too many observers get lost in marketing hype and forget these fundamentals.
Remember what I said at the beginning – your eyepiece is the critical link between telescope and eye. It doesn’t matter how big your mirror is or how perfect your tracking – a poor eyepiece will waste it all. Take your time, do your research, and choose eyepieces that match your needs. I’ve seen humble telescopes deliver stunning views through quality eyepieces, while expensive scopes disappoint through poor ones. In the end, the right eyepiece doesn’t just show you the universe – it brings you closer to it.
I do want to make one thing clear. While high-end eyepieces like TeleVue Naglers that cost $300-$800 are extremely nice and absolutely worth the money for the advanced amateur astronomer, they are in no way “necessary” to provide a substantial improvement in your views.
The Truth About Telescope Filters: What Most Beginners Get Wrong

I’ve spent years watching fellow astronomers fall into the same trap – believing telescope filters will magically transform their views of the night sky. The marketing makes it sound so simple: just add a filter and suddenly faint nebulae pop with incredible detail. If only it worked that way.
Here’s the reality I’ve learned through countless nights of observation: filters don’t add anything to what you see. They actually work by taking light away, blocking certain colors while letting others through. Sure, this can enhance contrast and make some objects easier to spot, but it’s nothing like the dramatic claims you’ll see in astronomy catalogs.
One of the biggest challenges I face these days comes from the LED streetlights popping up everywhere. These new lights throw out such a wide range of colors that traditional light pollution filters struggle to handle them. I’ve watched several astronomy friends waste money on expensive filters, expecting them to cut through city light pollution like it wasn’t there.
Let me help you avoid the mistakes I made when starting out. Through this article, I’ll walk you through what telescope filters can and can’t do, based on my real-world experience using them. We’ll look at everything from basic light pollution filters to specialized narrowband options. Most importantly, I’ll show you when these tools are actually worth your money and when you’re better off saving it for other gear.
The Marketing Hype vs. Reality of Telescope Filters
Let me tell you about the time I walked into my local astronomy shop and nearly fell for a filter promising “600-power views” of deep sky objects. The salesperson had all these gorgeous photos showing incredible nebula detail. Good thing I’d already learned the hard way about filter marketing claims.
How filter advertisements mislead beginners
You’ve probably seen these ads yourself – filters that supposedly transform your basic telescope into a deep-sky powerhouse. The marketing folks love throwing around impressive-sounding numbers like “454-power” that mean absolutely nothing useful about what you’ll actually see. Trust me, it’s about as meaningful as those “140-mph” speedometer readings on economy cars.
The really sneaky part? These companies show incredible astrophotos on their packaging without mentioning those images came from specialized cameras using long exposures and heavy processing. Your eye will never see anything close to that through the eyepiece.
I’ve owned quite a few filters over the years, and here’s what the ads won’t tell you: filters work by blocking light, not adding it. Sure, they might claim to “enhance details” or “improve contrast,” but as Sky at Night Magazine points out, “A telescope’s job is to grasp as much light as possible, but filters add a further barrier between your eye and the sky”.
What filters actually do to light
Simple truth here – filters block certain colors of light while letting others pass through. As one expert puts it, “a filter is a device that rejects a signal we don’t want and passes a signal that we do want”.
Let me break down the main types I’ve used:
- Lunar filters: Think of these as sunglasses for your telescope when viewing the Moon
- Planetary filters: Only let specific colors through to boost planet details
- Deep-sky/light pollution filters: Try to block artificial light while keeping the good stuff
- Solar filters: Block 99.999% of sunlight so you don’t fry your eyeballs
The fancy dichroic filters use metal layers on glass to reflect unwanted light. The spacing between these layers determines what gets through. But here’s something the ads rarely mention – if you’re using a fast telescope (low f-ratio), these filters can actually make things worse due to something called “blue shift“.
The psychology of expectations in astronomy
I’ve noticed something interesting about us amateur astronomers – we share that same curiosity that makes kids ask endless questions about the sky. Problem is, this wonder makes us vulnerable to marketing promises about seeing incredible cosmic sights.
One fellow astronomer confided in me, saying “It was my secret shame that I wasn’t clever enough to use a small, simple telescope. Self-doubt is a vicious thing”. I’ve been there myself, buying filters hoping they’d prove I knew what I was doing, only to feel disappointed when the improvements were subtle rather than dramatic.
The night sky does something special to us. That vast darkness, the meditation of stargazing – it’s no wonder we’re drawn to anything promising to enhance the experience. But after years of using filters, I’ve learned to appreciate their modest but real benefits. They won’t transform your viewing, but with the right expectations, they can definitely help you see more.
Light Pollution Filters: Miracle Cure or Modest Helper?
Living in a light-polluted suburb, I’ve tried just about every filter promising to turn my washed-out skies into a dark-site experience. Let me save you some money and disappointment – these filters aren’t magic wands, but they can help under the right conditions.
What light pollution filters can realistically achieve
Here’s what took me years to figure out: light pollution filters work by blocking specific colors of artificial light while trying to let starlight through. Think of them like a bouncer at a club – they’re picky about what light gets in. But here’s the kicker – they actually make everything dimmer, not brighter. The improvement you see comes from making the background sky darker than the object you’re trying to view.
I’ve tested quite a few filters that claim to block up to 90% of unwanted light from city skies. While that sounds impressive, remember what I said about making everything dimmer? Still, with certain emission nebulae, these filters can mean the difference between seeing faint details and seeing nothing but gray fuzz.
When these filters actually make a difference
Through countless nights of testing, I’ve found these filters work best in specific situations:
- Observing emission nebulae – Objects like the Orion Nebula really pop because they emit light at specific wavelengths the filter can isolate.
- Viewing from suburban areas – From my backyard, where we still have some sodium streetlights, these filters make a noticeable difference.
- Used with appropriate telescope setups – I’ve learned the hard way that your telescope type and size matter hugely. Narrowband filters generally outperform broadband ones for visual use.
- Paired with dark adaptation – Trust me on this one – give your eyes 15-20 minutes to adjust before judging the filter’s effect.
From downtown areas, though, even my best filters struggle to cut through the light soup. For astrophotography, they’re more helpful, letting me shoot longer exposures before the sky washes out.
Common misconceptions about light pollution filters
Let me bust some myths I’ve encountered over the years:
Misconception #1: Filters make objects brighter. Nope – they only subtract light. Any perceived brightness boost comes from better contrast.
Misconception #2: All objects benefit from filters. I wasted money learning this one – galaxies, star clusters, and reflection nebulae barely improve. These filters shine mainly on emission nebulae.
Misconception #3: Filters block all light pollution. I wish! Those new LED streetlights in my neighborhood? They laugh at traditional light pollution filters. As more cities switch to LEDs, these filters become less effective.
Misconception #4: Expensive filters work miracles. Even my priciest filter can’t turn my suburban sky into a dark site. The difference between filtered city viewing and true dark skies still amazes me.
Are these filters worth your money? That depends entirely on what you want to observe and where you live. While they won’t transform your urban skies into a pristine desert night, they might just help you spot that elusive nebula you’ve been chasing. I have used the Baader Moon and Skyglow filter with excellent results where I live.
Color Filters: The Truth About Planetary Viewing
After spending countless nights testing light pollution filters, let me share what I’ve learned about their colorful cousins – planetary filters. These simple colored glass disks work completely differently, and boy, did I have some interesting nights figuring out what they actually do versus what the ads claim they do.
How color filters affect what you see
Think of these filters like a bouncer who only lets certain colors into the club. A red filter, for example, waves through red light while showing blue and green the door. Pretty simple, right? Well, there’s more to the story.
The whole system uses something called the Wratten numbering system, cooked up by Kodak way back in 1909. It’s basically a standardized way for us astronomers to avoid confusion when talking about filters. Trust me, it’s better than saying “that sort of yellowish-greenish one.”
Here’s something that took me way too long to figure out – these filters never add light. I can’t tell you how many times I’ve watched beginners (including myself, once upon a time) get disappointed when their shiny new filter actually made everything dimmer. Sure, it might increase contrast, but it’s still taking away light, not adding it.
Realistic improvements you can expect
Let me be straight with you – most color filters give subtle improvements, not dramatic ones. A yellow filter (#12, #15) might make Jupiter’s Great Red Spot pop a bit more, or help Mars’s polar caps stand out. Blue filters (#80A, #38A) can make Jupiter’s cloud bands more obvious by blocking out red and orange light.
I’ve found the results vary based on three main things:
- Telescope aperture – Those dark filters need some serious light-gathering power to work well. We’re talking 8 inches or more. Using my old 4-inch scope with dark filters was like trying to see through sunglasses at night.
- Planet being observed – Each planet has its favorite filters:
- Mars: Orange (#21) for dust storms; Blue for clouds
- Jupiter: Blue (#80A) for bands; Yellow (#8) for that famous spot
- Saturn: Yellow-green (#11) for rings; Light blue for storms
- Seeing conditions – In lousy seeing, you might as well leave the filters in their case.
When color filters are worth using
Through trial and error (mostly error 😉), I’ve found these filters really shine in specific situations. Jupiter’s bands, Mars’s caps, and Saturn’s rings all perk up with the right filter. But here’s the catch – you need to get good views without filters first. As a wise observer once told me, “before you venture into the realm of filters to improve your planetary views, first make sure that you are getting detailed views of planets without filters”.
For those just starting out, grab a light yellow (#8) and pale blue (#82A) filter. They’re like the training wheels of planetary filters – helpful without being overwhelming. I consistently get good results with these on my smaller scopes.
Here’s my advice after years of filter collecting: start small and build based on what you love viewing. Mars fan? Orange and green filters should top your list. Can’t get enough of Jupiter? Blue and yellow will be your best friends.
Remember, these aren’t magic solutions – they’re more like subtle enhancers. But used right, with proper expectations, they can definitely add something special to your planetary viewing. Just don’t expect miracles from those marketing claims!
Moon and Solar Filters: Separating Fact from Fiction
Let me share something that still makes me cringe – watching a beginner thread a cheap eyepiece solar filter onto their telescope. I nearly did the same thing when starting out, not realizing it could have literally cooked my retinas. But we’ll get to that scary stuff in a minute.
Do you really need a moon filter?
The Moon through a telescope can look blindingly bright, right? That’s what I thought too, until I learned something surprising – it’s actually dimmer through smaller telescopes than with your naked eye. Those neutral density (ND) filters they sell as “moon filters” might help with comfort, and on larger telescopes, but on a small telescope they are not really doing you a favor.
After years of lunar observing, here’s what works in addition to a filter:
- Crank up the magnification – it naturally dims the view
- Skip the dark adaptation before Moon viewing
- Keep a white light handy for reading charts
- Some telescope front caps have a smaller hole, put the cap on and remove the small hole cover
Some of my astronomy buddies swear by polarizing filters since you can adjust the brightness. Others use colored filters – blue for sharp shadows, yellow for better surface contrast. I personally like polarizing filters such as the Celestron Polarizing Filter.
The dangerous solar filter myth many beginners believe
Now for the scary part. Those solar filters that thread into eyepieces? They’re basically ticking time bombs. I’ve seen one crack during solar viewing – thankfully nobody was looking through it at the time. These things can shatter from heat faster than you can blink, and by then it’s too late.
Here’s the absolute rule I live by: safe solar filters go on the FRONT of your telescope, period. No exceptions, no clever workarounds. Why? Because the Sun’s energy needs to be blocked before your telescope concentrates it.
Something terrifying I learned – solar damage to your eyes doesn’t hurt. Your retina has no pain receptors, so you won’t feel it cooking. By the time you notice vision problems hours later, the damage is permanent.
Safe solar viewing practices
Let me be crystal clear about proper solar filters. They need to block:
- More than 99.999% of visible light (380-780 nm)
- At least 99.5% of near-infrared radiation (780-1400 nm)
Safe filters I’ve used and trust:
- Aluminized polyester made specifically for solar viewing
- Type 2-Plus glass filters with proper coatings
- Shade 12-14 welding filters
- Black polymer filters
These should let through less than 0.003% of visible light. Period.
Now for the “absolutely not” list – things I’ve actually seen people try (please don’t): color film, photo negatives, smoked glass, stacked sunglasses, floppy disks, and CDs. These might make the Sun look dim, but they’re letting through invisible infrared radiation that can fry your eyes.
I also avoid dirt cheap solar filters. Remember, any imperfection or failure while looking through a telescope (or binoculars) has the potential to irreversably blind you. It isn’t worth it! Good brands to look for are Celestron, Baader, and Thousand Oaks.
Don’t have a proper filter? Use projection instead. I’ve had great success projecting the Sun’s image onto white cardboard using both pinhole projectors and telescopes. Just make sure nobody looks through the scope.
Remember this: you can only safely look at the Sun with your naked eye during the brief totality of a total solar eclipse. Partial eclipses, annular eclipses – those need proper protection every single time.
Narrowband Filters: When They’re Worth the Investment
Let me tell you about one of the most expensive astronomy mistakes – dropping hundreds or thousands of dollars on a complete set of narrowband filters before understanding what they actually do. These aren’t your basic light pollution filters. We’re talking about seriously specialized equipment that only lets through incredibly specific colors of light, usually just 3-7nm wide.
These are mostly useful for imaging although they can be useful for visual in certain circumstances. I highly recommend you borrow these and try them before purchasing them. You can often go to a local astronomy club’s star party and borrow equipment to test.
The specific objects that benefit from narrowband filters
Through years of testing, I’ve found these filters are really only useful on certain targets:
- Emission nebulae like the Orion and Rosette Nebulae – these beauties actually generate their own light
- Planetary nebulae from dying stars throwing off their outer layers
- Supernova remnants that really pop with the right wavelength isolation
Here’s what nobody told me starting out – don’t waste your money using these on galaxies. Same goes for star clusters and reflection nebulae. Trust me, I tried. These objects spread their light across too many colors for narrowband filters to help. I also noted that the 7nm work far better than the 3nm in the rare cases where they work for visual. One such filter is the Optolong L-Extreme 7nm Dual Narrowband Filter (H-Alpha and O-III).
Why telescope size matters for filter effectiveness
Your telescope makes a huge difference with these filters. I learned this the expensive way. Those fast telescopes (low f-ratio numbers)? They cause something called “shift off band” where the filter starts blocking the very light you’re trying to see.
Think these super-narrow 3nm filters sound better than 7nm ones? Not so fast. Sure, they might give better contrast theoretically, but they cut out so much light that you’ll find it almost impossible to see anything without a serious telescope and imaging equipment.
Here’s something interesting I discovered – refractors actually work better with narrowband filters. This doesn’t mean they don’t work with other types, again, try before you buy.
Cost vs. benefit analysis for beginners
Let’s talk money – these things aren’t cheap. We’re looking at $100 to $600 per filter. The L-uLtimate gives you the most bang for your buck at $108 per unit SNR, while fancy options like the Triad Ultra run about $406 per unit SNR.
After burning through my astronomy budget, here’s what I wish someone had told me:
- Research that OIII filter carefully – cheap ones create nasty halos and reflections
- Start with one filter for specific targets you love viewing
- If you mix brands, watch out for focus issues from different thicknesses
Bottom line? These filters are serious investments that make sense if you’re deep into nebula observing and have a telescope big enough to handle them. Otherwise, save your money for other gear. I wish someone had given me that advice when I started.
Filter Compatibility Issues Most Beginners Overlook
After spending hundreds on filters, I discovered something the catalogs don’t mention – getting them to actually fit and work properly can be surprisingly tricky. Let me share some compatibility headaches I’ve encountered that might save you some frustration.
Matching filters to your eyepieces
You’d think filter threads would be standardized (they’re supposed to be M28.5×0.6 for 1.25″ and M48x0.75 for 2″ threads), but reality isn’t that simple. I’ve got a drawer full of filters, and some just refuse to play nice with certain eyepieces. One of my astronomy buddies put it perfectly: “All my Lumicon 1.25″ filters thread onto my eyepieces quite well with the exception of the 1.25″ H-Beta filter. That one doesn’t like any threads except for that of my old Meade 14mm Ultrawide”.
Here’s what I’ve learned the hard way – never force a filter that doesn’t thread smoothly. Take it from someone who stripped some expensive threads. A gentle test fit tells you everything you need to know. Sometimes just cleaning the threads with a stiff brush makes all the difference.
How different telescope designs affect filter performance
This might surprise you – your telescope’s design can make or break filter performance. Those fast scopes everyone loves? They cause something called “blue-shifting” where the filter starts blocking the wrong colors.
Something really interesting I discovered – big reflectors with central obstructions (like Hyperstar or RASA systems) handle filters completely differently than refractors. The obstruction only lets angled light through, which actually makes the blue-shifting worse. Would you believe a tiny 4″ refractor can actually outperform an 8″ RASA when using really narrow filters?
Through trial and error, I’ve found that F4.8 or slower telescopes generally work best with filters, unless you spring for those fancy “pre-shifted” ones.
Quality considerations that impact results
Nobody told me about filter thickness when I started. A 2mm thick filter can actually shift your focus point – something that’s especially problematic with fast scopes.
The really frustrating part? Quality control varies wildly between manufacturers. Some filters are precision-made works of art, while others… well, let me share what another observer reported: “We see a lot of new eyepieces with poor machining in which metal debris is clearly visible”. Not exactly confidence-inspiring when you’re spending serious money on gear.
Conclusion
After thousands of nights under the stars and probably too much money spent on filters, I’ve learned something important – these tools aren’t magic, but they can be incredibly useful when you understand their limits. The key is matching the right filter to your specific situation.
Let me share what took me years to figure out. Those light pollution filters sitting in my case? They really shine on emission nebulae when I’m observing from my suburban backyard. The color filters I once dismissed as gimmicks? They actually help tease out subtle details on Jupiter and Mars when the seeing is steady. And those expensive narrowband filters I initially regretted buying? They’ve become invaluable for specific deep-sky objects while imaging.
Here’s the most important lesson I wish someone had taught me starting out: filters always take away light, they never add it. Sounds disappointing, right? But understanding this simple truth helped me set realistic expectations and make smarter choices. My advice? Start small – grab one or two basic filters that match what you love to observe and what your telescope can handle. Trust me, this approach will save you money and frustration while you discover which filters actually improve your time under the stars.
If you are interested in some beginner filter recommendations, check out my article on the best filters you can get or specificaly the best light pollution filters you can get.
Spherical Mirror vs Parabolic Mirror in a Reflector Telescope, Which is Better?
The choice between a spherical mirror and a parabolic mirror is one of those variables that seems to get blown out of proportion when looking at telescopes. Is it important to understand the difference? Absolutely. Should it be of critical concern to a beginner choosing their first telescope? Let’s talk about it.
This article aims to provide a comparison between these two widely used mirrors in telescope optics and demystify the differences. I also hope it helps beginners understand when, and if, this should be a concern.
Understanding the Basics of Telescope Mirrors
What is a Mirror in a Telescope?
In a reflector telescope, the primary mirror plays a critical role. It collects the incoming light from celestial bodies and focuses it to create a concentrated and magnified image for the observer. The shape of this mirror, whether spherical or parabolic, significantly impacts the quality and clarity of the resulting image.
While magnification in a telescope seems to be well understood by even complete beginners, the concentration of light is often overlooked. One way to understand this fairly easily is to look at the aperture of the telescope (the front that faces the sky) and see how large that opening is. Now look at your eyepiece and measure the size of the glass where you put your eye to see.
The aperture of a beginner reflector telescope may be 114mm, 130mm, or even more, while the glass you look through in your eyepiece is likely to be about 10mm depending on the eyepiece. That difference shows that your telescope is concentrating the light it collects with a 130mm opening into a 10mm circle. This is why you can see things in a telescope you can’t see with the naked eye, and why bigger telescopes allow you to see more.
Both aspects of the telescope mirror: light concentration, and magnification, are critical in the discussion of the types of mirrors in telescopes, and why you might prefer one over the other.
Spherical Mirrors: An Overview
Spherical mirrors, as the name suggests, have a spherical shape. They are a portion of a sphere and can be either convex (bulging outward) or concave (curving inward). In the context of telescopes, we primarily deal with concave spherical mirrors. These mirrors magnify the image, but because of their spherical nature, the incoming parallel light rays do not converge at a single focal point, resulting in a less sharp and slightly blurred image.

Parabolic Mirrors: An Overview
On the other hand, parabolic mirrors have a parabolic shape, enabling incoming parallel light rays to converge at a single point. This unique property provides a sharper, more focused image compared to spherical mirrors. However, they do present their own set of challenges, including a higher manufacturing cost and the occurrence of an optical aberration known as coma.

Delving Deeper: How Spherical Mirrors Work
Concave Spherical Mirrors
In reflector telescopes, concave spherical mirrors are used to magnify the image. However, due to the spherical nature of these mirrors, incoming parallel light rays do not focus at a single point, resulting in a less focused and slightly blurred image. This is particularly noticeable when the mirror’s circumference is large, and can be all but impossible to detect in smaller mirrors without specialized tests and/or equipment.
This lack of perfect convergence of light rays is called Spherical Aberration and gets worse the larger the mirror is.
Convex Spherical Mirrors
Convex spherical mirrors, on the other hand, reflect light rays outward in all directions or toward a single direction. These mirrors are commonly used in car mirrors or security mirrors to make objects appear closer than they are, often resulting in a fisheye-like image.
Analyzing the Advantages and Disadvantages of Spherical Mirrors
Spherical mirrors bring both advantages and disadvantages to the table. On the positive side:
- They are relatively easy to manufacture.
- They are less expensive due to simpler manufacturing processes.
- They are less prone to manufacturing errors.
- More are produced, so they tend to have more consistent quality.
On the downside:
- They lack a single, fixed focal point when the mirror’s circumference is too large.
- The brightness of a celestial object can be diminished.
- Images can be distorted due to spherical aberration.
- They can have issues with diffraction.
Understanding the Functioning of Parabolic Mirrors
Unlike spherical mirrors, parabolic mirrors have a distinct design that allows incoming parallel light rays to converge at a single point. This design results in a more focused and sharper image. However, parabolic mirrors also suffer from an optical aberration called coma (comatic aberration).
Coma is caused because light hits the mirror off-axis, or at an off angle, which reflects light to slightly different points. This creates a comet-like flare instead of a sharp point. This is most commonly visible at the edges of the field of view, and gets worse the faster the telescope is, but can be mostly corrected with a coma-corrector. In fact, astrophotographers almost always have a coma-corrector on their fast Newtonian imaging scopes.
Weighing the Pros and Cons of Parabolic Mirrors
Parabolic mirrors offer several advantages:
- They produce a more focused image.
- They do not suffer from spherical aberration.
- They are ideal for a wider viewing experience.
- They produce more light than a spherical mirror.
However, they also have their own set of disadvantages:
- They suffer from coma.
- They are more expensive to produce.
- Cheap versions often suffer from astigmatism.
- Fewer are produced in small sizes, which can lead to quality control issues.
Spotting the Differences Between Parabolic and Spherical Mirrors
Without removing the mirror and running specific tests with expensive test equipment, the star test is probably the best way to answer that question. If nothing else, performing a star test will make sure that your collimation is as good as it can get, which is even more important than your mirror type.
A general rule of thumb is that the smaller and less expensive a telescope is, the more likely it is to have a spherical main mirror. While there are certainly exceptions to this, costs have to be cut somewhere, and this is usually where it happens. That isn’t necessarily a bad thing, read on.
The Final Verdict: Which Telescope Mirror is Better and Does It Matter?
I can’t tell you how many times I have been asked this question about a telescope mirror. Most people who ask this question are people buying budget telescopes and are “spec hunting”, trying to get the best specifications for their dollar. They also read on some forum about how superior the parabolic mirror is to the spherical mirror (and technically that is completely correct). The problem with this is that a person with a good spherical mirror, in a nice telescope, with excellent collimation and very good eyepieces will get a much better view than someone with a parabolic mirror in a cheap telescope who doesn’t really know how to collimate their telescope and uses cheap eyepieces.
You also have to consider that if you have two $300 telescopes, one has a spherical and one has a parabolic, it is entirely possible that the parabolic model cut costs somewhere else which actually makes it worse, such as in the eyepieces, focuser, or worse still, in the mount. The entire package needs to be considered, not just the mirror.
Your choice of locations is also far more important than your mirror. Someone with a spherical mirror out in a designated dark sky site will have infinitely better views than someone within a hundred miles of a large city who has a parabolic mirror. Read about that in this interesting article, Do dark skies really matter.
In other words, the type of mirror in your telescope is just one factor among many, and probably one of the factors you can not really do much about.
My suggestion is to quit chasing rabbits, buy a reasonable telescope from a name brand like Celestron, Sky-Watcher, etc, learn to collimate it well, allow it to acclimate completely before using it, and buy reasonably good eyepieces. Doing this will have far more impact on the quality of your viewing than holding out for a parabolic mirror that you don’t even have the equipment to verify it actually is parabolic.
Everything You Want to Know About Solar Eclipses

Solar eclipses are one of the most enchanting celestial events that capture the attention of millions around the globe. This comprehensive guide will delve into the marvel that is a solar eclipse, its types, its occurrence, and the science behind it. We will also discuss how to safely observe a solar eclipse and answer some commonly asked questions.
Understanding the Phenomenon of Solar Eclipses
A solar eclipse is a captivating natural phenomenon that occurs when the Moon, Earth, and Sun align in a straight line. This alignment leads to the Moon casting a shadow on Earth, temporarily blocking the Sun’s light.
In the realm of astronomy, an eclipse refers to an event where one celestial body obscures another. Typically, the term ‘eclipse’ signifies the Sun being obscured by the Moon (a solar eclipse) or the Earth blocking sunlight from reaching the Moon (a lunar eclipse).
For an eclipse to happen, the three bodies (Sun, Moon, and Earth) must align precisely. This alignment is possible only during certain moon phases – New Moon for a solar eclipse and Full Moon for a lunar eclipse.
However, these phases occur monthly, so why don’t we witness solar and lunar eclipses each month? The answer lies in the Moon’s orbit.
Delving into the Moon’s Orbit
Visualize for a moment the Earth being stationary with the Sun and Moon revolving around it. From our perspective on Earth, this is the apparent motion, leading to the belief in the geocentric “Earth-centered” model of the solar system.
In this model, the Sun seems to follow a specific path across the sky, passing through the zodiac constellations. This path is known as the ecliptic. Now, imagine this path as a hula hoop with Earth at its center.
The Moon does revolve around the Earth, so picture another hula hoop representing its orbit. However, these hoops don’t lie in the same plane. The Moon’s orbit is tilted by about five degrees relative to the Earth’s orbit.
During New Moon or Full Moon phases, the Moon typically appears above or below the Sun in our sky due to this tilt, resulting in no eclipse.
Approximately every six months, the Moon and the Sun are found near the points where the Moon’s orbit and the ecliptic intersect, known as lunar nodes. At these times, the Sun, Earth, and Moon align in a straight line, making an eclipse possible.
Types of Solar Eclipses
Depending on the alignment of the Sun, Moon, and Earth at the time of the event, we witness four different types of solar eclipses:
- Total Solar Eclipse: Occurs when the Moon fully obscures the Sun, casting a dark shadow known as the umbra on Earth.
- Partial Solar Eclipse: When the Moon doesn’t entirely block the Sun, it casts a lighter shadow called the penumbra, leading to a partial solar eclipse. Here, the Moon appears to take a “bite” out of the Sun.
- Annular Solar Eclipse: When the Moon is centered in front of the Sun but doesn’t cover the entire solar surface, it results in an annular solar eclipse or a “ring of fire” around the Moon.
- Hybrid Solar Eclipse: This rarest type of solar eclipse, also called an annular-total (A-T) eclipse, transitions between a total and annular eclipse as the Moon’s shadow moves across Earth.
Total Solar Eclipse

In a total solar eclipse, the Moon passes between the Sun and Earth, completely obscuring the Sun’s face. This type of solar eclipse occurs because the diameter of the Sun is about 400 times that of the Moon, but it’s also approximately 400 times farther away from Earth. As a result, from our perspective, the Sun and the Moon appear almost the same size in the sky, allowing the Moon to entirely block the Sun under the right conditions.
Annular Solar Eclipse

An annular solar eclipse happens when the Moon passes between the Sun and Earth when it is near its farthest point from Earth (apogee). At this distance, the Moon appears smaller than the Sun and doesn’t cover its entire face. Instead, a “ring of fire,” or annulus, is created around the Moon.
Partial Solar Eclipse
A partial solar eclipse happens when the Moon passes between the Sun and Earth when they aren’t perfectly aligned. As a result, only the penumbra (the partial shadow) passes over observers, and the Sun is partially obscured.
Hybrid Solar Eclipse
A hybrid solar eclipse, the rarest type, occurs when the Moon’s distance from Earth is near its limits for the umbra (the inner shadow) to reach Earth, and because our planet is curved. In most cases, a hybrid eclipse starts as an annular eclipse, becomes total in the middle, then returns to annular towards the end of the path.
The Science Behind Solar Eclipses
Solar eclipses are not merely captivating celestial events but are underpinned by intricate science. Let’s delve into how and why solar eclipses occur.
The Role of Lunar Nodes
When the Moon crosses the ecliptic — Earth’s orbital plane — it is known as a lunar node. The proximity of the new moon to a node determines the type of solar eclipse.
The type of solar eclipse is also influenced by the Moon’s distance from Earth and the distance between Earth and the Sun.
The Impact of the Moon’s Distance from Earth
The distance of the Moon from Earth significantly impacts the type of solar eclipse that occurs.
During a total solar eclipse, the Moon is relatively close to Earth, allowing it to fully cover the Sun.
In contrast, during an annular solar eclipse, the Moon is near its farthest point from Earth. At this distance, the Moon appears smaller than the Sun and doesn’t cover its entire face, creating a “ring of fire.”
During a partial solar eclipse, the trio of the Sun, Earth, and Moon isn’t perfectly aligned. As a result, only the penumbra (the partial shadow) passes over observers, and the Sun is partially obscured.
The Rarity of Hybrid Solar Eclipses
Hybrid solar eclipses are rare because they require specific conditions. They occur when the Moon’s distance from Earth is near its limits for the inner shadow — the umbra — to reach Earth and because the planet is curved.
Hybrid solar eclipses begin as one type of eclipse (either total or annular) and transition to another. These eclipses start as an annular eclipse because the tip of the umbra falls just short of making contact with Earth. They then become total because the roundness of the planet intercepts the shadow’s tip near the middle of the path, and finally, they return to annular towards the end of the path.
How Often Do Solar Eclipses Occur?
Approximately twice a year, we experience an eclipse season when the new moon aligns in such a way that it eclipses the sun. However, solar eclipses don’t occur every time there is a new moon phase because the moon’s orbit is tilted about 5 degrees relative to Earth’s orbit around the Sun. For this reason, the moon’s shadow usually passes either above or below Earth, preventing an eclipse from happening.
What Happens During a Solar Eclipse?
The type of solar eclipse will affect what happens and what observers will be able to see. Here’s what to expect during different types of solar eclipses:
Total Solar Eclipse
During a total solar eclipse, the sky darkens dramatically. Observers equipped with the correct safety gear may be able to see the sun’s outer atmosphere, known as the corona. This makes for an exciting viewing experience as the corona is usually obscured by the bright face of the Sun.
Annular Solar Eclipse
During an annular solar eclipse, the Moon doesn’t fully obscure the face of the Sun, as is the case in a total eclipse. Instead, it dramatically appears as a dark disk obscuring a larger bright disk, giving the appearance of a ring of light around the Moon. These eclipses are aptly known as “ring of fire” eclipses.
Partial Solar Eclipses
Partial solar eclipses appear as if the Moon is taking a “bite” out of the Sun. As the trio of the Sun, Earth, and Moon is not perfectly lined up, only part of the Sun will appear to be obscured by the Moon. When a total or annular solar eclipse occurs, observers outside the area covered by the Moon’s umbra (the inner shadow) will see a partial eclipse instead.
Hybrid Solar Eclipse
During a hybrid solar eclipse, observers will see either an annular or total solar eclipse depending on where they are located.
Expert Insights on Solar Eclipses
One of my favorite resources is Allan Hall’s eclipse information over at allans-stuff.com. He has imaged a few eclipses and his articles are not just informative, but a lot of fun to read. He has also published the book shown above. If you are going to go see a solar eclipse in person, his book is a good investment.
What Happens During a Solar Eclipse?
During a solar eclipse, a New Moon obscures some or all of the sun. A partial solar eclipse is a mildly interesting event that must be observed using eye protection and solar filters. A total solar eclipse is a far grander and more nuanced spectacle. As the last sliver of sunlight is still visible, the temperature crashes, twilight takes hold and once it’s 100% eclipsed the sun’s white corona is revealed to the naked eye. It’s a powerful, even life-changing experience.
The Difference Between a Solar Eclipse and a Lunar Eclipse

During a solar eclipse, a New Moon gets in between Earth and the Sun, and the Sun’s light is partially or totally blocked. During a lunar eclipse, the Earth is between the Sun and a Full Moon, so the Moon is in Earth’s shadow. The only light that reaches the lunar surface is first filtered through Earth’s atmosphere — it’s as if a thousand sunsets are projected onto its surface simultaneously, turning it an orangey-copper color.
The Difference Between a Central and Partial Solar Eclipse
When the Moon crosses the Sun, a cone-shaped shadow trails behind the Moon. When the tip of that cone just misses Earth, a partial solar eclipse is visible. When the tip touches Earth’s surface, it creates a narrow dark shadow from which it’s possible to see a total solar eclipse. On either side of that ‘path of totality,’ a partial solar eclipse is visible.
When is the Next Solar Eclipse?
The next solar eclipse as of this writing will be an annular or “ring of fire” solar eclipse on Oct. 14, 2023 and will be visible across North America, Central America, and most of South America.
The point of greatest eclipse — where viewers could see a ring of fire lasting 5 minutes and 17 seconds — will occur off the coast of Nicaragua and Costa Rica.
For more information on how and where to see the “ring of fire” solar eclipse, check out the annular solar eclipse 2023 guide.
The Risks of Solar Eclipses
Solar eclipses can be dangerous if not observed safely. Never look directly at the sun without proper eye protection. It is never safe to look directly at the Sun’s rays, even if the Sun is partly obscured because they contain harmful ultraviolet (UV) and infrared (IR) rays that can damage your eye’s retina and even cause blindness.
Never use regular sunglasses to observe the Sun. The only safe way to look directly at the Sun is through specially designed solar filters, using solar eclipse glasses for direct viewing and solar filters for telescopes and binoculars.
A safe way to observe a solar eclipse is to construct a “pinhole camera.” A pinhole or small opening is used to form an image of the Sun on a screen placed about 3 feet (or about 1 meter) behind the opening. Binoculars or a good telescope mounted on a tripod can also be used to project a magnified image of the Sun onto a white card. The farther away from the card, the larger you can focus the image. Look for sunspots. Notice that the Sun appears somewhat darker around its limb or edge. This method of solar viewing is safe so long as you remember not to look through the binoculars or telescope when they are pointed toward the sun; put another way, never look directly at the Sun when any part of its blindingly bright surface is visible.
A variation on the pinhole theme is the “pinhole mirror.” Cover a pocket mirror with a piece of paper that has a ¼-inch (7 mm) hole punched in it. Open a sun-facing window and place the covered mirror on the sunlit sill so it reflects a disk of light onto the far wall inside. The disk of light is an image of the Sun’s face. The farther away from the wall the better; the image will be only 1 inch across for every 9 feet (or 3 centimeters for every 3 meters) from the mirror. Modeling clay works well to hold the mirror in place. Experiment with different-sized holes in the paper. Again, a large hole makes the image bright, but fuzzy, and a small one makes it dim but sharp. Darken the room as much as possible. Be sure to try this out beforehand to make sure the mirror’s optical quality is good enough to project a clean, round image. Of course, don’t let anyone look at the Sun in the mirror.
Resources for Further Exploration
If you’re intrigued by solar eclipses and want to delve deeper into this fascinating subject, here are some additional resources:
- NASA’s eclipse website offers a concise summary of solar eclipses through to 2030.
- Eclipse Wise is a dedicated website for predictions of eclipses.


