Hauling a bunch of equipment out, setting it up, and following this tiny object across a vast sky is hard enough without having to constantly worry about whether you purchased the right tools for the job, and your budget. Astronomy and astrophotography are amazing pursuits that can really enrich your life, with the right equipment. Nothing is worse than to spend a substantial amount of money on something that doesn’t work well, or doesn’t do what you needed it to do.
That’s where we come in! In these pages you will find reviews and product suggestions from people who have already bought the equipment and used it in the field. We are not professional reviewers, not salesmen, and certainly not equipment manufacturers so we have only your best interest at heart. Yes, if you purchase an item using a link on this website we get a tiny commission that helps us keep the website paid for but that’s it.
If you have comments or suggestions for astronomy or astrophotography equipment we should cover, let us know.
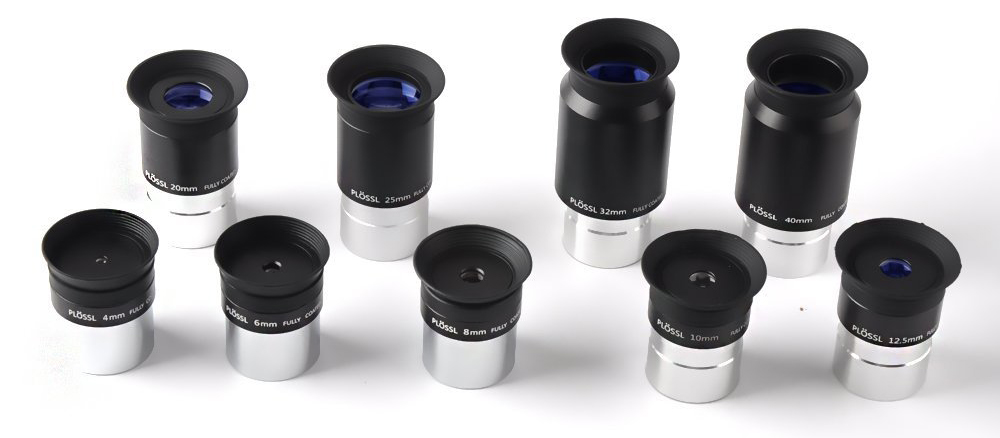
Beginner telescopes always come with a couple of eyepieces to get you started, these are not the best telescope eyepieces for your telescope, just ones to get you going. Then you want more, usually to get more magnification. The problem here is most people look at eyepieces wrong and then even when they get the right idea, they have no idea what the best telescope eyepieces to buy since there are hundreds of them out there.
If you want an in-depth look at eyepieces, check out this article on Telescope Eyepiece Types Explained. If you would rather just get the suggestions for your budget, read on!
The first thing you need to know is that you only need three or four good eyepieces, you do not need an entire telescope eyepiece kit or a complete telescope eyepiece set. Keep in mind that if you are using a refractor telescope, the eyepiece is half of all the optics in your telescope, in a reflector it can be about a third, either way, upgrading your eyepieces can make a huge difference in your enjoyment of your telescope.
So what are the best telescope eyepieces on your budget?
Let me start by saying this list of best telescope eyepieces is made for the generic observer. If you are looking for the best telescope eyepiece for viewing planets or the best eyepieces for telescopes to use splitting starts then Brandon’s or Orthos may be more your thing, or if you are really into wide clusters the Ethos line from TeleVue might work better for you. The ones listed in this chart are for the typical observer who observes a wide variety of things and needs eyepieces that will do well at all object types, although maybe not the absolute best at any one thing.
So what eyepieces should you get? That all depends on your budget and your needs. There is no reason to spend $350 per eyepiece when your entire telescope package only cost $299, then again if you paid thousands of dollars for your telescope, using $20 eyepieces is killing your views. Let’s look at several of the best telescope eyepieces in different price ranges and see what will work for you.
For a beginner, the Plossl is the most likely eyepiece to come with your telescope. It is also one of the best budget telescope eyepieces for the newcomer. There is nothing at all wrong with these for the person just starting out and your telescope very well may have come with a 25mm and a 10mm as these are the most common shipping with telescopes these days. If you are not sure how serious you want to get, stick with these and add about a 17mm to your collection. Plossl eyepieces are not well suited for fast telescopes such as f5 or faster Dobsonians.
One word of caution. Not all Plossl eyepieces are created equal. Just because you got a $20 Plossl eyepiece with your inexpensive starter telescope does not mean there are not high end Plossl eyepieces. TeleVue makes some excellent Plossl eyepieces that start at around $100 each. These are used primarily for specific purposes such as planetary observations and as such do not fit what we are looking for. I just thought you should know they exist.
These eyepieces are the next logical step up for beginners with a wider field of view, better eye relief, and a nice grip around the barrel making them easier to handle. For a mere $70-$90 you can get far better views than you can with your $30 Plossl. In fact, many advanced amateur astronomers carry these in their kits to loan out to other people, as backups for sizes they do not normally use, or in some cases, they may only normally use 2″ eyepieces and keep some of these around in case they are at someone else’s telescope and need a 1.25″ eyepiece.
These are not horrible in fast telescopes such as Dobsonians, but I would still recommend something a bit higher end. They are ideal in small refractors, starter reflectors such as small Newtonians, etc. Anyone who is using a telescope other than a Dobsonian and who wants to make a good improvement of their viewing, I highly suggest these and think they are the best telescope eyepieces for casual observers.
One fantastic feature of these eyepieces is that they work in both 1.25″ and 2″ telescopes making them pretty universal. They also have a 68 degree field of view, excellent eye relief and a fantastic grip to make sure you do not drop them. These provide fantastic views for the money and are available in a wide range of focal lengths. While Orion used to offer their Stratus eyepieces which were quite similar to these, the Baader versions sport a newer design and far more focal lengths than the Orions did.
These are the lowest end eyepieces I would recommend for fast Dobsonians.
Baader’s Morpheus line is a step up from their hugely popular Hyperion line. They have an increased field of view, substantially better edge sharpness, better contrast, are better corrected for fast scopes (Dobsonians) and are just overall better eyepieces. I have even heard of them being favorably compared to TeleVue Delos eyepieces (which are a tad more expensive with a smaller field of view).
The big advantages these have to other eyepieces in this range is the rubber grip and ability to be used in both 1.25″ and 2″ focusers without adapters. The one downside is they only come in six sizes including 4.5, 6.5, 9, 12.5, 14, and 17.5mm. I would love to see a 24mm!
Enough people have contacted me about not including eyepieces from Explore Scientific in my roundup of best telescope eyepieces that I felt I had to add a set. The ones I chose are my personal favorites from their lineup, the argon purged 82 degree models.
Overall, these appear to be copies of my TeleVue Naglers, in size and style. They feel solid in the hand and seem well-made overall. The views are good, and most models seem to give me a sharp view most of the way to the edge. Contrast is good with little to no internal reflections, even when I do something stupid like try to view a faint object right next to a full moon. Eye relief is good, and the eye cups are plenty soft enough to use with or without glasses.
That whole paragraph above should tell you why I didn’t include them before, they are good, but priced as excellent eyepieces. Even when I put aside my person issues with the service I have received from Explore Scientific, they are just not that special. You pay about the same as the Baader Morpheus, but get nothing in return except a little more FOV, a few more sizes, and for my dollar, slightly worse ergonomics (including a much worse eye relief). You pay a little less than the Televue Naglers and get inferior views (the Naglers are sharp as far as I can tell all the way to the edge, or at least 99% or better and seem to have better contrast).
So if you like the looks of the Explore Scientifics, get them, they are some of the best telescope eyepieces. I think you can do better with your money like saving for Naglers, or even buying Meade 5000 UWA eyepieces which will give you just as good of views, the same angle of view, better ergonomics, and a substantially lower price (about 25% less per eyepiece).
Nagler eyepieces are some of the best telescope eyepieces money can buy. Starting at $335 each, they should be! If you spent good money on your telescope, these are the eyepieces you want so that you make sure your views are the absolute best they can be. They also hold their value exceptionally well so if you ever decide to sell them you can get most of your money back without a problem.
These are also the eyepiece of choice for people who have a lot of telescopes because they will perform well in anything you can stick them in. You want perfect images from your fast Dobsonian? These will deliver in spades. Want edge to edge sharpness in your refractor? Child’s play for these guys.
Nagler’s are also known for their wide range of focal lengths, coming in as small as 2.5mm all the way to the “Hand Grenade” 31mm (once you hold one, you’ll get it). This allows you to have one for every use from planetary observations to the widest open clusters in the sky.
If you want the best you can get, TeleVue is it. They are definitely the best telescope eyepiece brand.
Conclusions
As I told you before, there are better eyepieces for specific uses, assuming you do a lot of only one thing. If however you are like most observers and want a general purpose eyepiece that does very well at a wide variety of targets, these are the best telescope eyepieces for you.
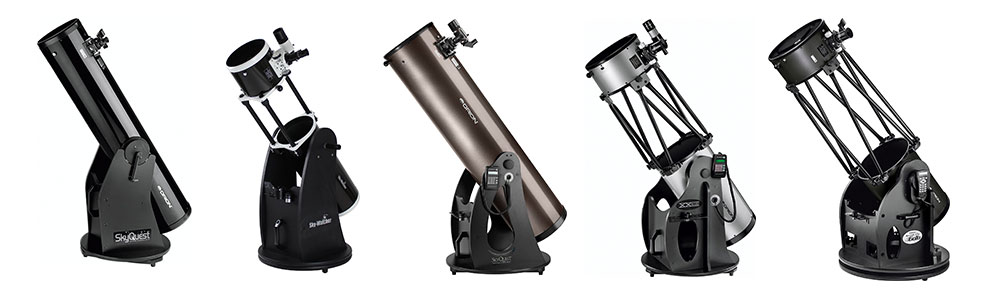
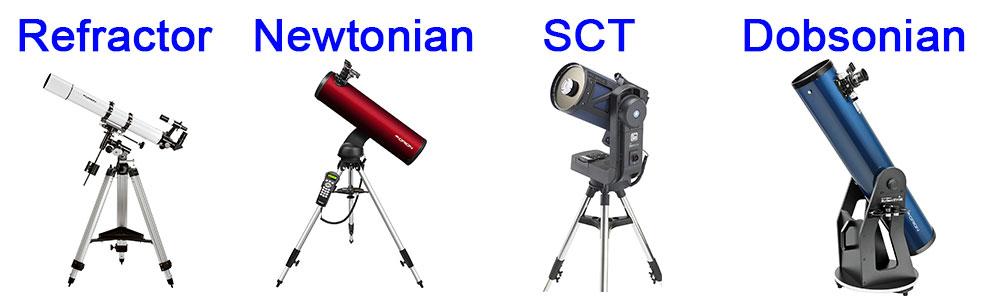
One of the most popular telescope types for beginners is Dobsonian telescopes. It is easy to use, provides good views and is one of the best values in astronomy. One of the major problems, however, is that there are a ton of them so which one is the best Dobsonian for you? You could sit around for months comparing one to another to find the one that gives you the best bang for your buck. Continue reading and you can save yourself a ton of time and effort and get the best Dobsonian for you with almost none of the work.
The Orion SkyQuest Dobsonian line has been one of the best Dobsonians for beginners for many years. While it may not offer the most bells and whistles, and it may not be the least expensive, and it may not come with the best accessories, it is a serious workhorse of a telescope and is my choice for the best Dobsonian for most beginners.
What the Orion SkyQyest has in spades is reliability. This scope has been produced in the same configuration with only minor changes as they found and fixed things for years. No other dob in this roundup has been beaten on for this long by this many people, and that means something that always works. That is how they made one of the best Dobsonian telescopes ever made.
I know people who had one of these for years, then sold it to someone else who used it for years. Go talk to the people who sold theirs and they will tell you it was one of the best Dobsonians they have ever used, always ready, always capable.
Orion also has excellent technical support and parts availability. The one downside to this is that they don’t want to sell parts to someone who is not the original purchaser. While this stinks, it also isn’t really that much of a problem as there are plenty of after-market people who can supply virtually anything you may need. Besides, this is a simple scope so there just are not too many complex pieces. For some of the best Dobsonian parts and upgrades out there, check out www.scopestuff.com
When you need the best Dobsonian that will fit in the back of your VW Beetle convertible, this is the telescope you want and is the best Dobsonian for portability and storage. Not only does the tube come off the mount, but it then collapses down making it even more portable. It is also the best Dobsonian to fit in the bottom of virtually any closet making it perfect for someone who lives in an apartment or just does not have much storage space.
The Sky-Watcher is a bit more expensive than the Orion xt8 but of course, it has the ability to compress down. It also has a much nicer finder and a tension clutch on the bearings, which the xt8 lacks. Overall this scope will feel nicer and has a much more refined quality to it. If you want something sensible in size but that also feels like the best Dobsonian, this is it.
The only downside is that since it is not a solid tube design, you may need to collimate it more often. It, unfortunately, does not come with a laser collimator but that is something that is easy to fix. My favorite, and what I consider the best Dobsonian laser collimator, is the Astromania Alignment Next Generation Laser Collimator which is around $25.
Almost everyone who buys a Dobsonian as a beginner gets one without a computer. That’s fine for general observing for newcomers to the hobby. Once you have been doing this a while and want to find more and more difficult targets you may need two things; a larger aperture telescope and a computer. This is the best Dobsonian for solving those problems.
The Orion Intelliscope push to system is the best Dobsonian electronics package and bridges the gap between full manual with no computer to a full go-to system. It tells you where to push and then confirms you are on the target once you get there. Not only does that make finding objects easier, but substantially faster. Besides, one of the things that makes the best Dobsonian for you is if you will use it. Being able to find targets quickly absolutely makes some people more likely to use their telescope and therefore, makes it the best Dobsonian for them.
Another excellent use for the computer on a dob is for outreach. Set it up, align it, and take requests on what people want to see. With a 12″ aperture there is virtually nothing you can’t see, assuming it is up. This is probably the absolute best Dobsonian for outreach.
This is much like the xt8 as far as reliability and simplicity is concerned. Orion also added a much nicer finder and improved substantially on the base. Overall this the best Dobsonian for any user if it is in your budget.
Best for advanced users who need portability: Orion 12″ XX12i
This little guy is on the best Dobsonian list because it will allow you all the capabilities of the standard 12″ Intelliscope Dobsonian telescope with the added benefit of being far easier to transport, even in a small car. It also has an upgraded focuser but not quite as nice a finder when compared to the standard 12″ Intelliscope.
To really make the portability work, Orion even makes a set of padded cases, the Orion 15094 Case Set, that each piece goes into. While there are other cases for telescopes, and some for dobs, these Orion cases are the best Dobsonian cases out there. This makes it one of the best Dobsonians to carry out to the dark site.
The base on this and the standard Intelliscope are the same, making the tube the only difference. The components of the truss tube variant seem to be made of heavier gauge metal making it not only stiffer, but a lot nicer to work with. Everything seems amazingly stable.
As with most truss tube setups, you will want to make sure you get the shroud that fits it and Orion makes a specific 15097 Light Shroud for this model and it really is the best Dobsinain shroud you can get for it.
If you need portability, a reasonable price, push to capabilities, and excellent views, this is the best Dobsonian for you.
Most of the portability of the 12″ truss tube with more seeing power and a full go to computer system, this guy will provide amazing images of any target you choose to point it at and still not give you a hernia trying to get it out to the field.
If you want the best views you can get while still staying portable in a mass-produced telescope, this is the best Dobsonian for you.
One of the advantages of the 14″ over the 12″ is that the base also collapses. This makes it as easy to transport than the 12″ model, just a little different.
This telescope also has the full goto controller that they use with their EQ mounts. In my opinion, this is the absolute best Dobsonian GOTO package available from any manufacturer.
Off and on Orion, as well as other manufacturers, have produced larger models than this 14″. They did not make this list because they are not always in production or lack some of the features of the XX14g. They also tend to get exponentially harder to transport once you get over this 14″ model. Unless you drive a full-sized SUV or don’t mind putting a telescope in the back of a pickup, this is about as large as you want to go.
I hope you enjoyed my article on the best Dobsonian telescopes.
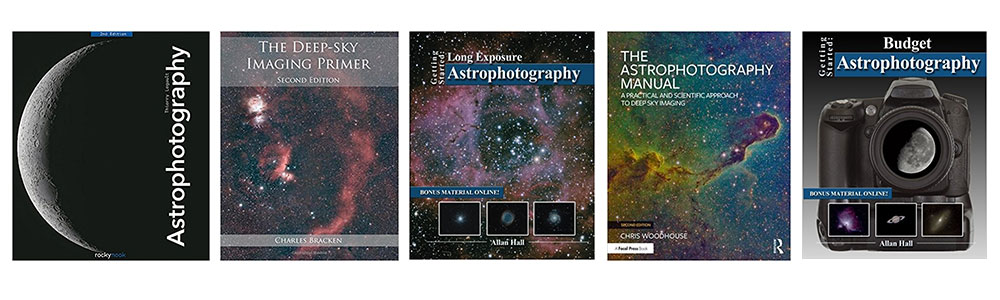
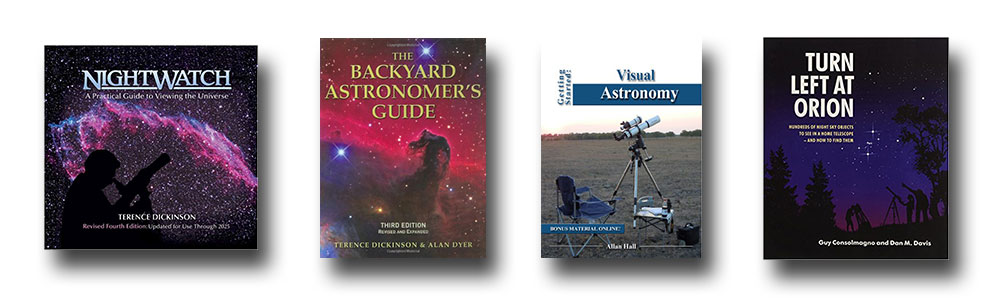
Why look for the best astrophotography book? There is a lot of information online about astrophotography, including some very interesting videos. Somehow it seems that I get more out of a good book than all this skipping all over the place trying to find answers to questions I didn’t know I had.
That doesn’t mean it has to be an actual book, the best astrophotography book for you might be an ebook in some cases. Personally I prefer printed books for this particular subject because I tend to write notes in the margins as I read and that is just easier in a print book. Fortunately, most of these are available in both formats.
This is easily one of the best astrophotography books of all time. If you think that books on astrophotography should not only be informative but drop-dead gorgeous, this may be the best astrophotography book for you.
Legault’s sections on the moon, planets and the sun are just jaw-dropping.
He is also excellent in not only telling you how things work but showing you examples. His examples of sharpening Jupiter and Saturn on page 97 are impressive, to say the least.
Anyone interested in astrophotography will find this an incredibly useful book. He covers a wide range of astrophotography topics from wide field to deep space long exposure. There really is a reason this book consistently gets five-star reviews on Amazon.
I expected problems reading this book as it seems it was originally written in French and then translated. I can honestly say the translation was excellent and I have no problems at all with anything in the book.
Unlike Astrophotography by Legault above, this book is more like Long Exposure Astrophotography by Hall below in that it does not deal much with planetary, solar, or lunar. It is almost exclusively devoted to deep-sky objects, as it should be.
While this may sound strange, I love love love the paper this book is printed on. While it is in full color, it is also a matt non-glossy paper that makes it much easier to read. Sure, the images are not as pretty as the high-gloss pages in Astrophotography, but the text and charts are much easier on the eyes like Hall’s books, but with color. Even if you have the best astrophotography book there is, if you don’t like reading it, it is useless.
This book seems to be aimed at the person who is really serious about astrophotography. There is little discussion on equipment capabilities instead of focusing on how things work. Once you understand how it all works, you can easily make decisions on what equipment you may need to purchase.
If you already are into astrophotography and want to take your abilities to the next level, this would be an excellent book.
Bracken divides his time well between all the aspects such as setting up, imaging and processing with a little emphasis on processing. This makes sense because processing is usually harder than imaging.
For a well-rounded book for people who are a little above total beginners, this may be your best astrophotography book.
Bracken has a WordPress blog at digitalstars.wordpress.com where he has some useful articles related to astrophotography.
Mr. Hall has a real winner here which should be obvious by the fact that it was released in 2013 and continues to be in the top sellers and get glowing reviews. All the other books by different authors on this list are newer, and yet, it is just as good now as it was back then.
Hall takes the complete newcomer and starts with the absolute basics. The book is structured in such a way as it starts with the equipment you need for different levels of astrophotography and then goes all the way to hold your hand through the capture and processing portions.
Nothing is assumed, and his conversational tone makes it easy to read and keep pace. Gone are the complicated formulas (although there are a few simple ones) and scientific explanations. While he does explain the why’s, he doesn’t dwell on them just to sound smart.
Another thing I like about Hall is that he didn’t stop with one book, he has a whole stable of them like one of my recommendations for visual astronomy. He also supports them with his website at www.allans-stuff.com including bonus material for many books, and his YouTube channel at www.youtube.com/c/AllanHall which includes tons of tutorials and reviews related to astrophotography.
One downside, if you want to call it that, is that Hall chose to print his printed books in black and white (Kindle editions are in color). It seems he did this for two reasons; to save on the cost of the books, and because although pretty, the color really isn’t required for what he is teaching you.
I guess he was right because his books are far cheaper than the other books on this list. In fact, you could buy two of his books for the price of a comparable book by another author. That’s nice since astrophotography is inherently expensive.
If you are looking for something to start off a serious interest in astrophotography with, but are starting at the very beginning, then this might be the best astrophotography book for you. Available in both print ($17.99) and Kindle ($9.99).
Woodhouse has one of the best astrophotography books on the market, with a heavy focus on the processing of images. In fact, short of a book like Inside PixInsight by Warren A Keller, this book has the hands-down best processing section of any astrophotography book I have read.
The book has several targets he processes, and for each one there is a wonderful flowchart showing the processing steps and order. These sections alone are worth the price of the book.
Fortunately, the processing sections are not the only things in the book. Woodhouse does a great job of covering the basics as well, from how things move above us, through equipment selection, taking images in the field, and finally to processing. This is an excellently well-rounded book.
I do have two little complaints; the text is a little small and the book is a little too textbook-like. At times, it can be a tad dry and matter-of-fact. Those are minor complaints however because the quality of the content is absolutely first-rate.
Woodhouse has a nice little website at www.digitalastrophotography.co.uk where he has more information on astrophotography and some helpful video tutorials.
That’s right, another book by Allan Hall. While his first book on this list concentrates on taking long exposures with dedicated astrophotography equipment, this one is more about getting cool images without spending much money.
Just like Hall’s last book, he starts at the beginning assuming little knowledge. Instead of expensive telescopes and mounts, he talks more about phones, point and shoot cameras, and cheap telescopes.
One unique part of this book is the good-sized DIY section that includes topics such as balancing a Dobsonian telescope, modifying a webcam for astrophotography, building a barn door tracker, building a Denver chair, and much more.
This is the best astrophotography book out there for people who want to take images on the cheap. Available in both print ($17.99) and Kindle ($9.99) editions.
I hope this article helped you find the best astrophotography book for you!
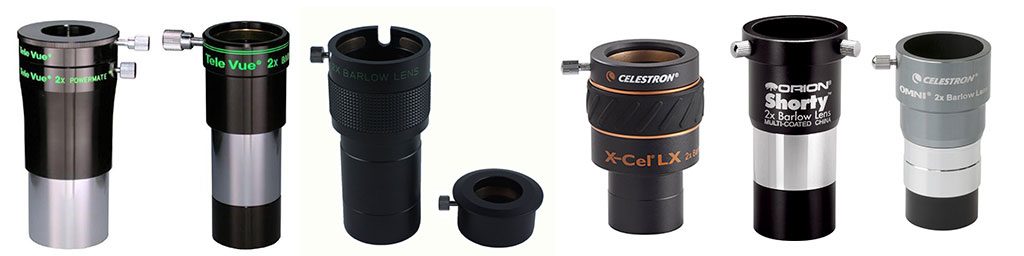
A Barlow Lens is an optical device that allows you to multiply the apparent magnification of your telescope with the telescope eyepieces you already have. They come in a variety of powers from 1.4x to 5x and in both 1.25″ and 2″ sizes and are often included with telescope accessories for beginners.
The advantage of using one of these is it can greatly increase the number of different magnifications you have available. For example: if you have a 25mm and 10mm eyepiece, buying a 2x Barlow will give you the equivalent of a 25mm, 12.5mm, 10mm and 5mm eyepieces.
Barlows are just like everything else, though, you don’t get an advantage without a disadvantage. The downside to a Barlow is that they degrade the image quality. Even if you have the best telescope in the world, you will still see image degradation. This degradation of the image can be due to the following:
Usually inexpensive (cheap) optics
As a function of the negative lens design causes some vignetting to the outer field of view
Increases the eye relief (sometimes too much)
It can also fail to focus the light correctly near the edges.
As a general rule, the more you spend on the Barlow, the less image degradation you get, to a point.
That does not mean that the average amateur astronomer has to spend a fortune, getting into Barlows can be very economical to start with. Many people find the less expensive Barlow lens to be just fine for their visual use, whereas astrophotographers tend to go for the higher-end devices if they use one at all.
Also note that the more powerful the device you use, the more likely you are to see image degradation, this is why most people stick with the 2x Barlow lens. A larger blurry blob is not nearly as nice to look at as a smaller sharp image of Saturn!
All of this boils down to the fact that Barlows are nice to have, particularly to see what eyepieces you may want in your permanent kit, but they are not and will never be as sharp, clear, and bright as having the right eyepiece to start with.
Top of the line Barlow lens
The highest quality Barlows available is actually called a Powermate and is made by Televue. The Powermate is basically a very high quality barlow with a second set of lenses inside that do additional correction to make the image as perfect as possible. These tend to solve all four issues with the degradation of the image listed above, however not even the Powermates are perfect.
When I tell people the price of the Powermate the first thing they do is gasp. Yes, they are expensive. The image quality, however, is amazing. Remember that these will basically double the number of eyepieces you have, and do it with very minimal loss in image quality.
If you have a telescope with a 2″ focuser get the 2″ version of the Powermate so it will work with all the eyepieces (and cameras later down the road!) you have or will ever purchase.
The best of the actual Barlows
If you just can not see yourself paying over $200 for a Barlow (which really is cheap for what it does) then there are certainly good alternatives. The best of those is a Barlow lens made by TeleVue, the same people we just talked about.
While these lack the secondary correction lens found in the Powermate, they still have the outstanding quality primary negative lens assembly and fantastic build quality.
Again I would recommend you get the 2″ version if you have a 2″ focuser and the 1.25″ version if you do not. Sure, the 1.25″ version will work in a 2″ focuser if you only have 1.25″ eyepieces but this stops you from using 2″ eyepieces in the future or from using some camera adapters.
Midrange barlows
Astromania is one of my favorite “off-brand” brands. By that I mean they are not one of the big boys in any category but they still make excellent quality equipment for the money. This includes their Barlow lens selection.
Their 2″ ED 2x Telescope Barlow is an excellent device which includes enhanced dispersion glass to reduce aberrations and provide a high-quality image and runs about $58. This Barlow includes a 1.25″ adapter making it perfect for your 2″ focuser allowing the use of both 2″ and 1.25″ eyepieces.
Now let’s say you only have a telescope with a 1.25″ focuser, or only have 1.25″ eyepieces and have no plans to upgrade to 2″ in the future, but you still want a pretty nice sub $100 Barlow….
My favorite 1.25″ midrange Barlow lens is the Celestron 93529 X-Cel LX 1.25″ 2x Barlow for around $65. These Barlows, and the matching eyepieces, are my favorite in this price range and I have a full set in my eyepiece case. They are fully multi-coated providing great views, well-built to last a long time and have an awesome rubber grip ring around the outside.
Inexpensive Barlows
The most popular inexpensive 2x Barlow lens is the Celestron Omni 2x Barlow Lens for around $34. In its price range it is an excellent performer and should last you many years of service until you decide to upgrade to a higher-end Barlow lens, or get 2″ eyepieces and have no choice but to replace it.
Even cheaper still!
So now there will be a ton of people screaming that they can get a Barlow online for less than $20, and that is absolutely true. Take a very close look at those before you purchase them.
A great example is the SVBONY 1.25″ 2x Barlow Lens, which currently is listed as “Amazon’s Choice” for “Barlow lens” and has 4.4 stars with 155 customer reviews. Looking closer, you can check it out on www.fakespot.com to find out that the company and product only get a review grade of B with 80% non-fake reviews. Compare that to the Celestron Omni which gets an A.
I am also a little concerned by the fact that the item seems to have changed names, as the fakespot.com report shows the manufacturer as VITE while Amazon shows SVBONY. Then there is the chart that shows that for a product that has been on Amazon for around two years, almost two-thirds of its reviews all happened in one month of 2018?
I hope you enjoyed my article on the 5 Best Barlow Lens available!
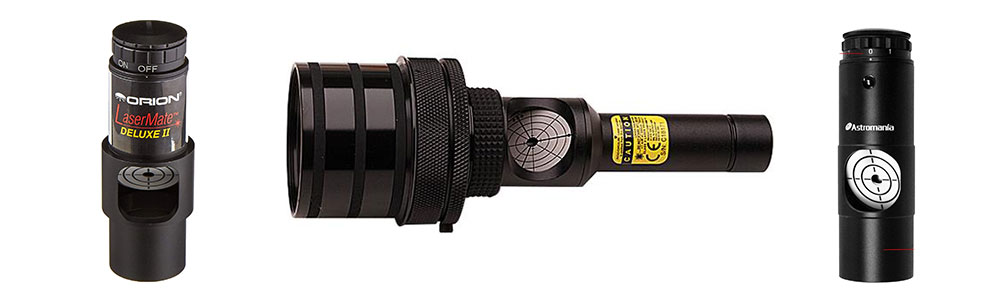
A laser collimator is the important tool to have if you own a Newtonian Reflector telescope to keep your mirrors in alignment, I would argue a requirement. While most of them will do a reasonable job, finding the right one in your price range can be confusing.
You could just order the cheapest one you can find and that might work well. The problem is that many inexpensive, and even some pretty expensive models are not collimated well themselves! If the laser collimator you purchase isn’t collimated, how well will the collimation job be on your telescope when you get done?
The units in this article are ones that have proven to very high accuracy for their price points. What I mean by this is that while I have only heard of one Hotech unit ever being out of alignment, and they replaced it without question, I have seen a couple of the Orion models and quite a few of the Astromania units with issues.
Both the Orion and Astromania laser collimators have fewer issues that other brands in their price range, and that is one of the primary reasons they are included in this list. Another reason is that both of those units have adjustment screws so that you can adjust them yourself should you want to.
On with the laser collimator review!
Top of the line laser collimator
One of the best laser collimator units you can buy is the HoTech Laser Collimator 2″ & 1.25″ SCA for Newtonian Telescope which runs about $130. This unit uses a crosshair pattern with the laser instead of just a dot to make absolutely sure you know where the center is.
The Hotech unit uses a unique centering method using compression of rubber rings. This makes sure the laser collimator is exactly centered in the drawtube. Both the laser collimator itself and the 2″ to 1.25″ adapter use this same technology.
When used properly, this laser collimator will give you the best views or images you can get from your telescope. I highly recommend this one for medium to high-end telescopes, such as ones used for astrophotography. I absolutely love mine!
Most popular midrange unit
As I have stated all over this website, SVBONY has really come in with some amazing value items lately. Their SVBONY SV121 Red Laser Collimator is no exception to that. With their upgraded lens that makes an extremely fine round point instead of the oval or smear you see with some cheaper models. It also includes a 2″ adapter, and the collimator and adapter are fully CNC milled metal.
Using this laser collimator is easy and so far has been surprisingly accurate considering the budget price. While not having the centering accuracy of the HoTech model above, it still results in very good views. Considering it costs almost $100 less than the HoTech, it is an extremely good value that should satisfy all but the most demanding users.
Budget laser units
If you are on a budget and just can not afford the $35 on a really good laser collimator, Astromania has you covered.
The Astromania Alignment 1.25″ Next Generation Collimator will make sure your mirrors are in prefect alignment any time, every time. This Astromania laser collimator is one of the most popular value collimators around. I see a lot of these in the accessory cases of people who have much more expensive units as they use this as a backup unit. It is also a great laser collimator to have around as a loaner.
Although it works exceedingly well, you need to make sure it is seated and centered well before using it. This step is required because it lacks the wide shoulder higher-end models or the centering technology of the HoTech. This does not make this unit bad, it just means you need to be a little more careful when using it.
While Astromania does not advertise lifetime support, the few times I have had to use their support they were great.
No matter which one you decide to buy it will help improve your views and make the job of alignment of your mirrors much easier and faster. I know I can align my Dob in just a couple of minutes with mine. That time savings and accuracy is absolutely worth the expense of the laser collimator.
I hope this has been helpful in picking out the laser collimator that is the best for you and your budget.
Finding that best first telescope can be a challenge. There are not only so many different types of telescopes but so many different manufacturers and models that it can be overwhelming. Let’s break it down a little and see if we can find the perfect first telescope for beginners for you.
How serious are you?
This question will help define your budget for that best first telescope. Amateur telescopes can range from little $40 specials you may find in a department store to $25,000 monsters and everything in between. If you are simply looking for a Christmas gift for a small child who seems mildly interested in astronomy, then a $40 telescope might be something to think about.
If on the other hand, you are looking for a best first telescope for a teen or young adult who shows a serious interest, that same $40 telescope will probably do nothing but make them mad because it will provide blurry views, not be stable at all (which is important when viewing objects under high magnification) and will be prone to breakage and malfunctions. A great example is that cheap telescopes tend to have poor focusers which means getting an object in focus can be time-consuming and difficult. They also tend to have poor quality eyepieces which make it difficult to hold your eye just right to see through the tiny hole, and even then provide dim and blurry images.
This doesn’t mean you need to spend thousands of dollars on the best first telescope for beginners, but it does mean you should probably stay away from the one in your local department stores.
What brands should you look at?
The brands you look at will affect the price you pay for your best first telescope, the quality you get, and the resale value should you ever want to sell the telescope. Two telescopes with the exact same specifications, one of which has a good brand name, will vary greatly in resale value and potential in quality of construction.
Unfortunately, there are a ton of knockoff brands, primarily from China, which manufacture telescopes with the same magnification, size, and accessories as the name brand models for far less money. The tradeoff is that the name brand versions are good telescopes that can last many years whereas the knockoffs are cheap flimsy versions that will likely not only provide horrible views and be tiresome to use, but will most likely fall apart quickly.
Again, if you are looking for something for a small child that will most likely be destroyed in a few months anyway, the best first telescope might be something cheap. If however, you are not trying to extinguish the hopes and dreams of someone with a genuine desire to view the heavens, a nicer brand name scope would be a better best first telescope for them.
So what are the brand names you can generally trust? Celestron, Skywatcher and iOptron all make excellent choices for a best first telescope (as long as you stay away from the absolute bottom of the line equipment). Although there are other quality manufacturers out there, these are the ones I have personal experience with who make good quality equipment which would be an excellent choice for the best first telescope for beginners.
What objects do you want to look at?
Different types of telescopes are better at different things, so to find your best first telescope we need to know what you want to see. A long focal length refractor will be better at viewing planets than a short focal length Newtonian. Large Dobsonians are better at faint objects than refractors at the same price point, whereas an MCT would be an awesome choice for observing the moon’s surface.
The first thing you should do is get a realistic expectation of what you can see with off the shelf beginner equipment. You can get pretty good views of Saturn and Jupiter with the most inexpensive equipment, but Mars will be difficult at best and the other planets will look like fat stars with no detail. Nebula and galaxies are a little more exciting and there are plenty out there so the better your equipment, the more you can see. The moon and sun (with the correct protective equipment!) will be awesome targets with anything on this best first telescope list.
How hard are you willing to work?
Telescopes come with one of two basic types of mounts, computerized or manual, the best first telescope mount for you might depend on what you want it to do for you. With manual you do everything; you find the object and you move the telescope to keep the object in the viewfinder as you view it. With computerized, you run through the computer’s alignment procedure and then tell it what you want to look at. The computer has a list of probably many thousands of objects and you simply select the one you want, then it moves and tracks the object.
Technically there is a third type of mount, a manual mount that you can put motors on which will keep an object in the viewfinder once you find it. This is not that common and you will have to learn to manually align your mount in order for the motor to work correctly so I suggest you avoid this type for your first beginner telescope.
The advantage of a computerized mount should be obvious, you spend less time looking for things and more time actually viewing things. The disadvantage is that they cost more.
Different telescope types
Generally, telescopes have two basic types; reflector and refractor. Just like we already talked about, picking the best first telescope for you might depend on what you want it to do. A reflector uses one or more mirrors to present you with an image while the refractor uses one or more lenses. There are some designs that use both, and of course, if you want to be really picky all telescopes use eyepieces that have lenses in them making all telescopes a sort of hybrid.
The first issue is the aperture or the diameter of the opening at the front of a telescope. The larger the aperture, the more light the telescope can collect so the dimmer things you can see (more nebulae and galaxies primarily). If you are looking to see faint galaxies, a large aperture would be a requirement for that best first telescope. On the other hand, if you prefer brighter objects such as star clusters and the moon, something with a smaller aperture would make a great best first telescope.
Refractors are usually the most expensive per inch of aperture, but typically provide the highest quality view with the most contrast, again, per inch of aperture. This is due to there not being any obstructions in the light path like reflectors have, and the fact that light is lost when bouncing off of mirrors in reflectors meaning refractors have higher light transmittance per inch when compared to reflectors. In my opinion, these are what you look at when you want the best professional telescope, but they can also be amazing first telescopes.
When people ask what is the best type of telescope for astrophotography, the answer is usually that refractors are considered to be about the best telescope for astrophotography by many people.
Oddly enough, inexpensive refractors are also the best telescope for kids as they are intuitive to use; simply point it where you want to look.
Reflectors are far cheaper to manufacture since there are no big pieces of high-quality glass to mess with. This allows you to get a telescope with far larger apertures then you might could afford otherwise. The loss of image quality due to obstructions and other issues is usually not noticeable by people looking for the best first telescope.
Beginner reflectors can then be divided into the Dobsonian, Newtonian, SCT, and MCT.
Dobsonians are often called the best first telescope because their inexpensive mount design allows for relatively large telescopes to be sold for extremely attractive prices. Dobsonians are also very easy for the beginner to set up and use. Larger mirrors, however, do require longer times for the telescope to adjust to the outside temperature before it will provide sharp images, so keep this in mind. Dobsonians also can require more expensive eyepieces to get good views but this is not that much of a concern when just starting out.
Newtonians are open tube reflectors just like the Dobsonian but are mounted on tripod style mount instead of a Dobsonian style mount. They are also usually smaller in aperture, lighter and are easier to find in computerized versions. This makes them a possible best first telescope for someone who doesn’t have a lot of room to store a large telescope and would like the convenience of a computerized system without a large expense.
SCT (Schmidt–Cassegrain Telescope) telescopes combine several mirrors enclosed in a short tube to provide a large aperture and high magnification in a compact package. The downside is that these are more expensive than Newtonians or Dobsonians, and require far longer to adjust to the outside temperature than any other type of telescope (except for MCTs). They are also relatively heavy for their size making larger aperture versions very heavy to deal with. The main advantage of an SCT is that you get most of the benefits of the Dobsonian and Newtonian in a nice small package with higher magnification making them excellent for splitting double stars, observing galaxies, etc.
MCTs (Maksutov–Cassegrain Telescope) is very similar to the SCT with the addition of a meniscus lens in the front and increased focal length. This makes these extraordinarily good for planetary observations, including high-resolution lunar observing. They are as heavy or heavier than SCTs and require even longer to acclimate before they can be used. If you are looking for the absolute best first telescope for viewing planets, this is it.
SCTs and MCTs are usually reserved for more advanced users but can be the best first telescope for someone with higher expectations and budgets.
Recommendations $100-$399
This Celestron 114 EQ setup is small enough to fit in a closet or under your bed yet large enough to provide excellent views for the beginner. One thing I really like is that the telescope tube is mounted to a standard dovetail meaning that if you wanted to upgrade the mount to something with a full computer on it, you would simply slide the telescope off this mount and onto the new one, no fuss.
This telescope has a large enough mirror to get some good images of nebulae and enough magnification to enjoy the views of Saturn and Jupiter.
The Celestron Astromaster 90mm Refractor is an awesome introductory telescope for beginners. With crisp views of anything you want to point it at it is sure to please. My personal opinion is that this is probably the best investment for the money and would be my choice in this price group. In fact, I still own one of these and even with thousands of dollars worth of other telescopes, I occasionally come back to this one for some fun and relaxation.
One of the big advantages of a refractor over a reflector is ease of use. You don’t even need to know how to spell the word collimation much less spend time doing it every time you move the telescope. They also equalize to the outside air much faster than Newtonians so you get sharp and contrasty views while the other people are still waiting.
Recommendations $400 and up
The Sky-Watcher Flextube 200 Dobsonian is a telescope I love, and always catch flack about. People tell me that you can get something like the Aptura 8″ for less money and it has nicer accessories, both of which are true. The reason I recommend this one though is that it is just as good of a telescope as the Aptura while helping to solve the number one reason I see people get out of this hobby: Not wanting to drag their telescope out and se it up.
The Sky-Watcher Flextube is designed to collapse, come apart, and be transported. Whether that is out of the garage into the back yard, or into the car and across town, this telescope makes it easier to get out and actually look up.
Celestron StarSense Explorer DX 130AZ $429
This is a real winner for a beginner (see what I did there?) I was not really impressed until I actually got my hands on one and now I think it is awesome. The Celestron StarSense Explorer DX 130AZ is a 130mm Newtonian with a descent mount, reasonable optics, not too bad a focuser, and two eyepieces that I can live with. So why do I call it awesome? The Starsense app and mount allow you to quickly and easily find a ton of things to look at and will keep you busy all night long.
They took an average telescope and gave you the ability to find targets in seconds. Even if you had a telescope that was ten times better, if you can’t find things to look at, how good is it really? For the money, this is one of the best bargains for a beginner out there today. Of course if you wanted to learn how to find targets on your own, check out this article on the Best Astronomy Books for Beginners.
Compared to the Dobsonian above, it won’t give you quite as good of views of some objects, but you will see a lot more with the help of the app.
In conclusion
Any of these telescopes you get is sure to provide you some amazing adventures in the heavens. If you choose to purchase your telescope used, be sure you try it out before you purchase it. There is nothing wrong with used telescopes assuming they have been treated well, and indeed a used scope may be the best first telescope for you.
I hope you enjoyed my article on the best first telescope you can buy!
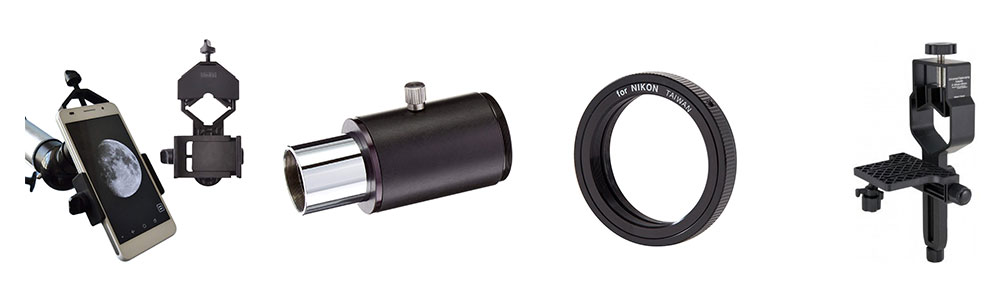
What type of telescope camera adapter do you need to connect your camera to a telescope? Connecting your camera or phone to your telescope is something that a lot of people are curious about. Everyone wants to snap a quick shot of the moon, Saturn or Jupiter. Most people’s first try at this can be a little disappointing because you can not hold the camera steady enough to get a sharp image. What you need is a way to connect the camera directly to the telescope to minimize vibrations.
Let’s explore the different ways of connecting a camera to a telescope.
Afocal: The easy telescope camera adapter for phones and small cameras
Most of us have probably tried just holding the camera or phone up to the eyepiece of the telescope, with varying degrees of success. If we just had a way to have it held up there it might work better. That is where this universal phone adapter comes into play.
Gosky Universal Cell Phone Adapter Mount $19
For most phones, this universal cell phone adapter will hold your phone right over the eyepiece. This not only eliminates the shaking hands and keeps in alignment better, but by setting your phone’s self-timer to take the photo it will make the image even sharper (your finder tapping the screen to take the image makes the image blurry). It can hold phones up to 90mm in width making it ideal even for larger phones like the iPhone 10/11, and the Samsung Galaxy Note series. Of course, it works with smaller and older phones like the Samsung Galaxy S4 and iPhone 6 as well.
Celestron 93626 Universal Digital Camera Adapter $40
For a small camera such as a point and shoot model, a universal camera adapter is used. Since cameras are heavier they require a more substantial support system and this Celestron model is my absolute favorite.
With either of these types of adapters, you just get the object in the eyepiece and focused like you normally would for viewing. Then you attach the adapter to the eyepiece and use the screen on your phone or camera to make sure everything is good and centered before you set the self-timer and let it take the picture.
One warning is that you want to make sure if you use a camera with a lens that moves in and out as it zooms that you do not zoom in so much that the lens hits the eyepiece. This can actually break your camera!
Eyepiece Projection: For detachable lens cameras
If you have a larger camera it may not be practical to have it hanging off the eyepiece. In this case, there are two methods, and this one tends to work all the time whereas the next one does not.
For this to work, you need three things: a physically small eyepiece such as a Plossl in the 20-25mm range, an eyepiece projection adapter, and a T-ring for your specific camera.
Astromania 1.25″ 25mm Plossl Telescope Eyepiece
If you do not have an eyepiece that will work, this Astromania 25mm 1.25″ Plossl should work fine. The barrel is small and smooth making sure that it will fit into the adapter well. This eyepiece is also threaded for standard 1.25″ filters so you can attach a light pollution filter, ultra-high contrast filter, or moon filter to make your images even better.
Meade Instruments SLR 1.25-Inch Basic Camera Adapter
This Meade camera adapter is what you slide the eyepiece into, tighten it using the screw on the side, and then the assembly goes into the telescope where the eyepiece normally goes. Make sure that you slide it in slowly and carefully if you are using a diagonal on your telescope because the nose of this adapter can impact some diagonal mirrors and scratch or crack them.
Celestron 93419 T-Ring for 35 mm Canon EOS Camera
This is a Celestron T-Ring for Canon cameras but many other makes are available such as a Nikon t ring adapter if you need to attach Nikon DSLR to telescope. All T-Rings have a T-thread which will screw on to the Meade adapter shown above. You do not have to get a Meade T-Ring or anything special, all T-Rings and T-Adapters should work together.
This particular Celestron telescope camera adapter ring is solidly made and works well.
Once you have all the pieces, insert the eyepiece into the camera adapter and secure it with the thumbscrew. Next, screw on the T-Ring to the camera adapter and lock the T-Ring onto your camera where the lens would normally go. Remember to switch your camera to manual focus!
Slide the entire Assembly into where you would normally place your eyepiece and turn on your camera’s live view (or use the viewfinder). Focus and start taking pictures! Always use a remote shutter release or the camera’s self timer to avoid blurry images. You may need to play around a bit with the exposure settings to get a good image but it should not take much.
Prime Focus: When you want to get a little more serious
If you have a DSLR or similar camera and want to take your astrophotography to the next level, you can remove the eyepiece completely (eliminating the distortions etc caused by the extra optics) and use the telescope as a big lens.
This only works on some telescopes; virtually all refractors, some Newtonians, and a hand full of Dobsonians. The reason is that many telescopes, particularly Dobsonians, do not have enough travel in the focuser so when you attach a camera via prime focus you can not get the image to focus. For those telescopes, you either have to move the mirror, buy a new low profile focuser, use a Barlow, or use the previous eyepiece projection method.
Fortunately, you can try using the Meade Camera Adapter and T-Ring from above to try this method. It should work reasonably well but you may get some vignetting (darkening of the corners in the image). If you get vignetting and want to eliminate it, and if you have a focuser that accepts 2″ eyepieces, you can solve the vignetting problem with a 2″ prime focus adapter like this one:
Astromania 2″ T-2 Focal camera adapter for SLR cameras
This 2″ prime focus adapter from Astromania has threads on one end for the T-Ring and simply slides into your telescope where the 2″ eyepiece would go, no eyepiece needed! This is the ideal 2 inch telescope camera adapter. The 2-inch telescope camera adapter is of course only usable in telescope focusers which accept 2″ eyepieces or a 2″ diagonal. This is the preferred method of how to attach a DSLR camera to a telescope.
I hope this has helped, now go take some awesome pictures with your new telescope camera adapter!
There is a lot of fun to be had observing the heavens with a pair of astronomy binoculars but it can be confusing which pair would work well for what you want. Just like any astronomy equipment, there are several things we need to discuss before we just right in.
Size matters
When you are using binoculars in the daytime, the diameter of the lenses is not that big of a consideration. In astronomy however, the larger the diameter, the better you can see objects like nebulae and galaxies. The minimum you should consider is 50mm with the maximum being based on what you can comfortably hold (the larger the diameter, the heaver they are) and what you are willing to spend (larger usually means more expensive).
For hand holding, which is what we are talking about here mainly, you should stick between 50mm and 70mm. Smaller ones will make it harder to see objects and larger ones will make it harder to hold them steady enough to be useful.
Magnification is not as important but should be kept between 10x and 20x for most handheld applications. Less magnification means you will have a hard time seeing anything you want to see, whereas too much magnification will be hard to hold still enough to actually use them.
The most common starter size of astronomy binoculars is 10x50s and these are widely used in the field. For those wanting more, 15x70s is the next most popular size, primarily for those who forgo telescopes in favor of binoculars.
Optical quality matters
The quality of the optics not only makes objects clearer and sharper, it also increases the contrast between the object and the background of space.
If you were only looking at stars then contrast and sharpness would not really be much of an issue, but few people use astronomy binoculars for looking at nothing but stars.
Seeing nebulae and galaxies depends greatly on picking the very dim objects out from the slightly darker background. This makes increasing contrast a huge deal. In fact, if you read an astronomy or astrophotography book you will find that they often talk about adding filters to increase the contrast of what you are looking at. Adding filters to a pair of binoculars is not as easy as adding them to a telescope so you are better off getting high quality optics to start with.
Standard 10×50 general use binoculars
Celestron 71198 Cometron 7×50 Binoculars $35
The Celestron 71198 Cometron 7×50 Binoculars are the perfect place to start if you are unsure about how much you will be using your new astronomy binoculars, just want to dip your toe into this hobby, or just need a pair to help you get your telescope pointed where it needs to be. They are also perfect for astronomy clubs or for kids as the price is low enough that should a pair get lost or damaged, no one is going to get upset.
With light weight, reasonable optics, and threads for a tripod adapter, it has all the boxes checked for a basic set of astronomy binoculars.
Orion 09332 Scenix linear view Binoculars $99
The next step up is the Orion 09332 Scenix 7×50 linear view Binoculars which have a wider field of view, better optics, and better eye relief (which is better for eyeglass wearers and future eyeglass wearers). If you are even remotely serious about viewing objects in the night sky or having your astronomy binoculars around for more than a couple years, this is the minimum I would recommend. They offer excellent features and should last for many years to come.
Views with these binoculars seem brighter and have better contrast than the Celestron model above helping you pick out faint whisps of dust around the Orion Nebula and much more.
Nikon 7245 Action 10×50 EX Extreme Binocular $153
These Nikon 7245 Action 10×50 EX Extreme Binoculars are what I consider the top of the line in astronomy binoculars even though there are far more expensive binoculars out here. More amateur astronomers and astrophotographers I know use these then any other model out there, including myself.
These are so popular because the optics are amazing, they are waterproof so dew will not affect them, they have padded rubber coatings to make them easy to hold on to and prevent dings should you drop them or bang them into something, they are smooth as glass to use, and they have a lifetime warranty. That’s right, lifetime warranty from one of the world’s premiere optics manufacturers.
Of course the Nikons have all the bells and whistles too such as very nice twist up eye cups, a very reasonable neck strap, diopter adjustments, threads for a tripod adapter and more.
Are there better 7×50 astronomy binoculars out there? Sure, but once you get better than the Nikons you spend a lot of money for not a lot of gain, which is why these are the ones most people I know use.
Larger astronomy binoculars
Celestron SkyMaster Giant 15×70 Binoculars $65
Once again we start out with Celestron and their Celestron SkyMaster Giant 15×70 Binoculars. It is hard to beat their combination of reasonable quality with extreme affordability. While certainly not top of the line, these provide substantially brighter images and a little more magnification than their 10×50 model discussed above. They do this while only only increasing the price by about $30, and that is no easy feat as you will see shortly.
While I would not really want a pair of these for serious use, they are more than acceptable for someone just starting out or as loaners for an astronomy club.
Orion 09466 Mini Giant 15 x 63 Astronomy Binoculars $229
Next up we have a little of a hidden jem, the Orion 09466 Mini Giant 15 x 63 Astronomy Binoculars. These are a little of an oddball being 15×63 instead of a standard 15×70 which is also what makes them very desirable. You get quite a bit more light gathering over a set of 10x50s, with of course 50% more magnification too, but you save a lot of weight making these one of the few larger sets of astronomy binoculars that you can actually hand hold pretty well.
For comparison, these weigh 2.6lbs while the Celestron 15x70s weigh 3.28. That almost three quarters of a pound may not seem like much until you are out in the field holding them up for a hour, then I assure you it is a very big deal.
With excellent optics, good eye relief, very good build quality, and a five year warranty they are every bit worth the money.
For those of you who want the best 15×70 astronomy binoculars out there I suggest the Orion 9546 Resolux 15×70 Waterproof Binoculars. These do not pull punches, they have excellent optics, are fully waterproof, and provide individual eye focusing to make sure you get the absolute sharpest image possible.
Weighing in at 5.5 lbs I am not sure I want to hand hold these monsters for long, thankfully they have a tripod mount screw so I don’t have to. If you want the best astronomy binoculars that can be hand held and give you the best views possible, these are the ones.
Astronomy is an amazing hobby that anyone can participate in right in their own back yard, and a good astronomy book can help. Even if you live in a large city where there is a lot of light pollution it is likely you can still see a few astronomical objects in the night sky. Take a little trip outside of town into areas with less light pollution and you can see hundreds of objects.
While you could spend a lot of money on expensive telescopes, you can do a lot of observing with just your eyes, or a lot more with a pair of inexpensive binoculars.
The question becomes, what equipment do you need, how do you use it, and what are you looking for in the sky? This is where good astronomy books for beginners come in handy.
Why a book and not just read something online or watch some YouTube videos? Because having all the information you need in one place and organized (table of contents, glossary, index, etc) makes it tremendously easier when you are out in the dark trying to learn.
So why a printed astronomy book? Because electronic books while convenient, require a device to read and that device is illuminated which ruins your adaptation to the dark, making it harder to actually see anything. A paper book on the other hand can be lit by a dim red flashlight which will not affect your dark adaptation.
With all that being said, what astronomy books are worth your hard earned money? Here is my list of astronomy books….
4 Best Astronomy Books
Nightwatch 5th edition by Terence Dickenson is one of the “classic” books for amateur astronmers. This is a big, beautiful, spiral bound book that could easily be at home on your coffee table. To give you an idea take one part coffee table picture book, add one part really good text book, then add in one part really cool science magazine (think Omni if you can remember that far back) and you have this beautiful book.
The description online says the first three editions have sold over 600,000 copies, and as soon as you pick the book up and open it, you understand why. Its large size makes it perfect for displaying images that are simply jaw dropping, such as the star field on page 39. I also really like the star charts and the way the book lays perfectly flat.
If I have one complaint about this book it is that the book is fairly thin at 208 pages as you just want there to be more.
The Backyard Astronomer’s Guide is another book by Terence Dickenson and it too is considered a “classic” introductory book. While his other book I recommend, Nightwatch, I described as a combination of picture book, text book, and cool science magazine, this one is pure text book. It is a large (416 pages), heavy, hard cover book in full glorious color just like the best college text book out there, except this is one you will actually enjoy reading.
This appears to be an upgraded and expanded version of Nightwatch, it is even printed by the same Firefly Press. The paper the book is printed on and whatever press they used really makes the images pop. Unfortunately the star charts in the back are pretty, but far inferior to the ones in Nightwatch. I also see the lay flat design in the previous Nightwatch book as far superior.
If you are looking for a book that is as useful to more experienced astronomers as it is the absolute novice, this is it. Unlike many other books like this, it does not stop at the basics but instead takes you right up to the advanced levels which insures this astronomy book stays on your shelf for many years to come.
While this book is big and heavy, and is also by far the most expensive, if you could only have one book on astronomy then this would have to be it.
Author Allan Hall has an excellent no-nonsense book called Getting Started: Visual Astronomy which covers pretty much everything you need to get out and start observing in its 289 pages. I really like this book because it is written to give you the information you need to get going in this hobby quickly while skimping on the fluff and pretty pictures. This is also evident as he chose to release the printed book in black and white which makes it cheaper than the others we have discussed, although not as pretty. Given that most of the objects a beginner will see in the night sky are not colorful anyway, this makes sense and saves my money for other purchases. If you really want color, it is available for Kindle which makes it unique in this list of introductory astronomy books.
I like his conversational tone, which I also said when I recommended two of his other books on astrophotography. I don’t feel preached to, talked down to, or lost in a flurry of technical terms I don’t understand. Likewise, I also like the fact that he has a whole slew of books about astronomy and astrophotography as well as a pretty nice website, so I can get a lot of information with a single consistent tone.
Many people who are just starting out in astronomy enjoy Turn Left At Orion by Guy Consolmagno and Dan M. Davis. This is not an introduction to the hobby, but a book designed to help you find things to look at, which is also important. I would highly recommend someone new to the hobby pick up one or more of the three books above before getting this one because they will answer questions such as what the numbers on an eyepiece, meanwhile this book will not.
So now that you know what this book is not, what it is a nice set of objects you can view and how you go about finding them. The layout of the book is excellent and the overall quality of the book is absolute top-notch. The glossary is small, but amazing, including a couple of nice drawings to explain things. I also really like the charts he has included because so many times the layout of charts is hard to understand.
This book used to be available in standard print edition, spiral print edition (great for use out in the field while observing), Kindle, eTextbook, iBooks and Nook making it the most available astronomy book I know of 🙂 Sadly some of these versions seem to be gone or at least very hard to find.
Bonus
One of the things that really helped me when I was first starting out was my Miller Planisphere. With one of these I was able to find constellations quickly and easily and that let me find plenty of objects to view. It really was a lifesaver.
With a planisphere you need to purchase the right one for your location. They are typically sold by hemisphere and then latitude. Find the one with the latitude that is closest to where you are, they are not meant to be exact. There is no 42 degree latitude version so you would buy a 40 degree model for that latitude. Also, be sure to get the big one as the little one is hard to use in the dark with a flashlight, at least it was for me.
I can not overemphasize how much this little contraption helped me.
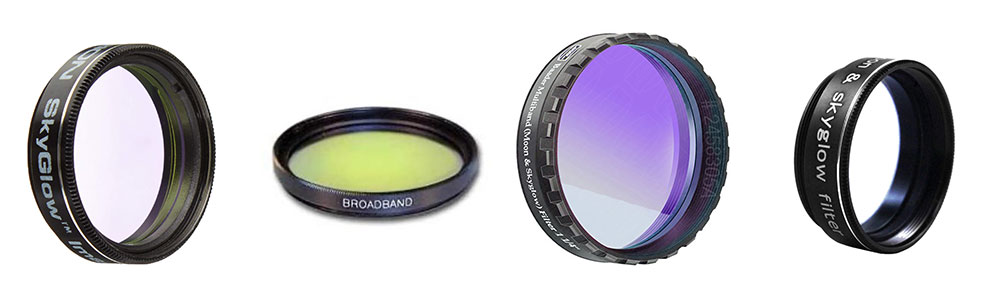
Light pollution filters can help with one of the main reasons it is so hard to see or image some objects in the night sky. This is caused by all the streetlights, signs, and other illuminations lighting up the particles and water vapor in the atmosphere. That’s why you need the best light pollution filter you can get. The problem is that it seems everyone is jumping on the light pollution filter bandwagon, and that makes it hard to figure out what is the best choice for you. Let’s see if this light pollution filter review helps.
What is a light pollution filter?
Light pollution filters are typically 1.25″ or 2″ round filters that screw into your telescope to reduce the effects of light pollution on your viewing or imaging. These can be screwed on to a camera adapter, eyepiece, or onto a diagonal. There are some which are designed to clip inside a DSLR, but these are very specialized, so they will not be covered in this article.
These filters are designed to block specific wavelengths of light. This is not to be confused with contrast boosting filters or filters that just block out a single whole range of light. If those filters qualified as a light pollution filter, so would a piece of glass spray-painted black blocking all light.
An easy way to rule out cheap filters that claim to be the best light pollution filters but really are not is that any real filter will come with a chart showing what wavelengths of light are blocked, and which are not. In addition, this should have several sections where it is blocked and several sections where it is not.
If the manufacturer or reseller do not provide such a sheet, stay away! If the sheet they provide has one big ole blocked section, stay away! Before and after pictures will probably be faked or worse, they might images of a city at night or something like that and they actually look better. The city pictures are worse because I want a filter for looking at faint nebulae and galaxies, not downtown Los Angeles!
Some people ask, do light pollution filters work? Not just yes, but oh yes!
First on my list is the one I use virtually all the time, the Baader Moon & Skyglow filter. I tend to use this both visually and for imaging and have had fantastic results.
It is not only one of the best light pollution filters, but also helps remove the skyglow caused by the moon (reflected sunlight), and also increases contrast by boosting RGB at specific wavelengths. If there was only one filter made, this is the one I would prefer. This was the one of the first astrophotography filters for DSLR astrophotography I purchased, and it was worth every penny.
Of all the filters I have used, this was one of the best light pollution filter for dslr astrophotography I could find. Its wavelengths matched my Nikon DSLR quite well. In fact, I have not used another filter that performed as well as this one as it produces improved image quality over every other filter I have tested.
Celestron makes excellent light pollution filters in their 94123 and 94124 LPR filters (1.25″ and 2″ respectively). This filter is almost as good as the Baader I listed above, but I do not believe it is as good at removing the glow from the moon. It also does not seem to provide quite as much contrast. These differences are really splitting hairs as you would have to have them both and switch back and forth to see any difference, even then, the differences are very minor.
These are absolutely some of the best light pollution filters and I would have no problem using them in place of my Baader filters.
If you are on a tight budget you might consider the SVBONY UHC Light Pollution Filter in 1.25″ or if you need the 2″ here. SVBONY is one of the better inexpensive brands I have played with, and in fact I have quite a bit of their stuff in my kits. When you want to improve on a beginner setup without breaking the bank, they have some pretty good choices.
Regarding this particular filter, let me start by saying it is a very good bargain. You are getting a lot of capability for not a lot of money. Is it as good as the Baader or Celestron above? Well, no. For about half the price, though, you are getting a lot of filter. It doesn’t stop quite as much moon glow, and some of the mercury vapor streetlights get through more than with the others.
Bottom line? If you want to try out a light pollution filter before making a larger investment, or you are on a limited budget, this is a fine choice.
Hopefully this little assortment will let you select the best light pollution filter that is right for you and will help you view or image all the amazing things in the night sky.
I hope you enjoyed this article on the best light pollution filter!
Please support this website by adding us to your whitelist in your ad blocker. Ads are what helps us bring you premium content! Thank you!